
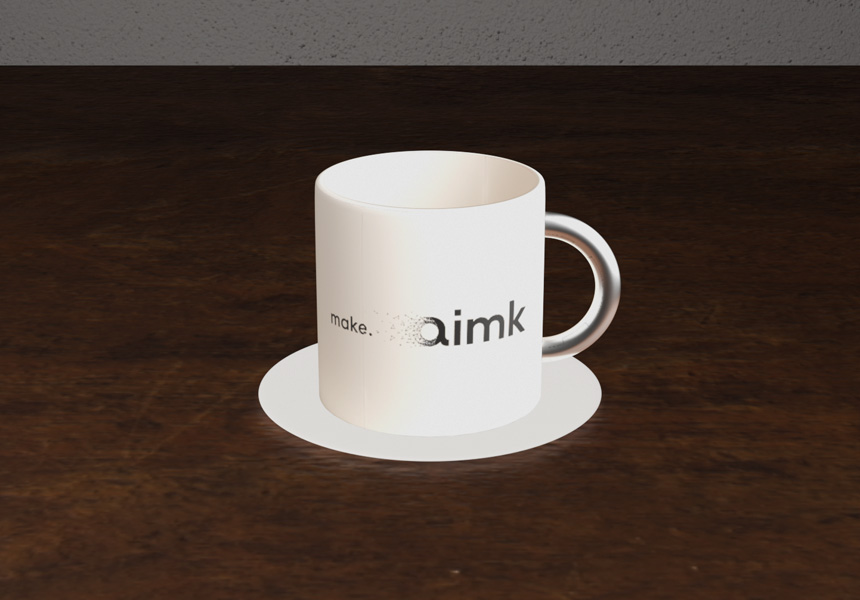
In the previous article, Blender Rendering Basics: Reducing Noise and Shortening Render Time, we rendered a coffee cup. This time we'll cover baking: writing the lighting and shading into a texture (an image).
The way a model looks under lights in Blender doesn't carry over when you export it for use on the web or in a game engine. So we'll bake first, and check that the cup keeps its brightness with no lights at all. After that, we'll look at why a baked image can come out black and what to watch for when exporting to glTF.
* This article was verified with Blender 5.2 LTS. Baking is only available in Cycles, so we use "Cycles" as the render engine.
Why bake?
In Blender Lighting Basics: Placing Your First Light Without an HDRI, the coffee cup scene was lit with two Area lights. Those two lights are what give the cup its shading.
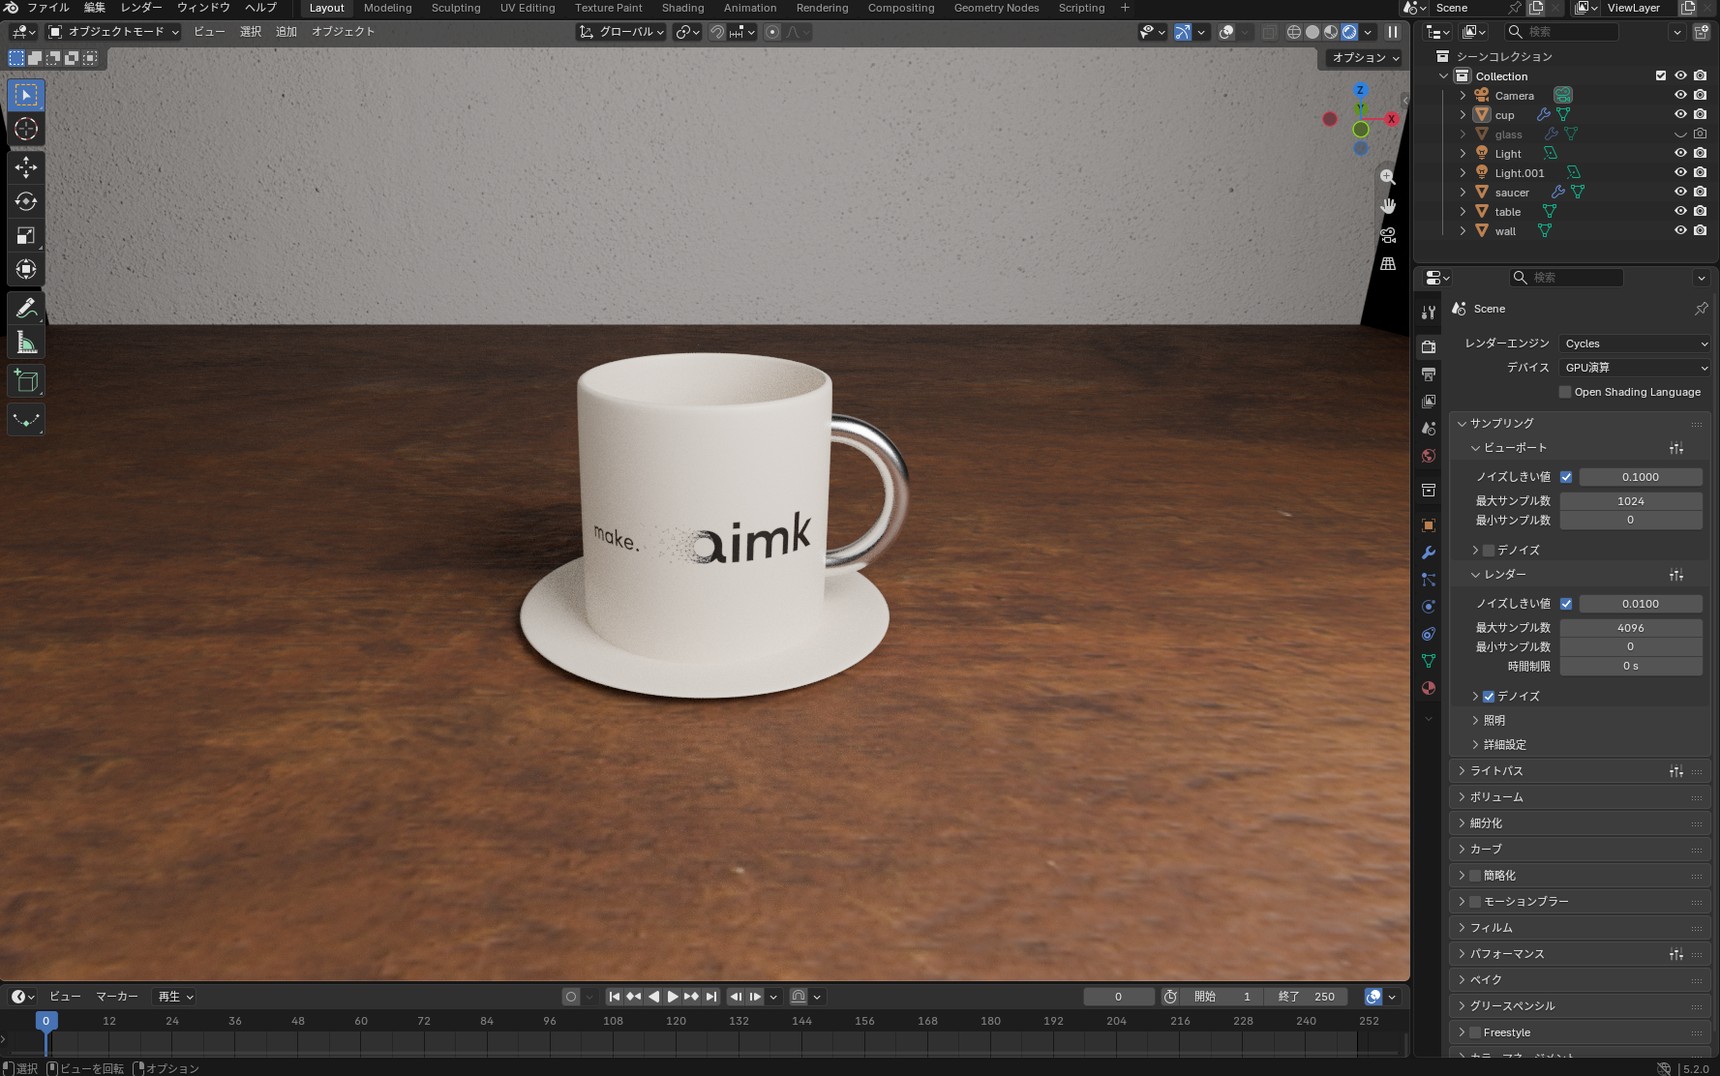
To take a model from Blender to the web or a game engine, glTF is the usual format. As a test, export the scene before baking with "File" → "Export" → "glTF 2.0" and open it in a web viewer. How to use the viewer is covered in the column "Viewing the exported glTF in a web viewer".
Under the viewer's own lighting, the whole cup is evenly bright. Turn that lighting off and the cup and table go completely black. The Area lights you placed in Blender can't be exported to glTF.
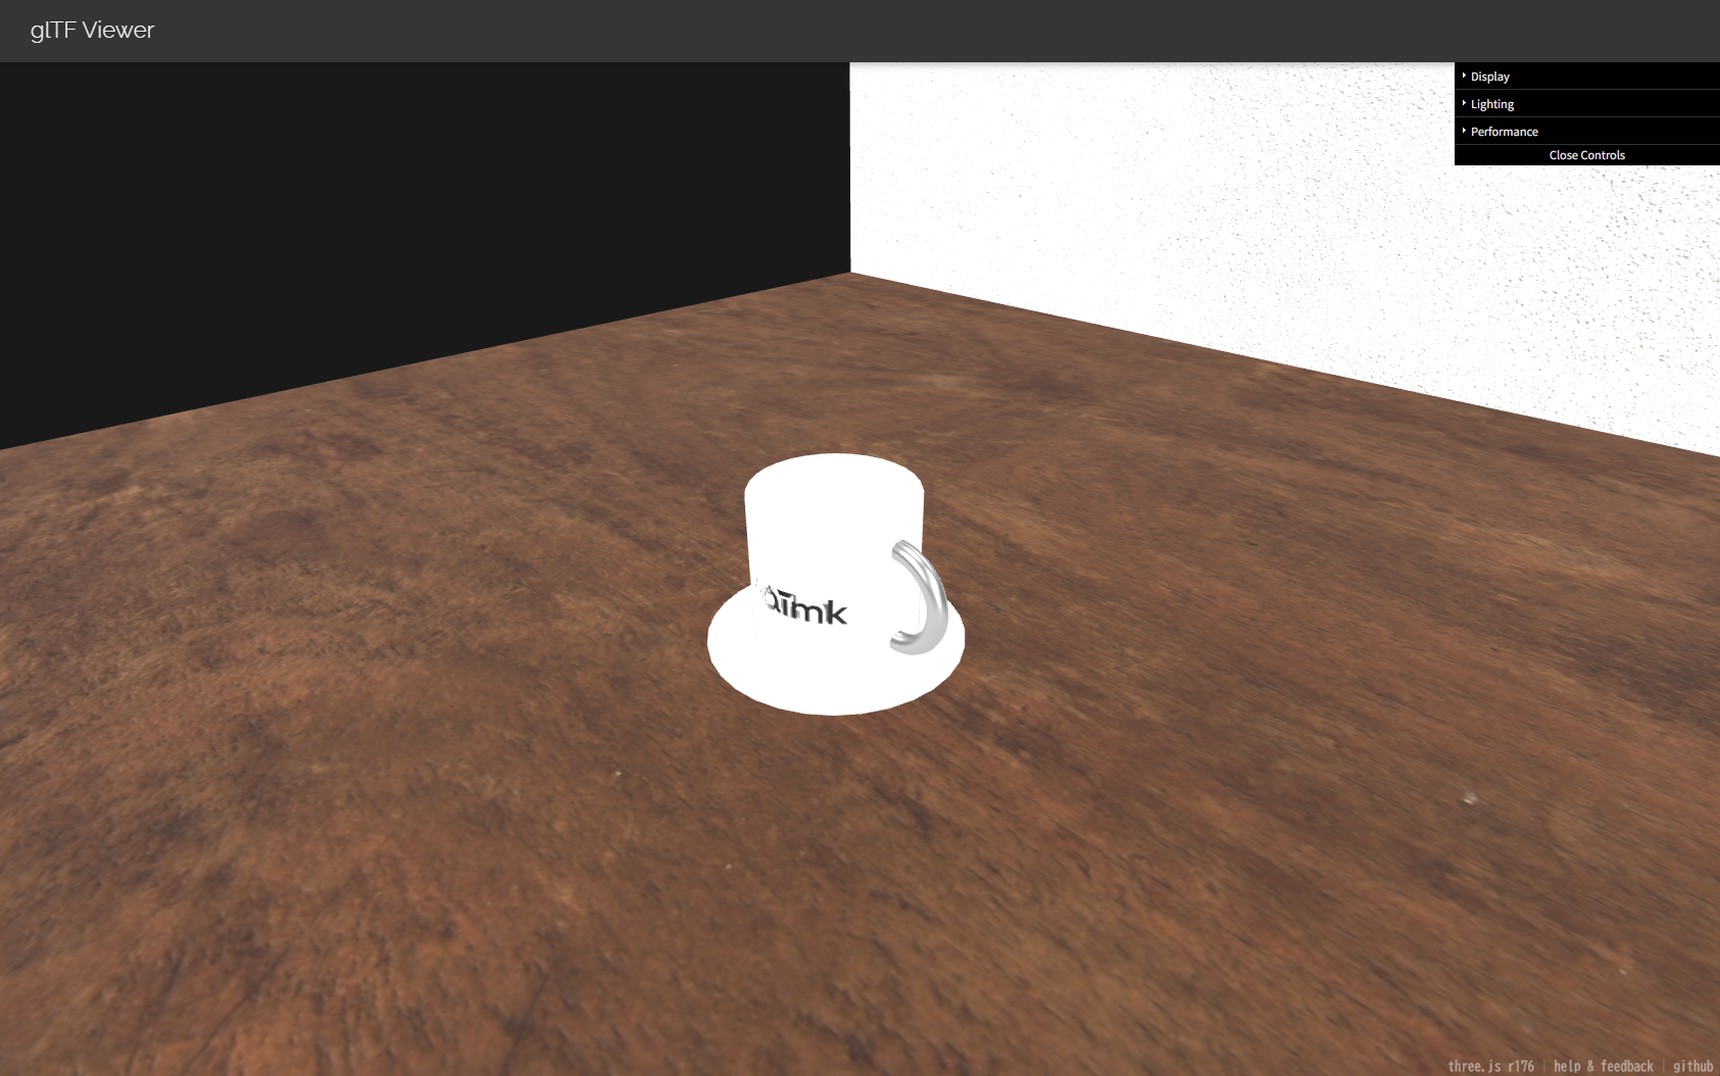
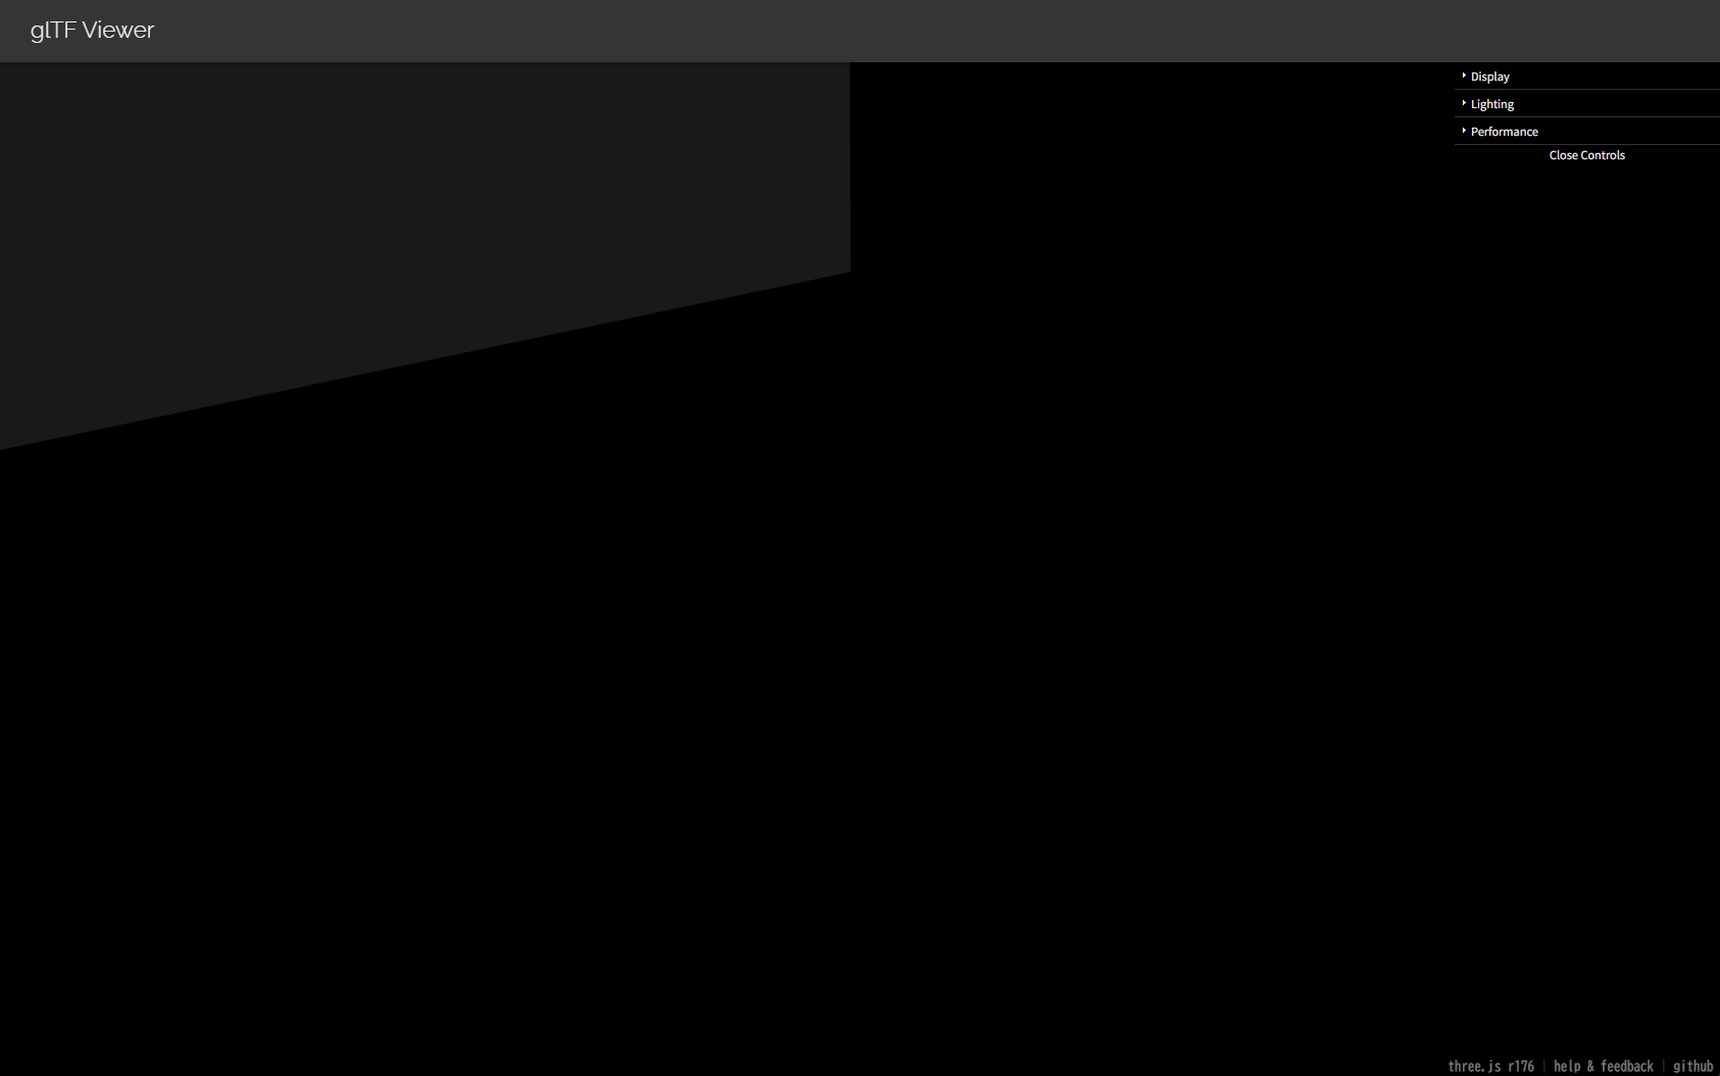
So instead, you bake the lighting and shading into a texture. That's baking. A baked texture stays on the model when you export it to glTF, so the look you had under the lights in Blender comes through even without any lights.
Make a UV map for baking
When you bake, a UV map decides which part of the cup goes to which part of the image. So start by checking what the cup's UVs look like.
The logo's UV map can't be used for baking
Switch to the "UV Editing" tab at the top of the screen, select the cup, and press Tab to enter Edit Mode. The UVs for the side of the cup spread well beyond the 0-1 square. That's because they were scaled up to fit the logo in the UV unwrapping article.
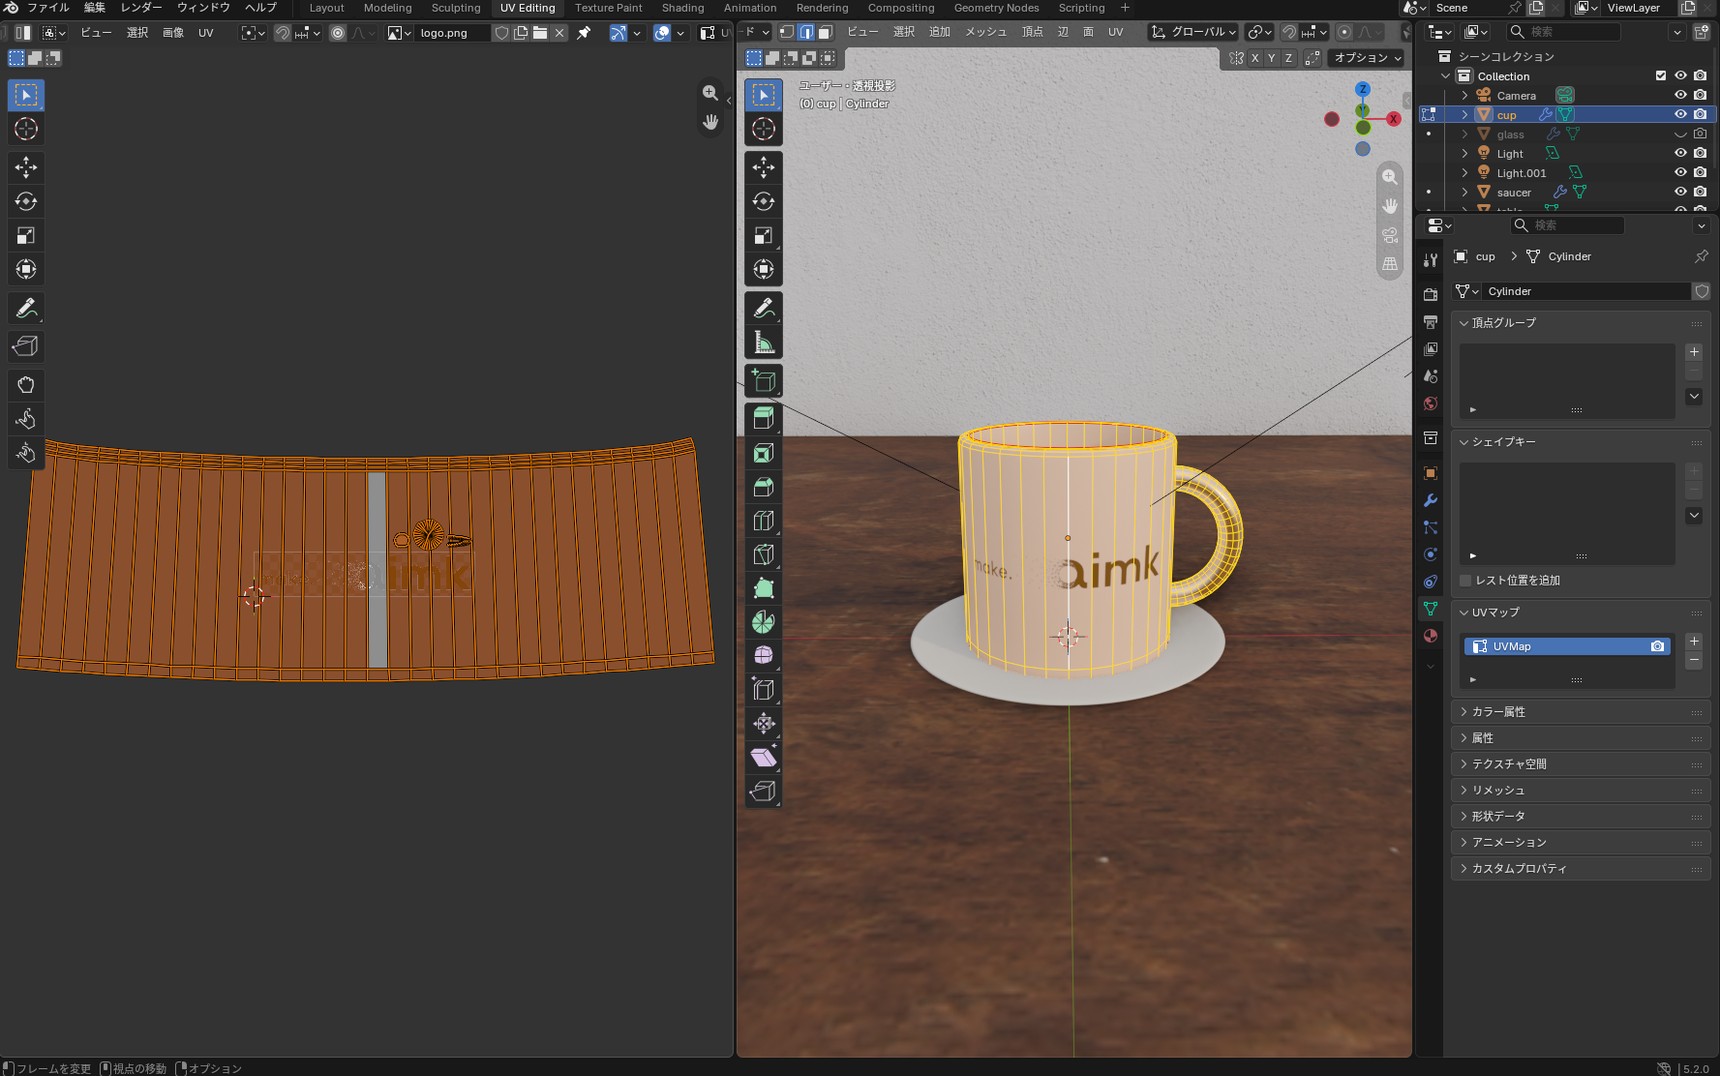
Only the parts of a UV map that sit inside the square can be baked. With the current UVs, most of the side of the cup is outside the square, so its lighting has nowhere to go. These UVs also position the logo, so rebuilding them would move it. Instead, keep the original UVs and add a second UV map just for baking.
Add a UV map
Open Object Data Properties (the green triangle icon) and press "+" under "UV Maps". A new UV map appears below "UVMap". Double-click it and rename it bake_uv.
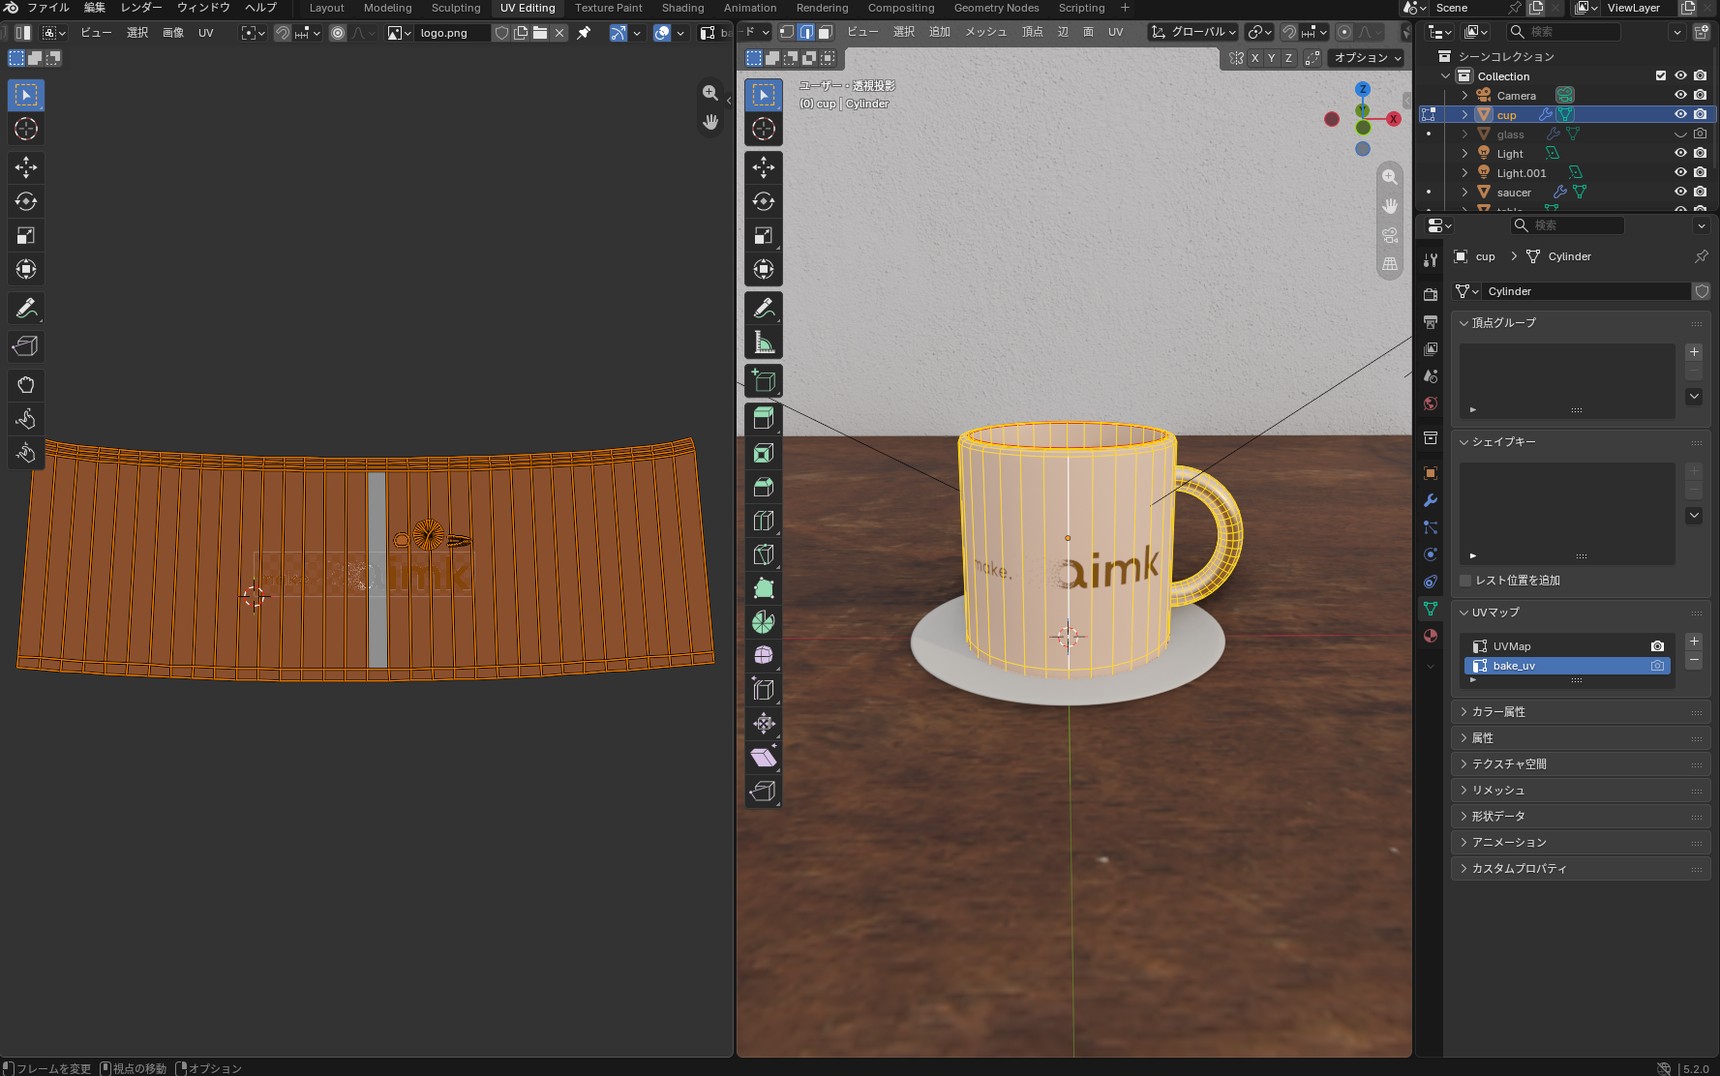
The new bake_uv is highlighted in blue, meaning it's the one selected in the list. Baking uses whichever UV map is selected here. Leave the camera icon to the right on "UVMap", since that's the map the logo uses
for display.
Unwrap with Smart UV Project
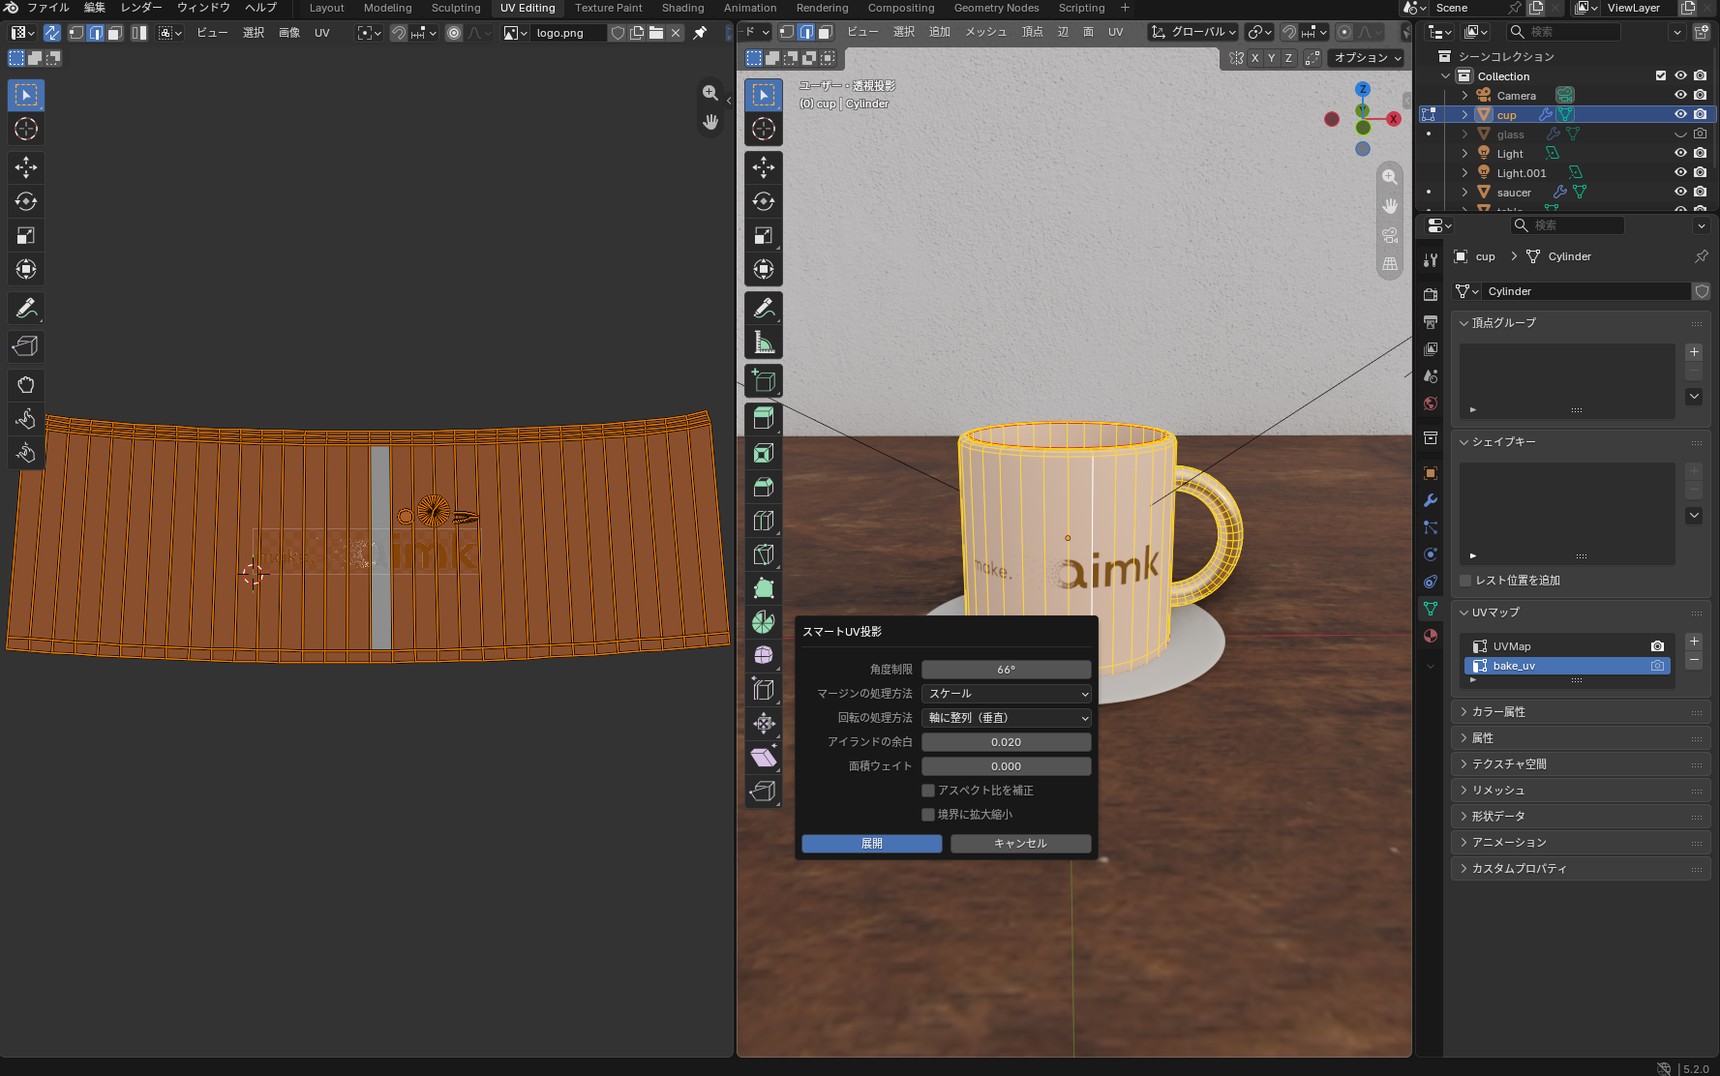
In Edit Mode, press A to select everything, then press U and choose "Smart UV Project". In the settings window, set "Island Margin" to 0.02, uncheck "Correct Aspect", and press "Unwrap". If
"Correct Aspect" is left on, the islands get squeezed sideways to match the aspect ratio of the logo image.
Unwrapping splits the UVs into several separate pieces, called "islands". With Smart UV Project, every island ended up inside the square without overlapping. The handle is part of the same object as the cup, so its islands sit in the same square.
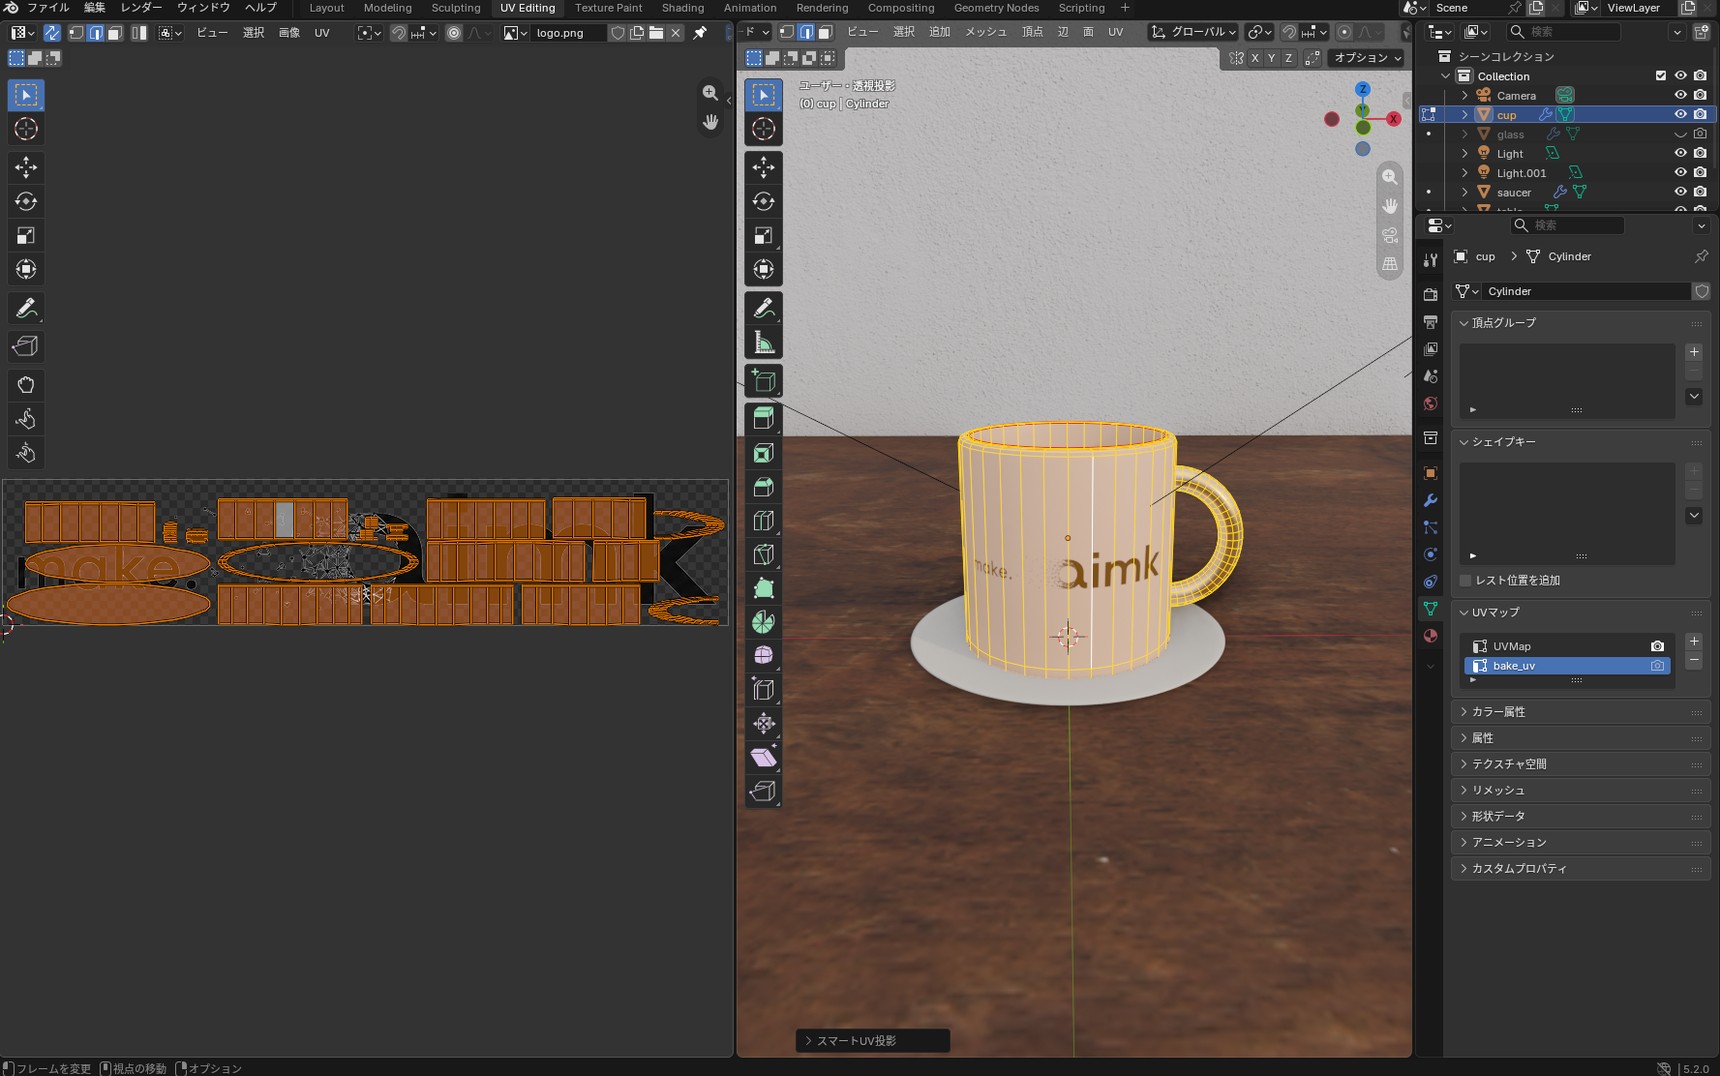
"Island Margin" sets the gap between islands. Overlapping islands won't cause an error, but where they overlap, only the color of the face baked last is kept. Apply the image to the model and every face that overlapped shows that one color.
Prepare an image to bake into
Before preparing the image, switch back to the "Layout" tab at the top of the screen and check the saucer's material.
Give the saucer its own material
Select the saucer and open Material Properties. If 2 appears to the right of the material name, the saucer is sharing the cup's material.
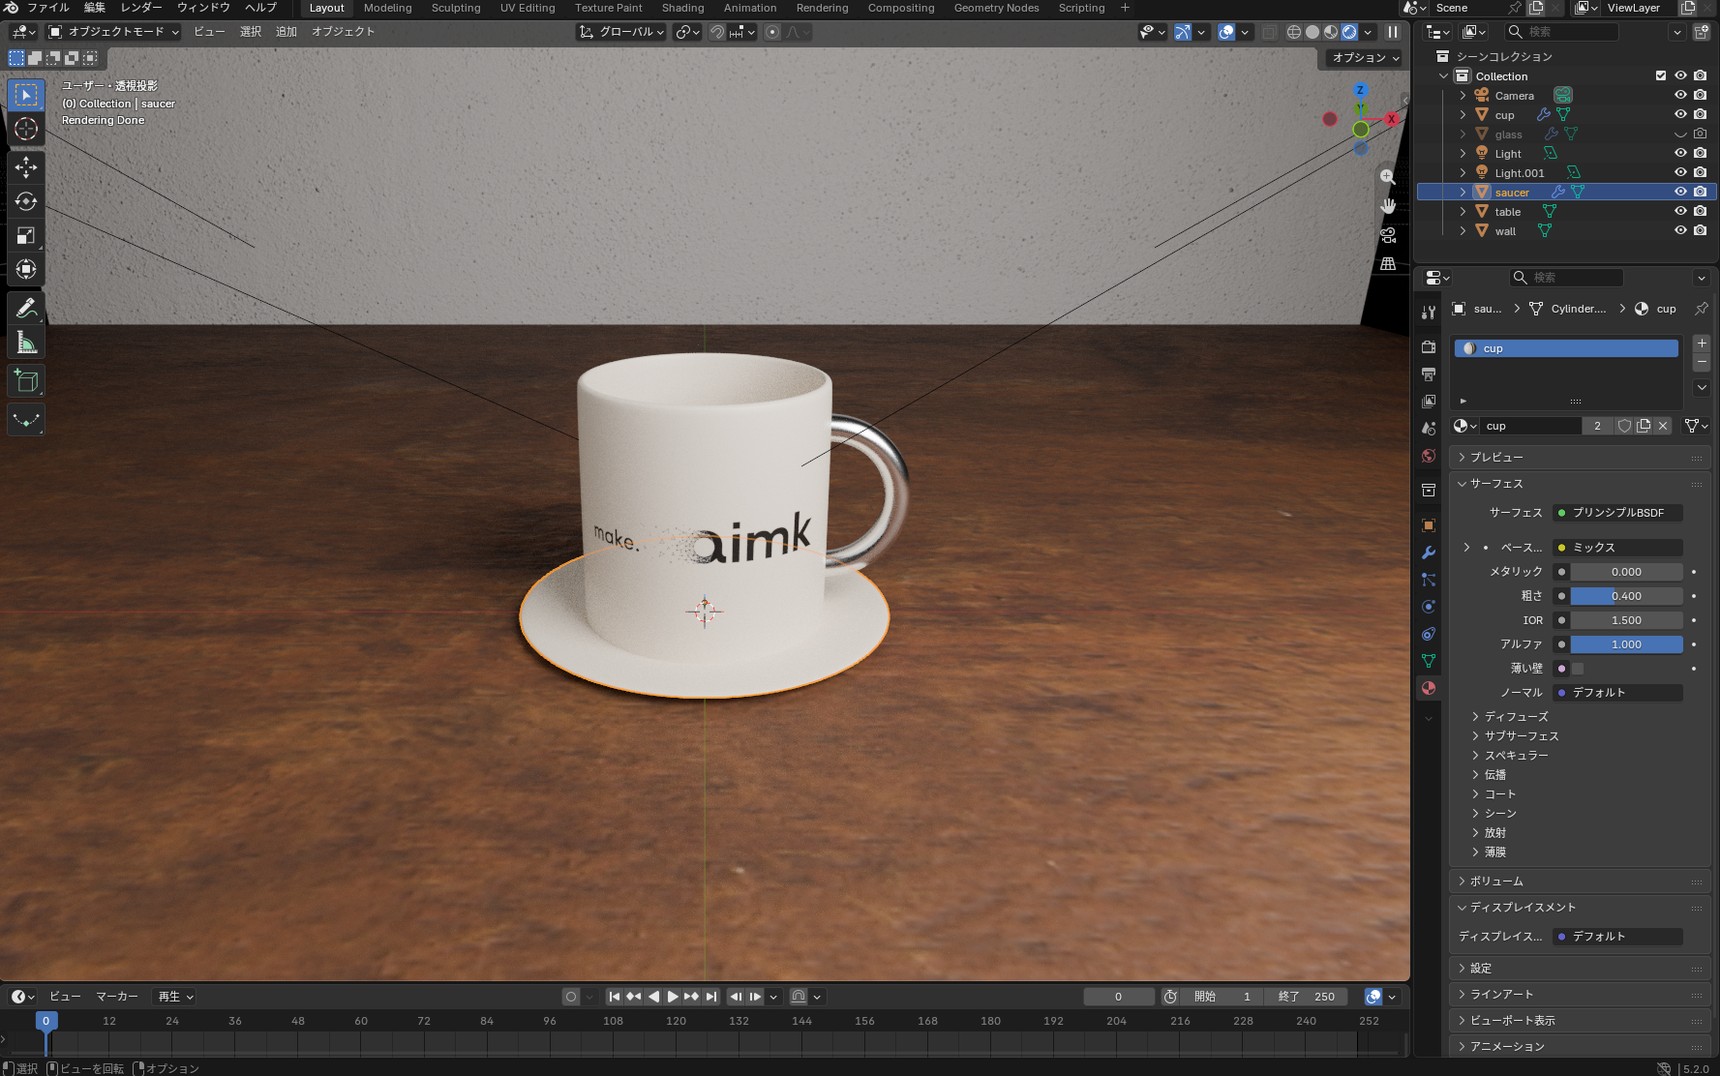
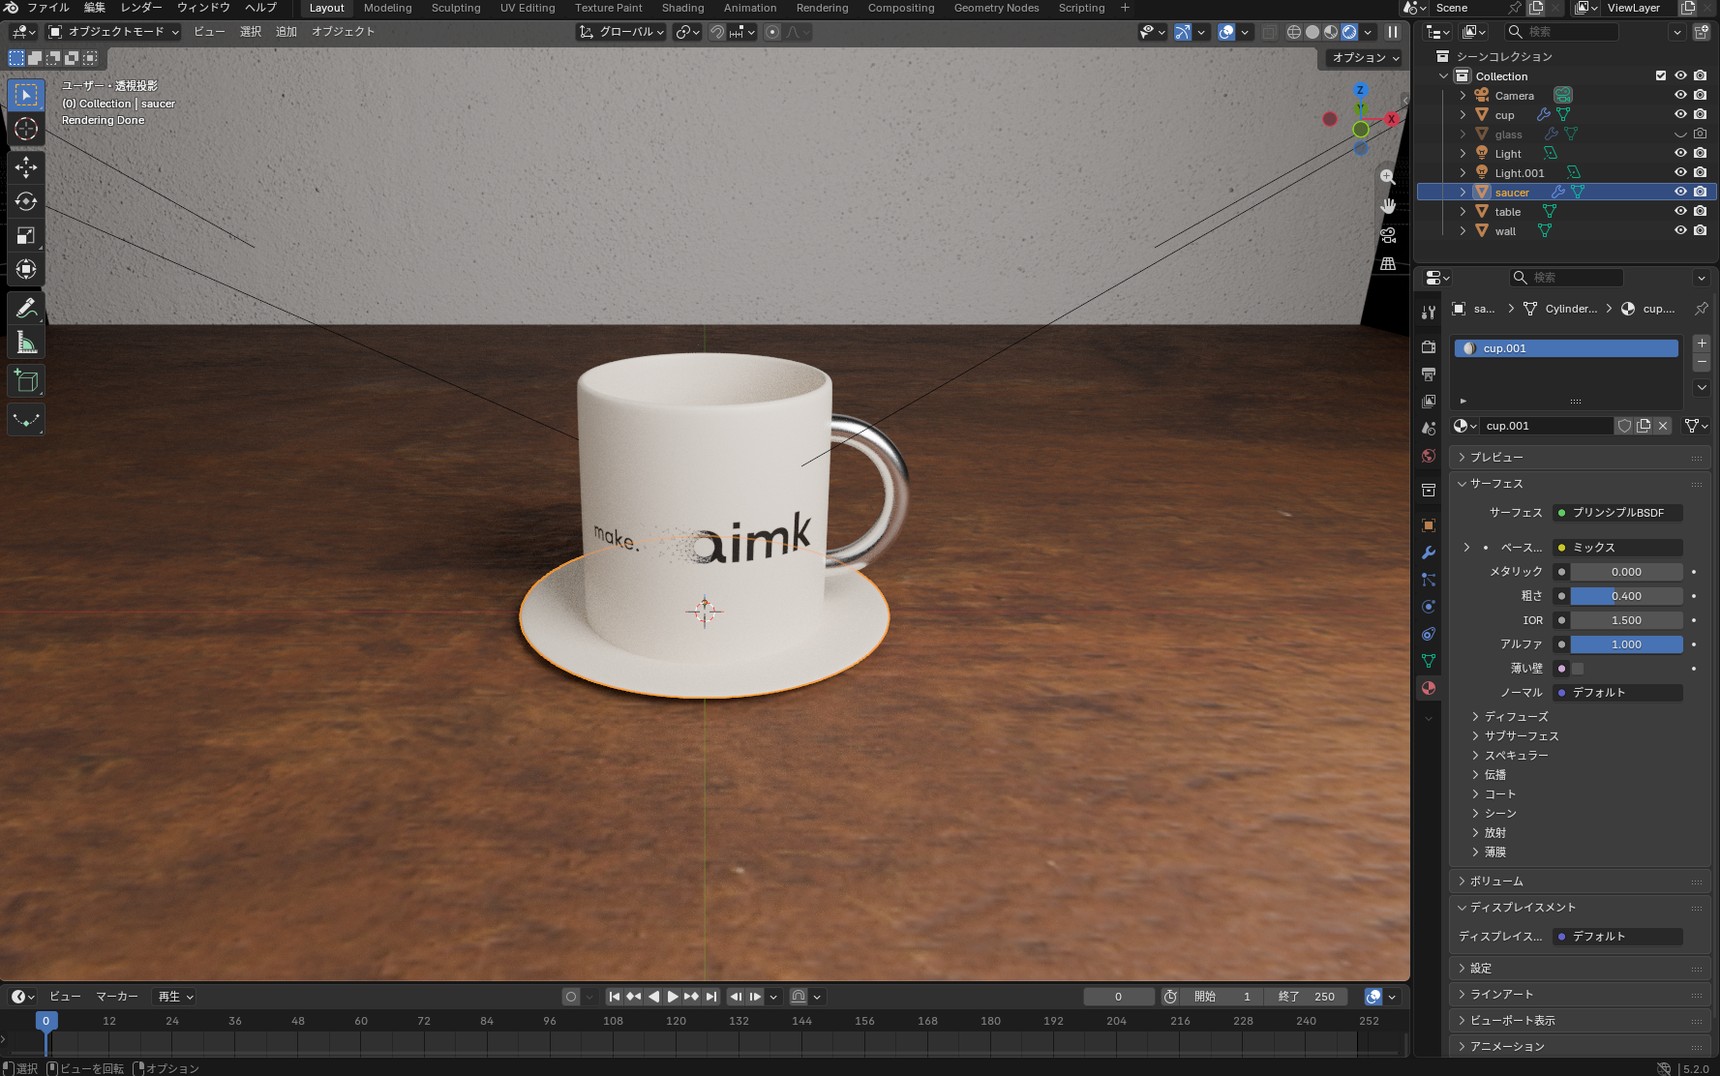
Left like this, applying the baked image to the cup's material later would apply it to the saucer too, and the saucer wouldn't display correctly. Click the 2 to create a material just for the saucer. It's named
cup.001, and the number disappears. If no 2 is shown, you can skip this step.
Add an Image Texture
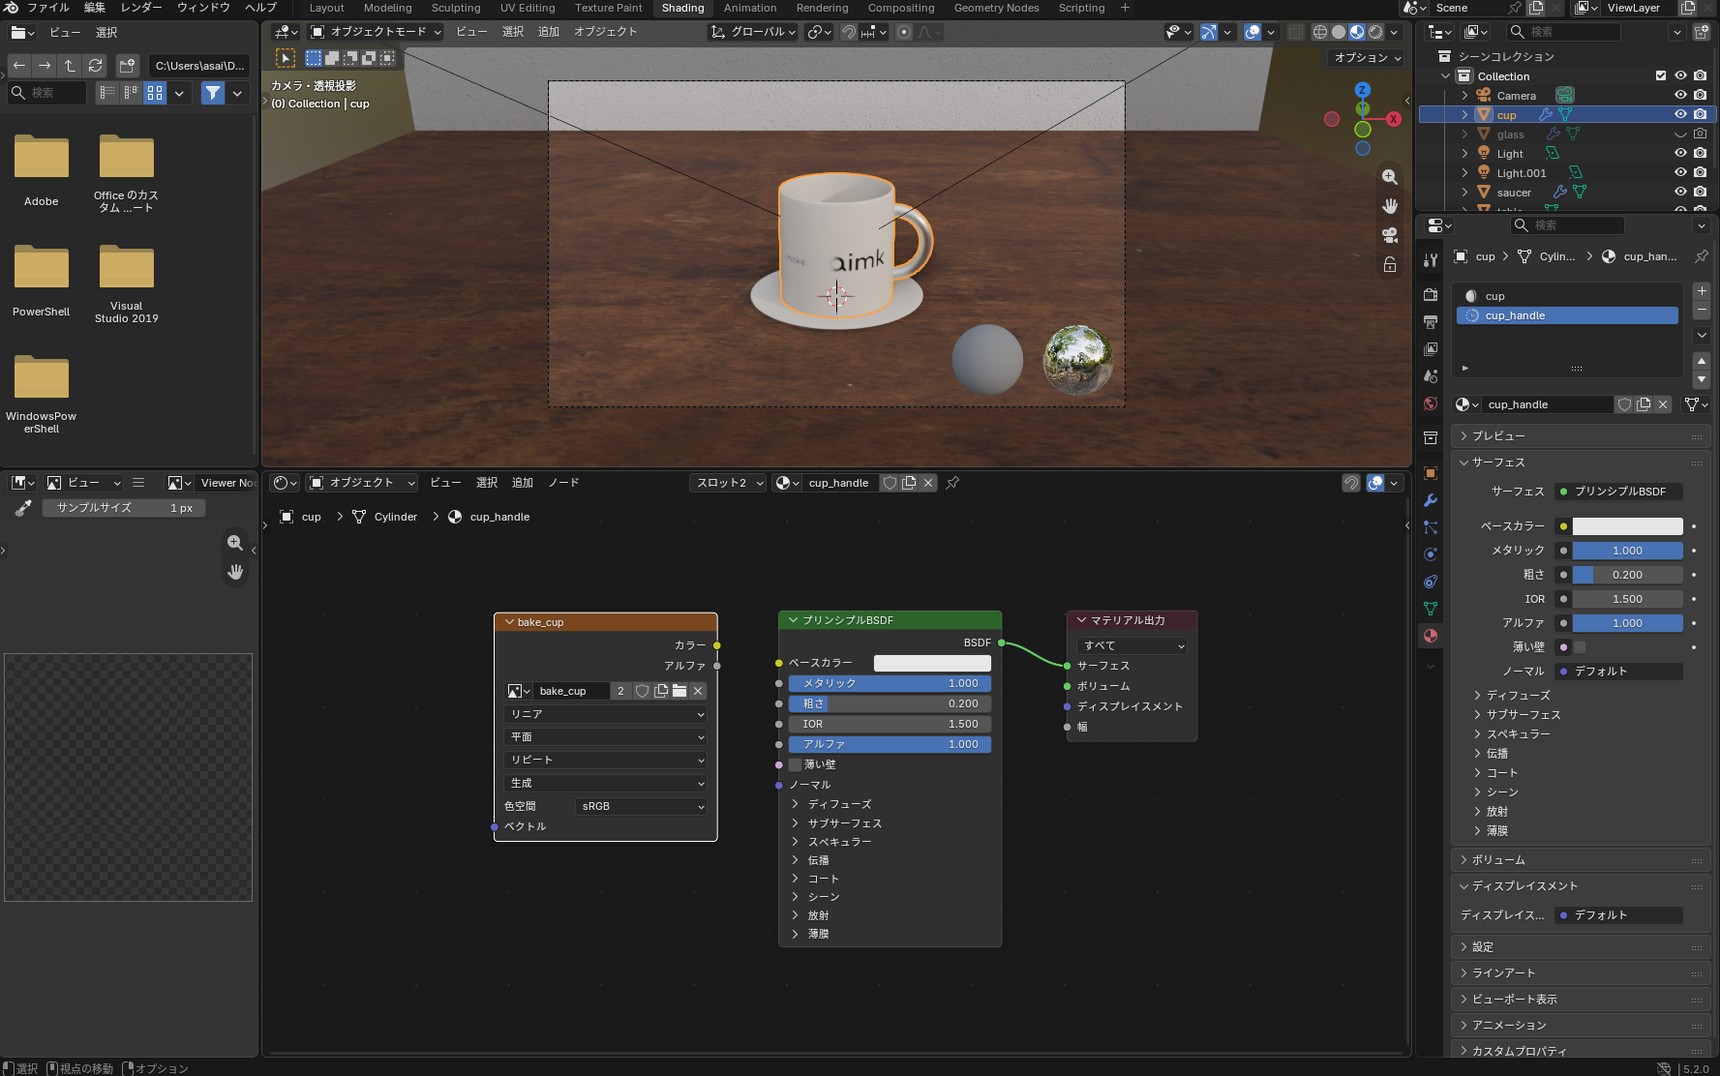
Switch to the "Shading" tab at the top of the screen and select the cup. In the Shader Editor, add an Image Texture with Shift + A → "Texture" → "Image Texture".
Click "New" on the node, set the name to bake_cup and both "Width" and "Height" to 1024, and press "New Image".
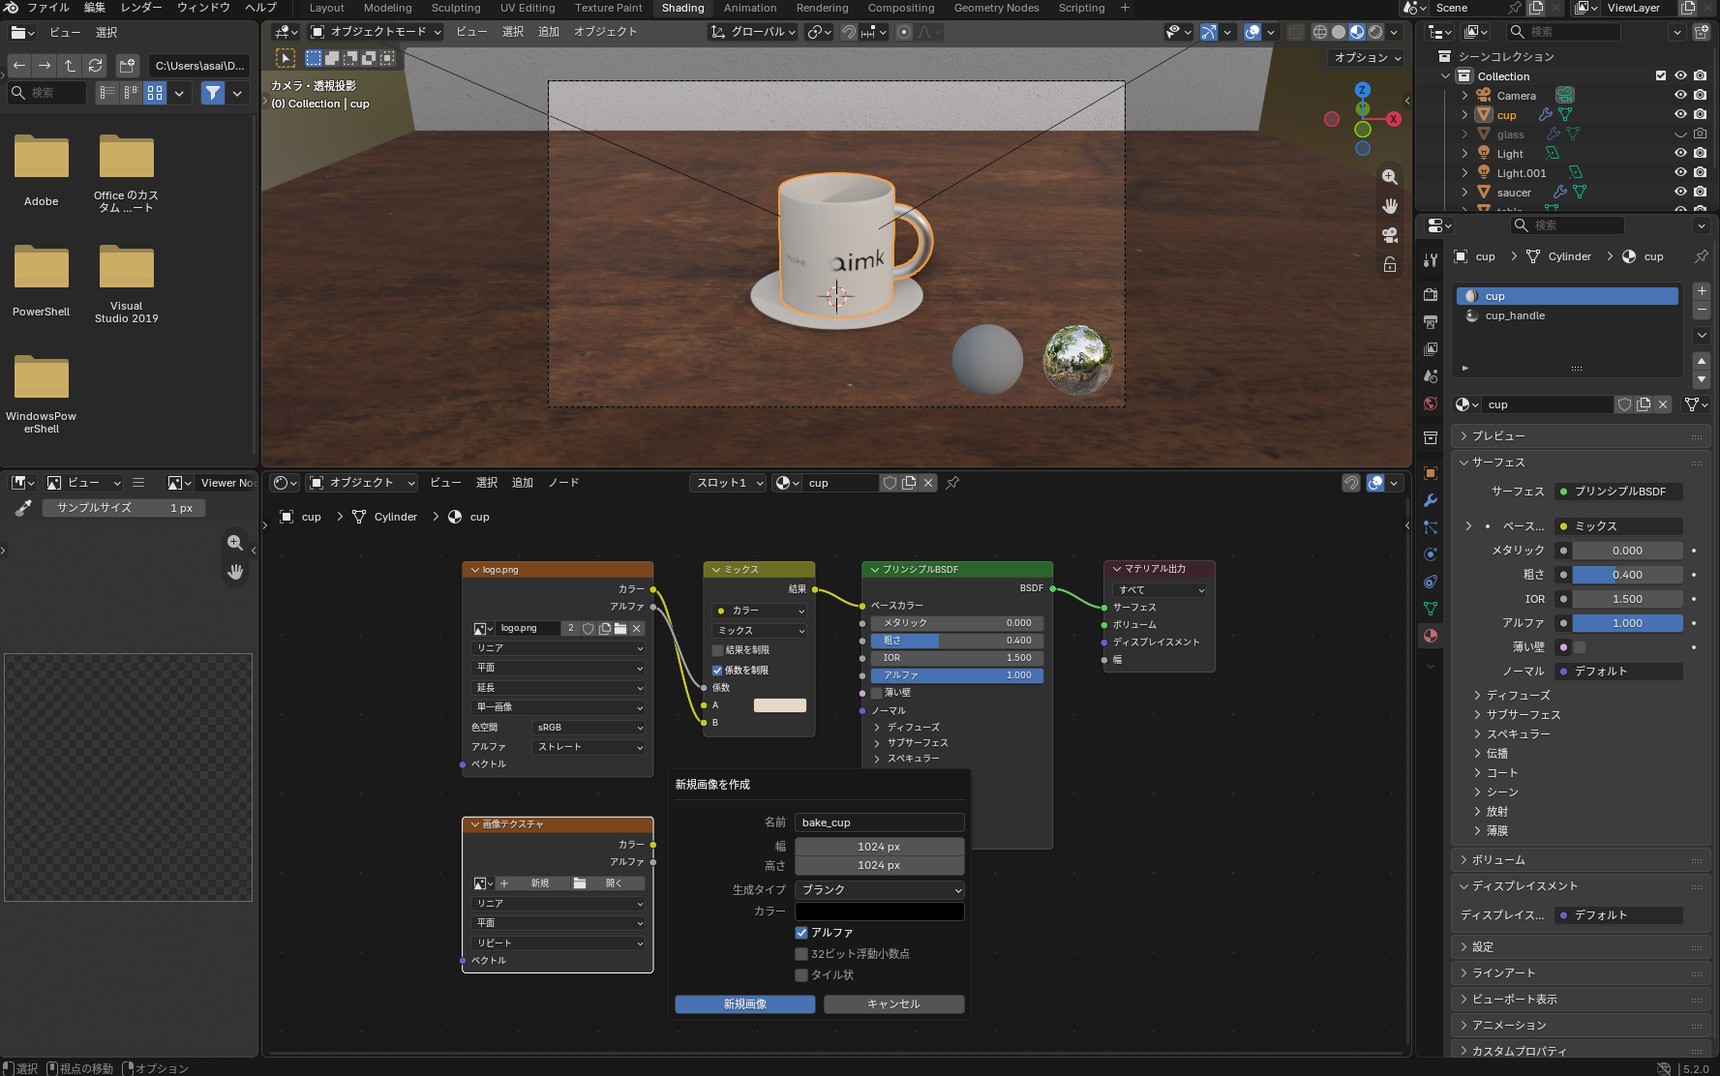
Don't connect this Image Texture to anything. Click the node to select it. A selected node has a white outline.
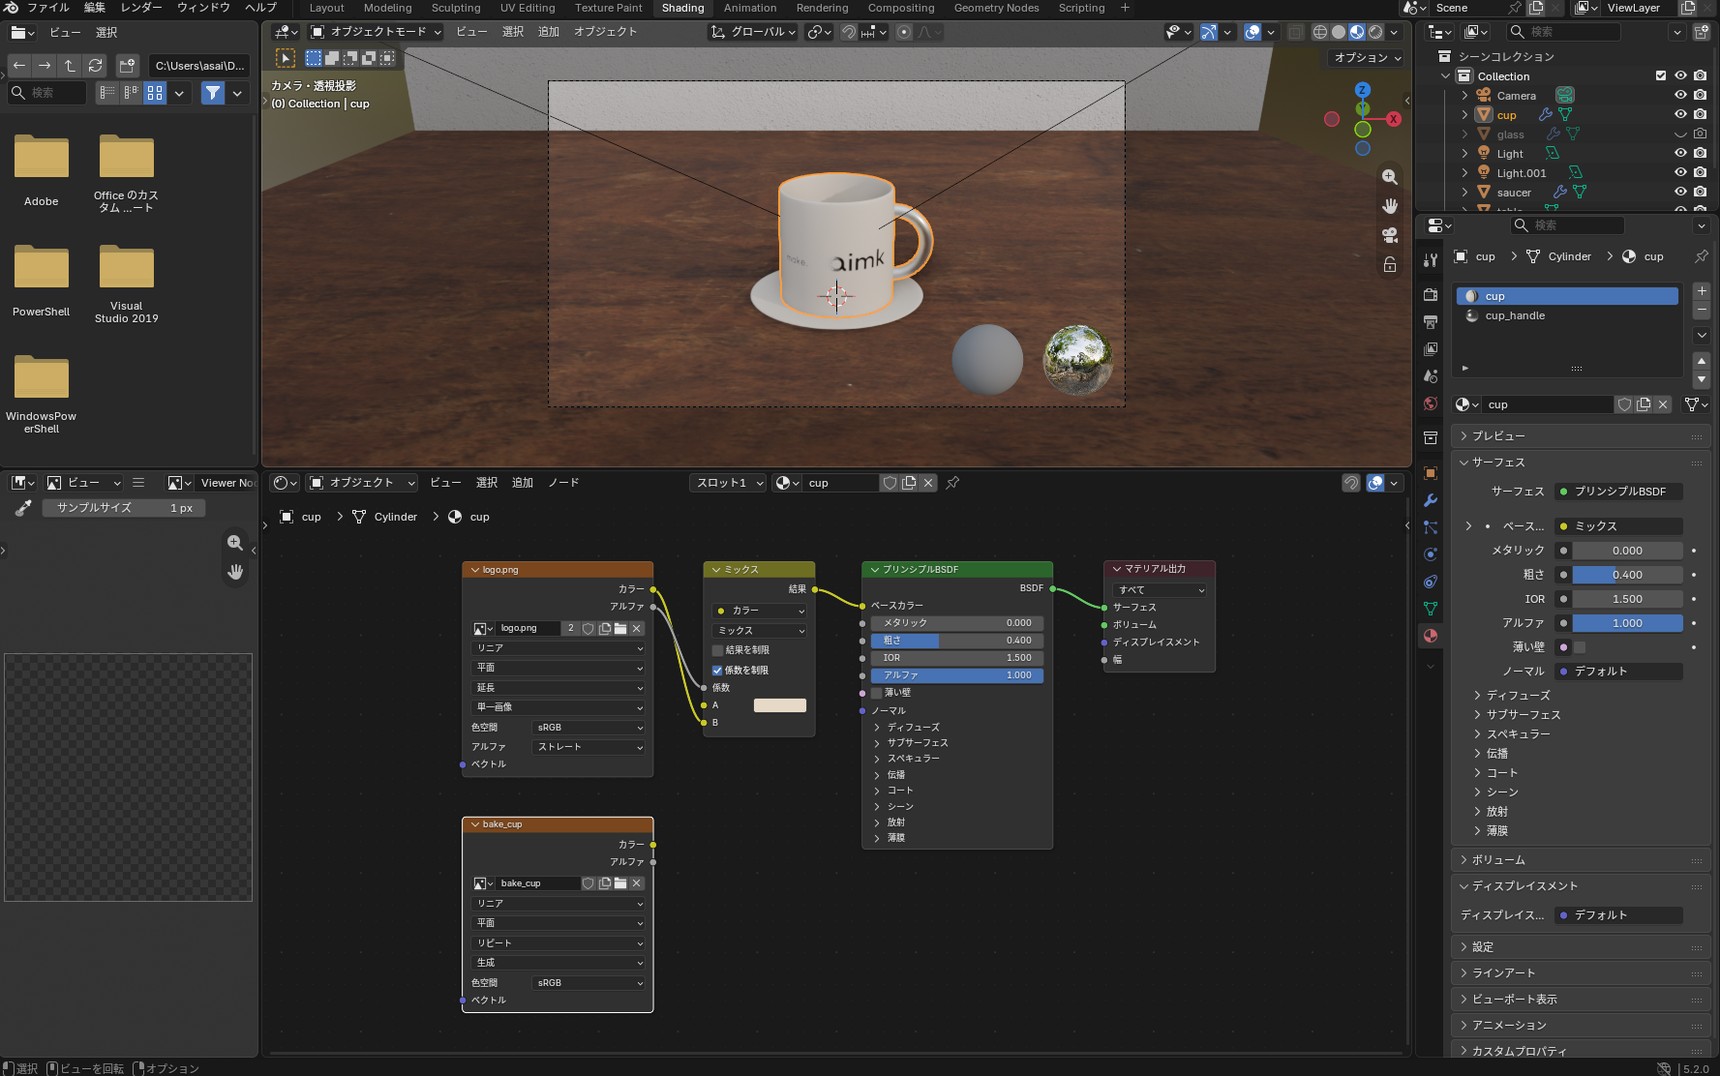
Since Blender 5.0, baking won't work unless the Image Texture node is selected. Clicking any other node deselects it, so check for the white outline before you press "Bake".
Put the same image in the handle's material
The handle uses a different material from the body of the cup. Every material needs its own Image Texture to bake; a material without one isn't baked at all.
Switch "Slot 1" to "Slot 2" at the top of the Shader Editor to show the handle's material.
Add an Image Texture here too. This time, don't press "New"; choose bake_cup from the node's image icon instead. Using the same image as the cup body bakes the body and the handle into a single image. Leave this
node unconnected and selected as well.
Bake
Set "Render Engine" in Render Properties to "Cycles". With EEVEE, the "Bake" panel doesn't appear.
Bake with "Combined"
Open "Bake" near the bottom of Render Properties. Leave "Bake Type" at its default, "Combined". Combined bakes the look of the scene under your lights as it is: the cup's color plus the light that reaches it directly from the lights and the light that arrives indirectly after bouncing off nearby objects.
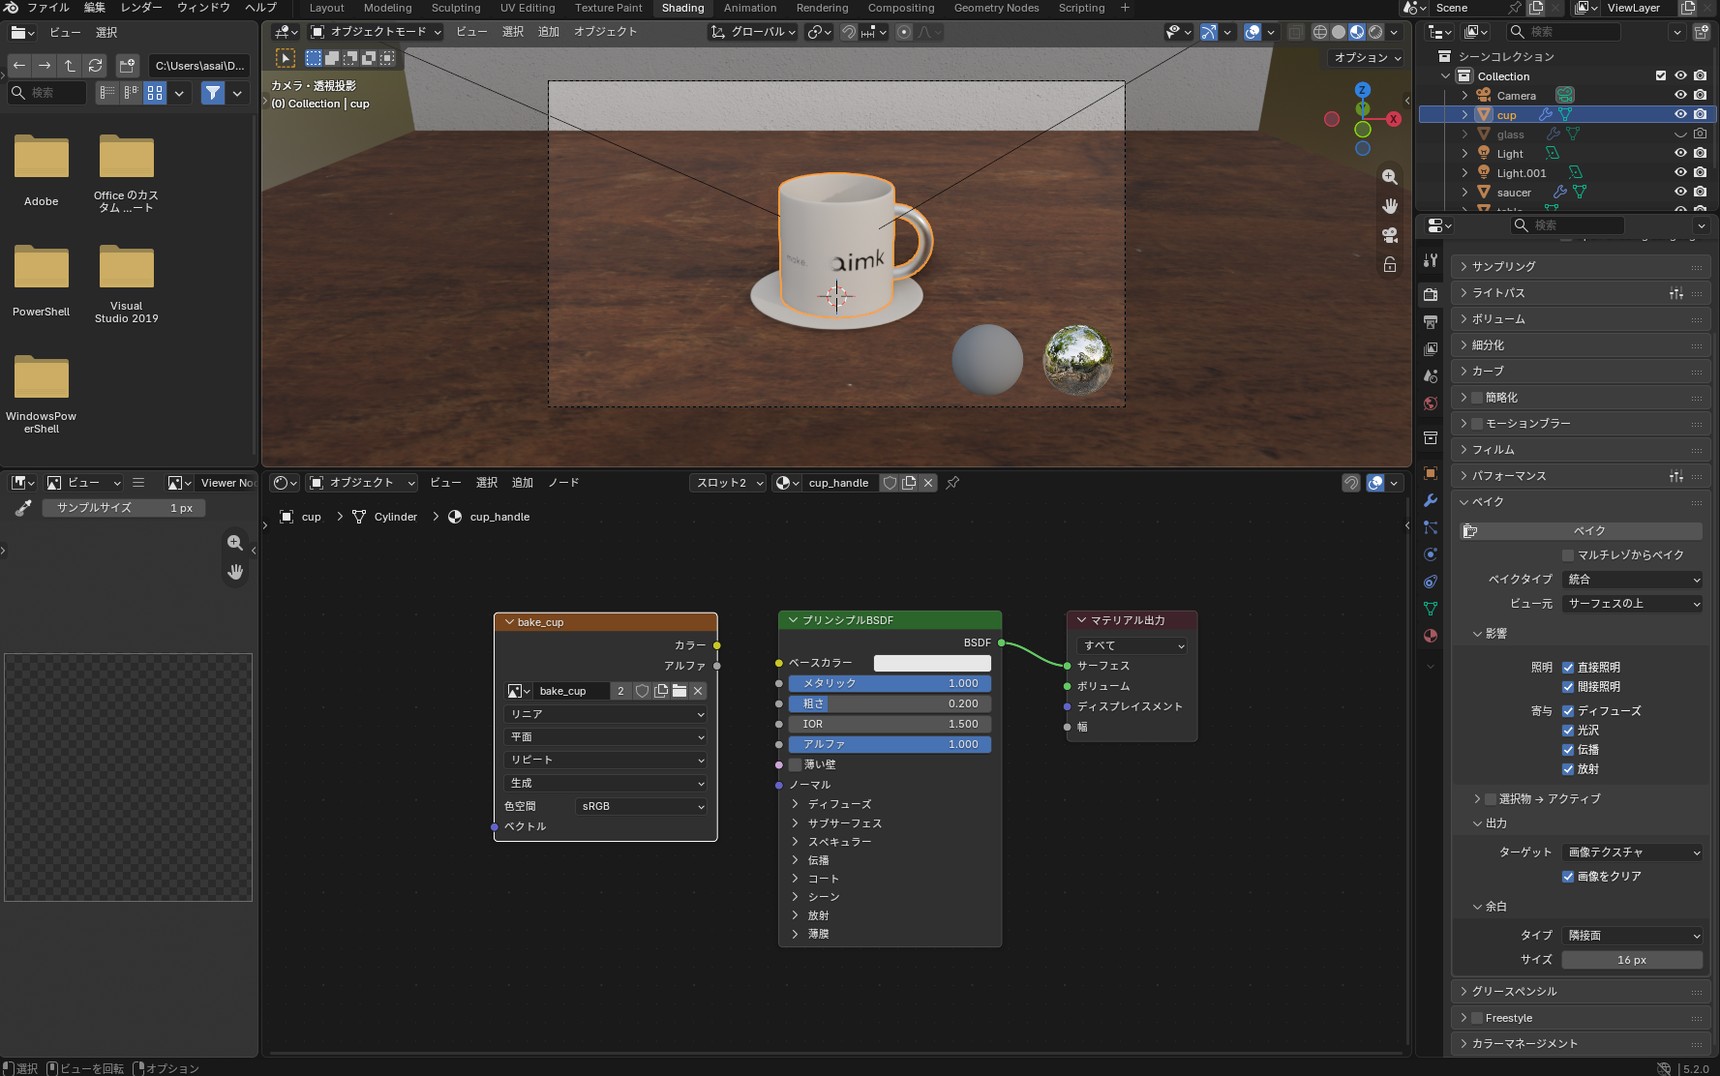
With the cup selected, press "Bake". When "Baking map saved to internal image, save it externally or pack it" appears at the bottom of the screen, the bake is done.
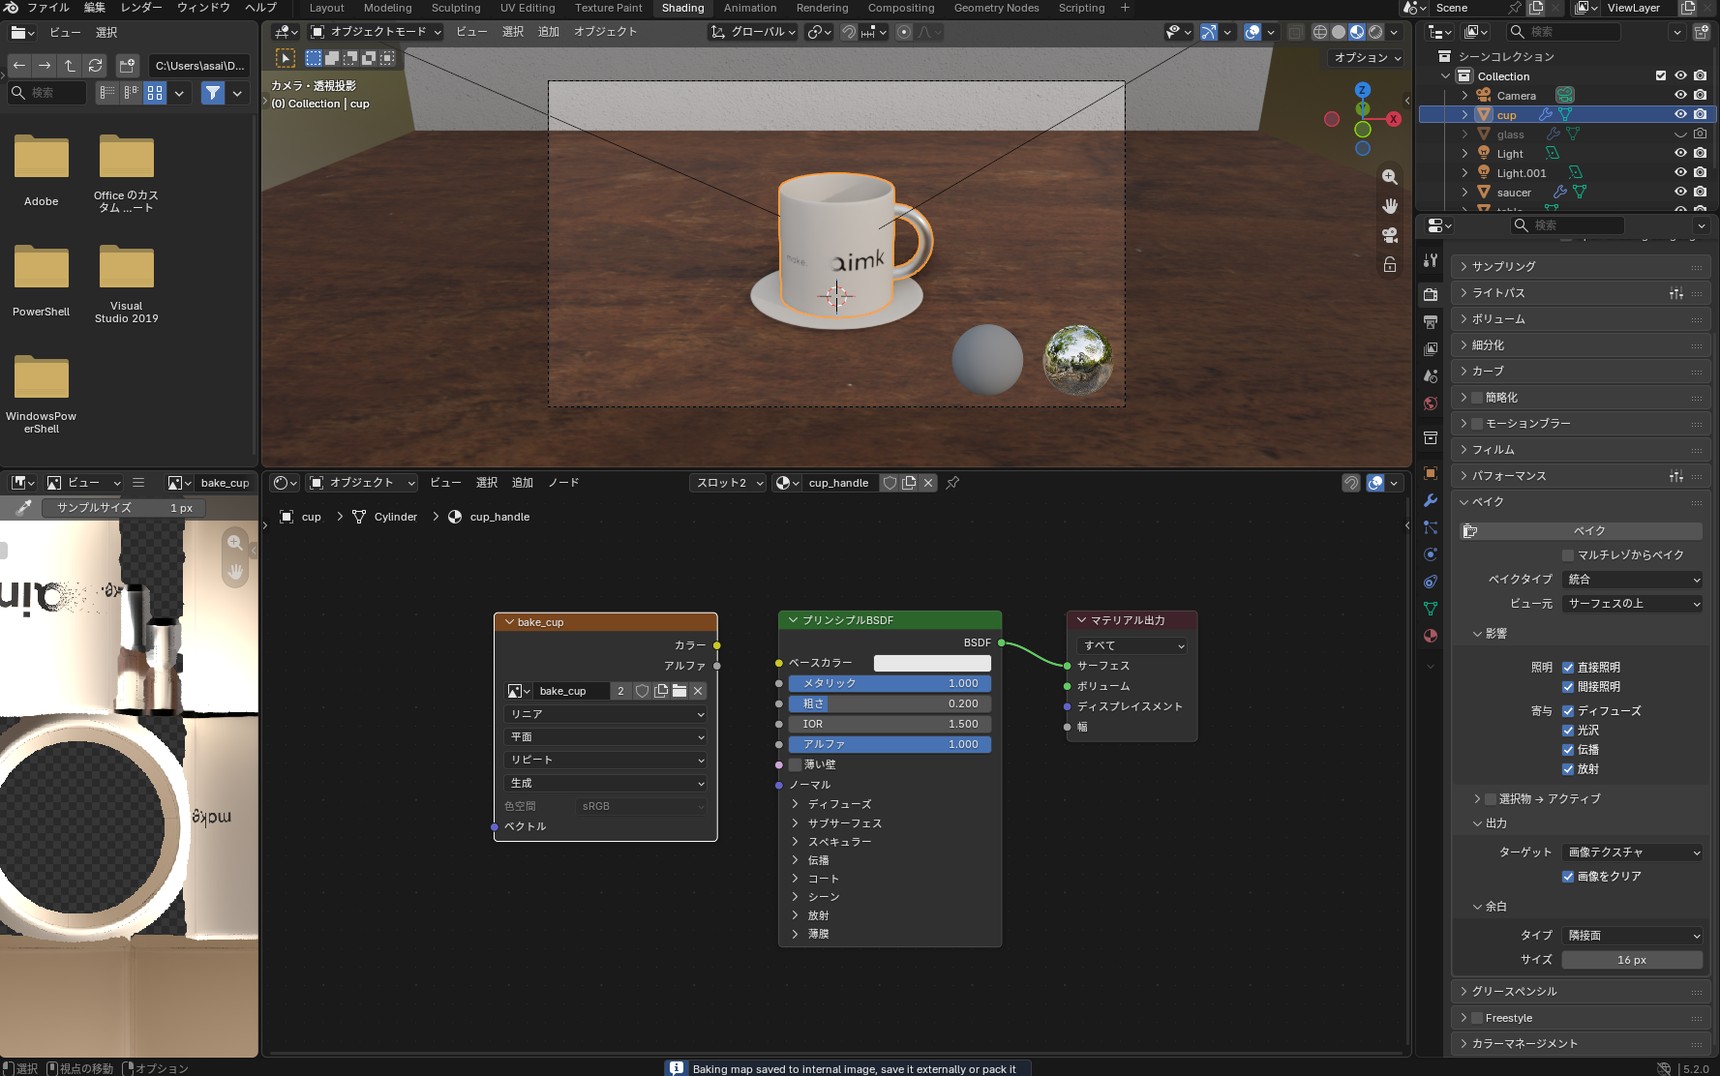
bake_cup appears in the Image Editor at the lower left. If it doesn't, pick it from the image icon at the top. The cup's UV islands now contain the baked lighting and shading.
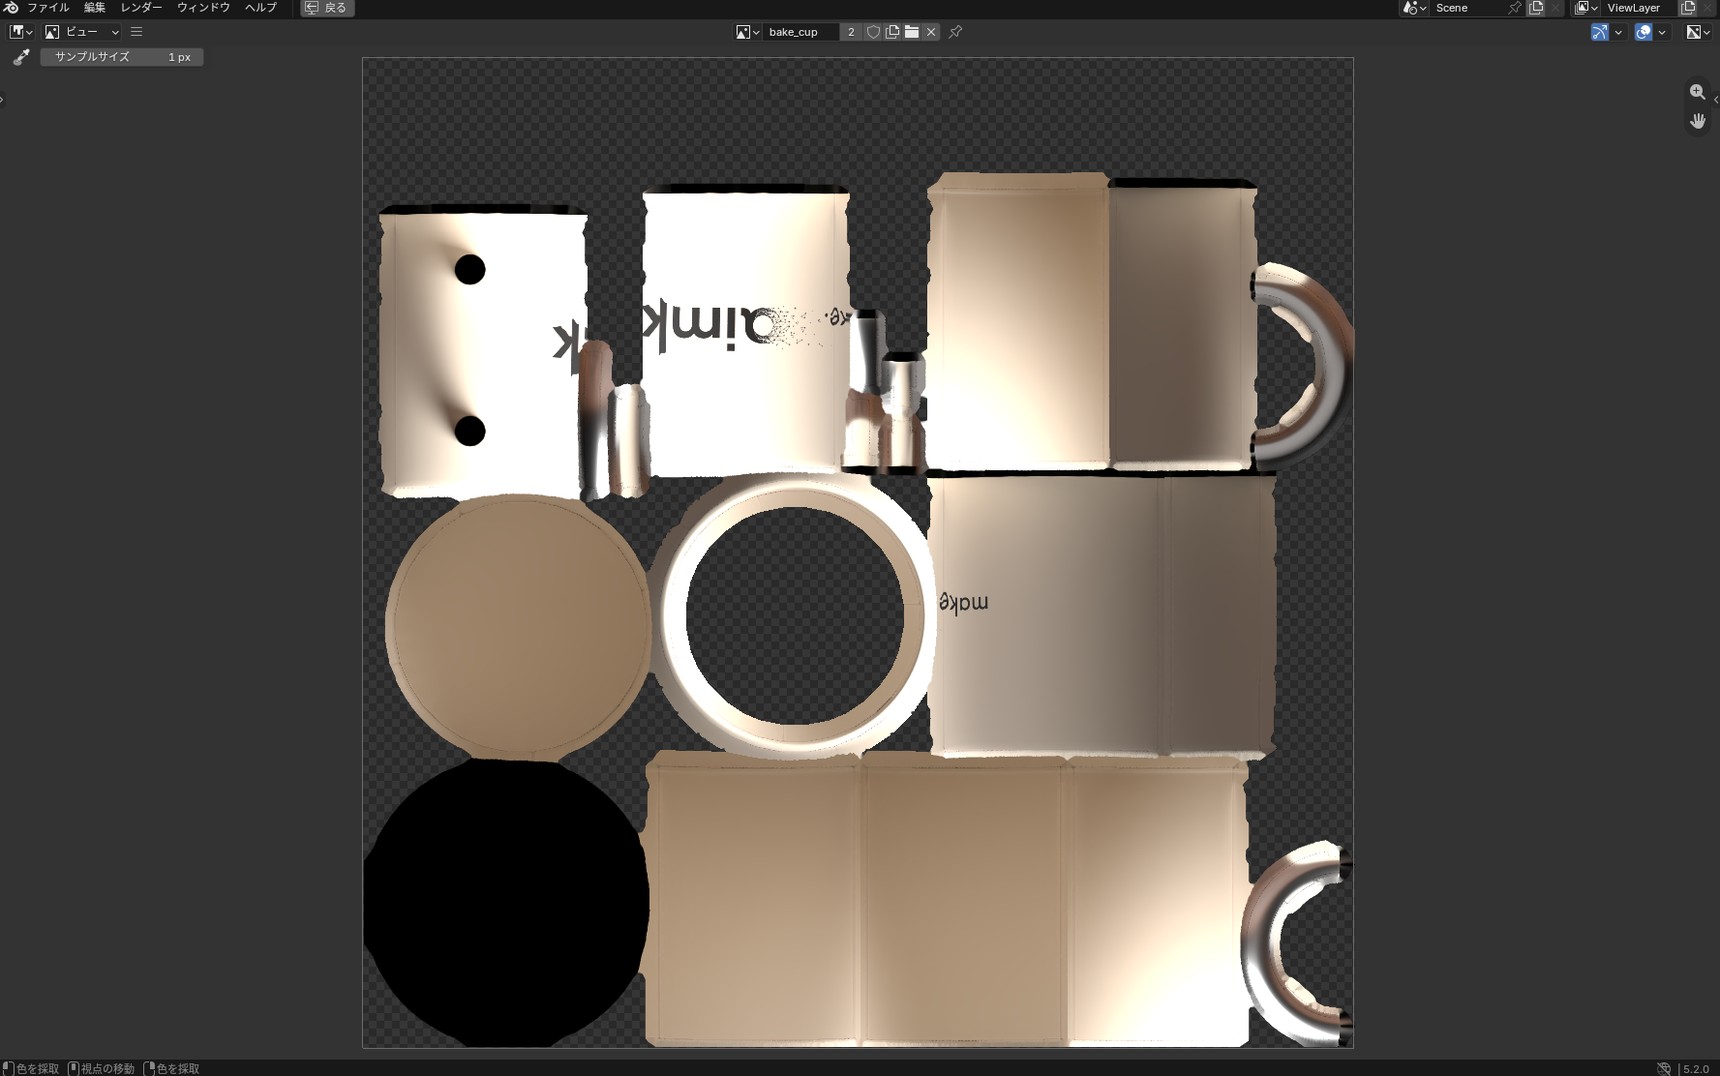
Baking uses the settings under "Sampling" → "Render" in Render Properties. With "Denoise" on, the bake comes out without grain.
Save the image
At this point, the baked image only exists inside Blender. Save it as a file with "☰" → "Image" → "Save As" in the Image Editor.
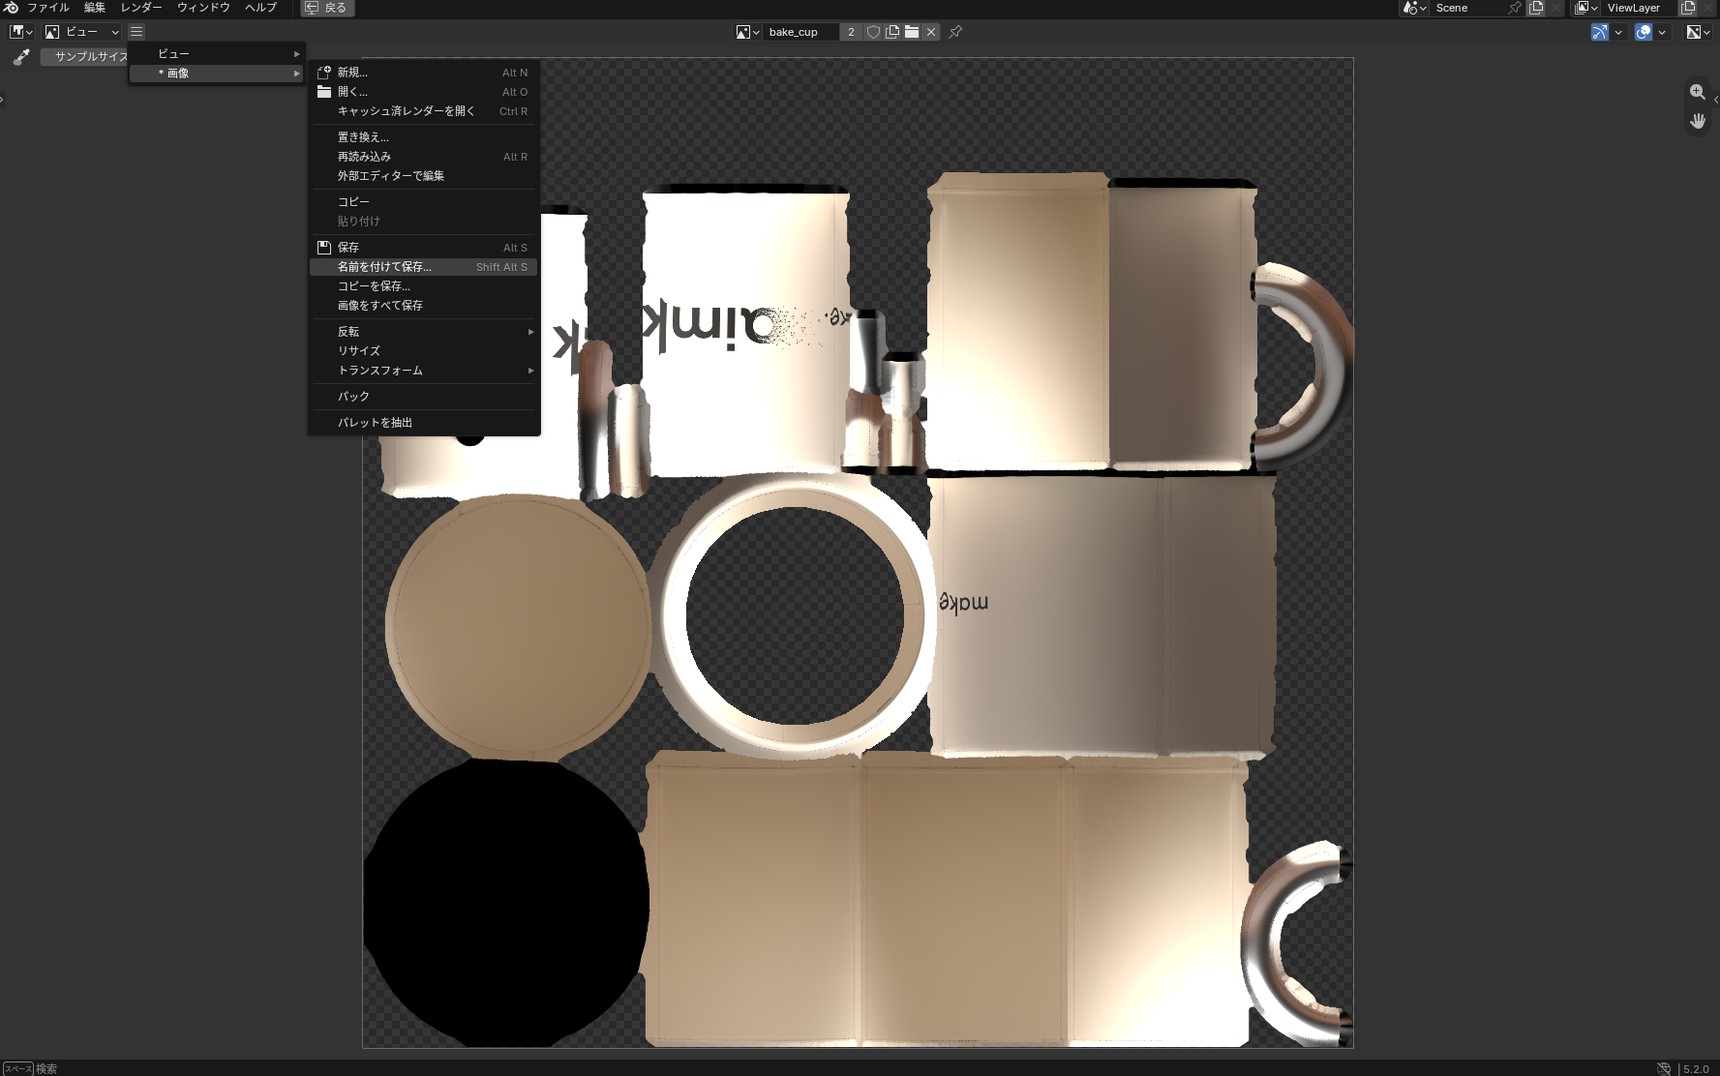
Once it's saved, don't move the image file to another folder or rename it. Blender loads the image from where it was saved, and if it can't find the file, the cup shows solid pink in place of the image.
Apply the baked image and check it
Now apply the baked image to the cup.
Apply the baked image
Add an Emission shader with Shift + A → "Shader" → "Emission" and connect it as follows. The Principled BSDF gets disconnected, but leave the node in place.
bake_cup"Color" → Emission "Color"- Emission "Emission" → Material Output "Surface"
At this stage, the baked image isn't in the right place, and the cup looks scrambled.
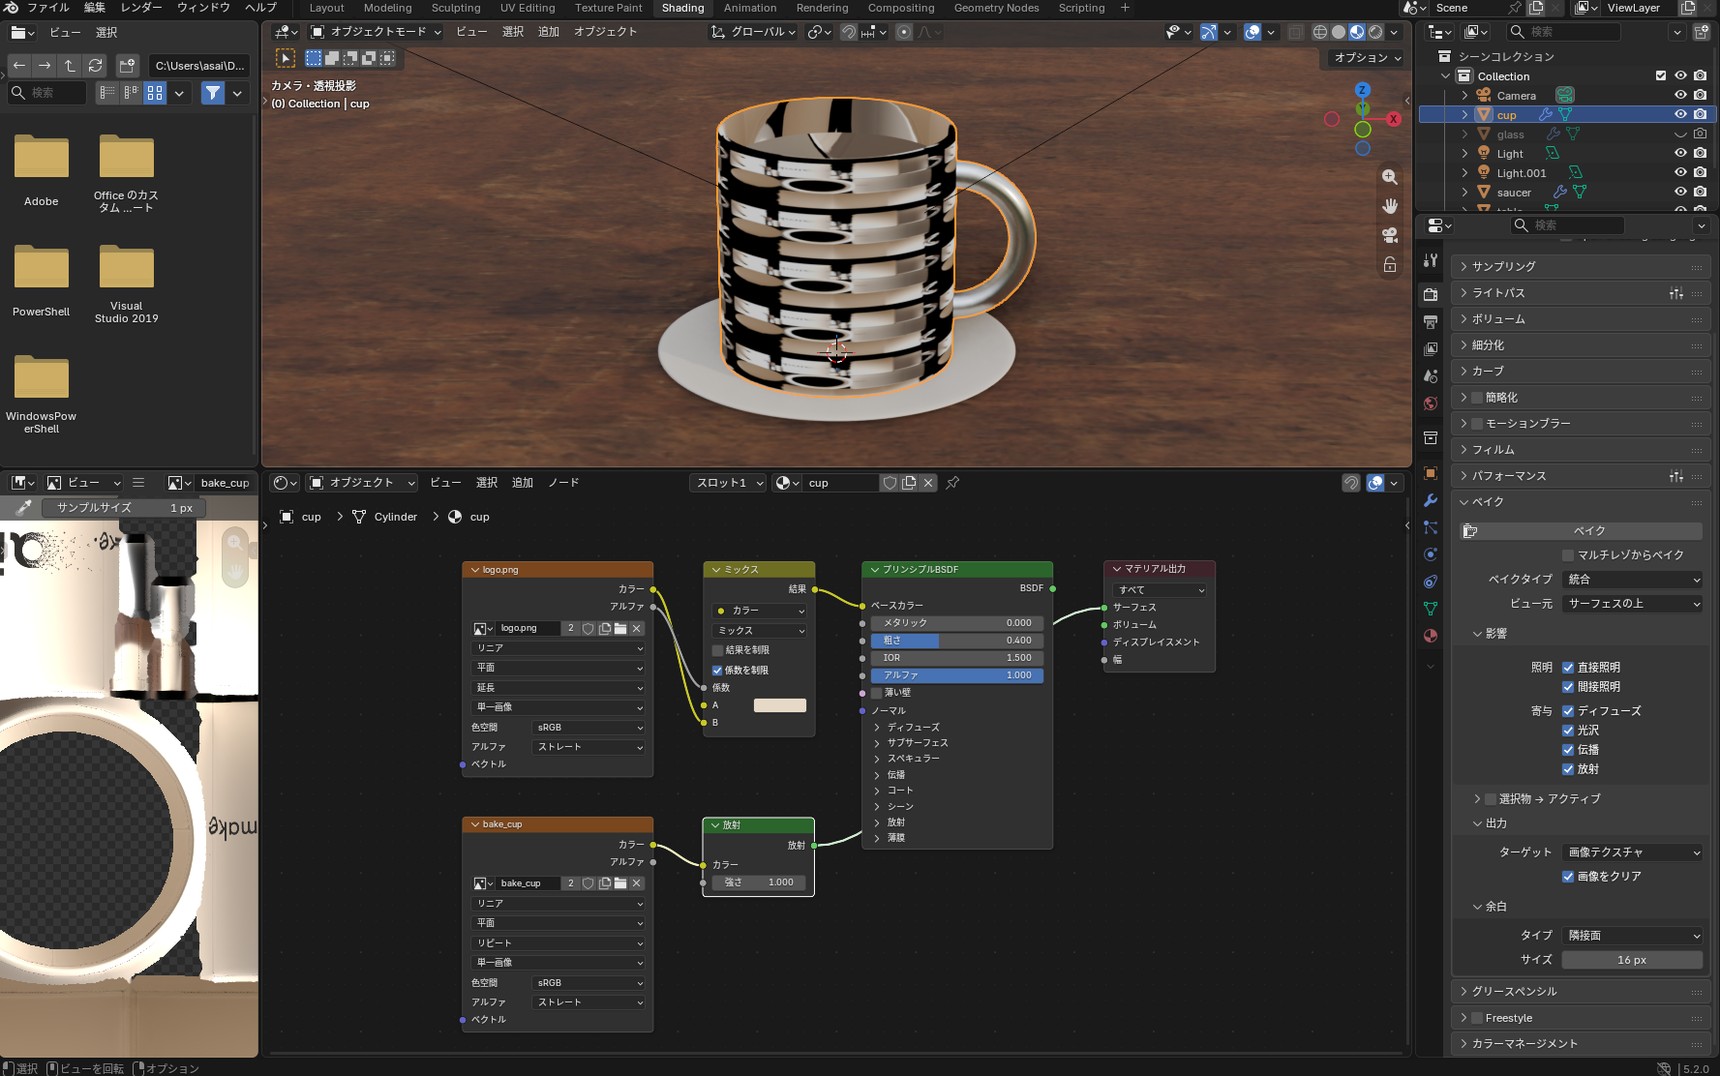
When nothing is connected to the Image Texture's "Vector" input, it uses "UVMap", the map with the camera icon. The bake used bake_uv, so to put the image in the right place, you need to point it at the same UV
map when applying it.
Add a UV Map node with Shift + A → "Input" → "UV Map" and choose bake_uv in the node's field. Connect the UV Map's "UV" output to the "Vector" input of bake_cup.
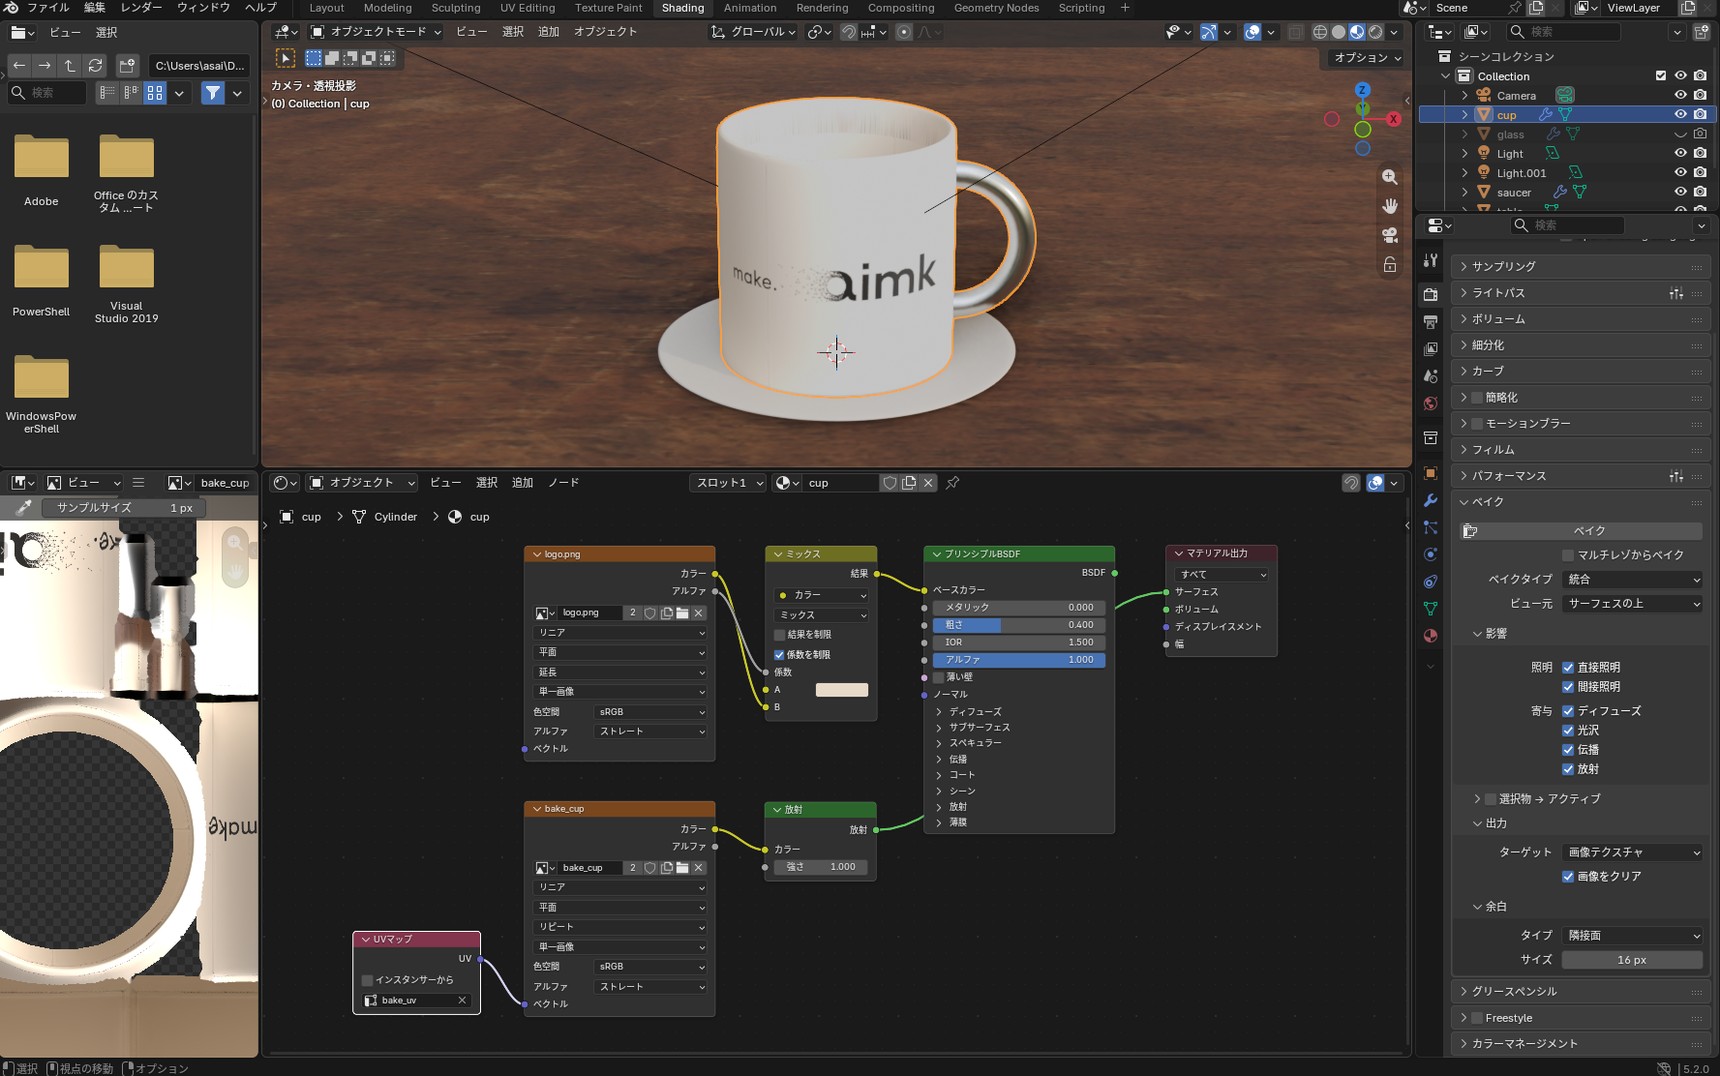
Connect the handle's material ("Slot 2") the same way. If its UV Map field is left on "UVMap", the handle doesn't display correctly either.
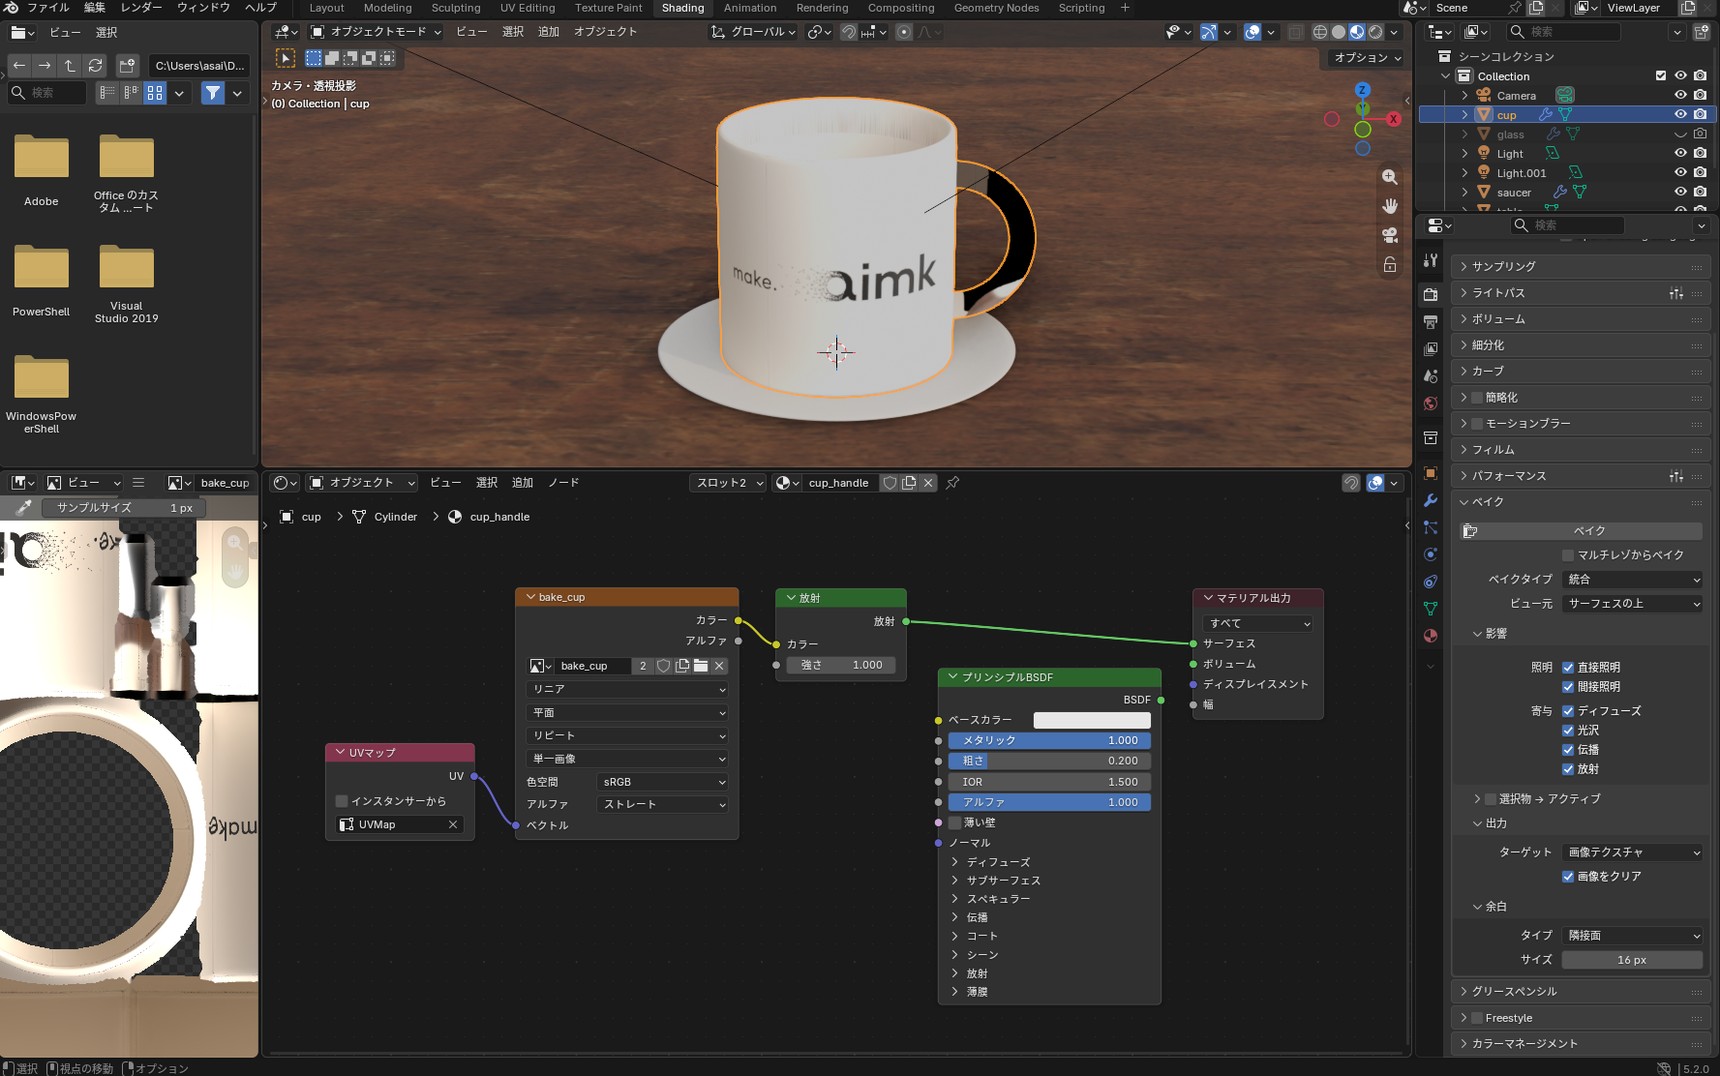
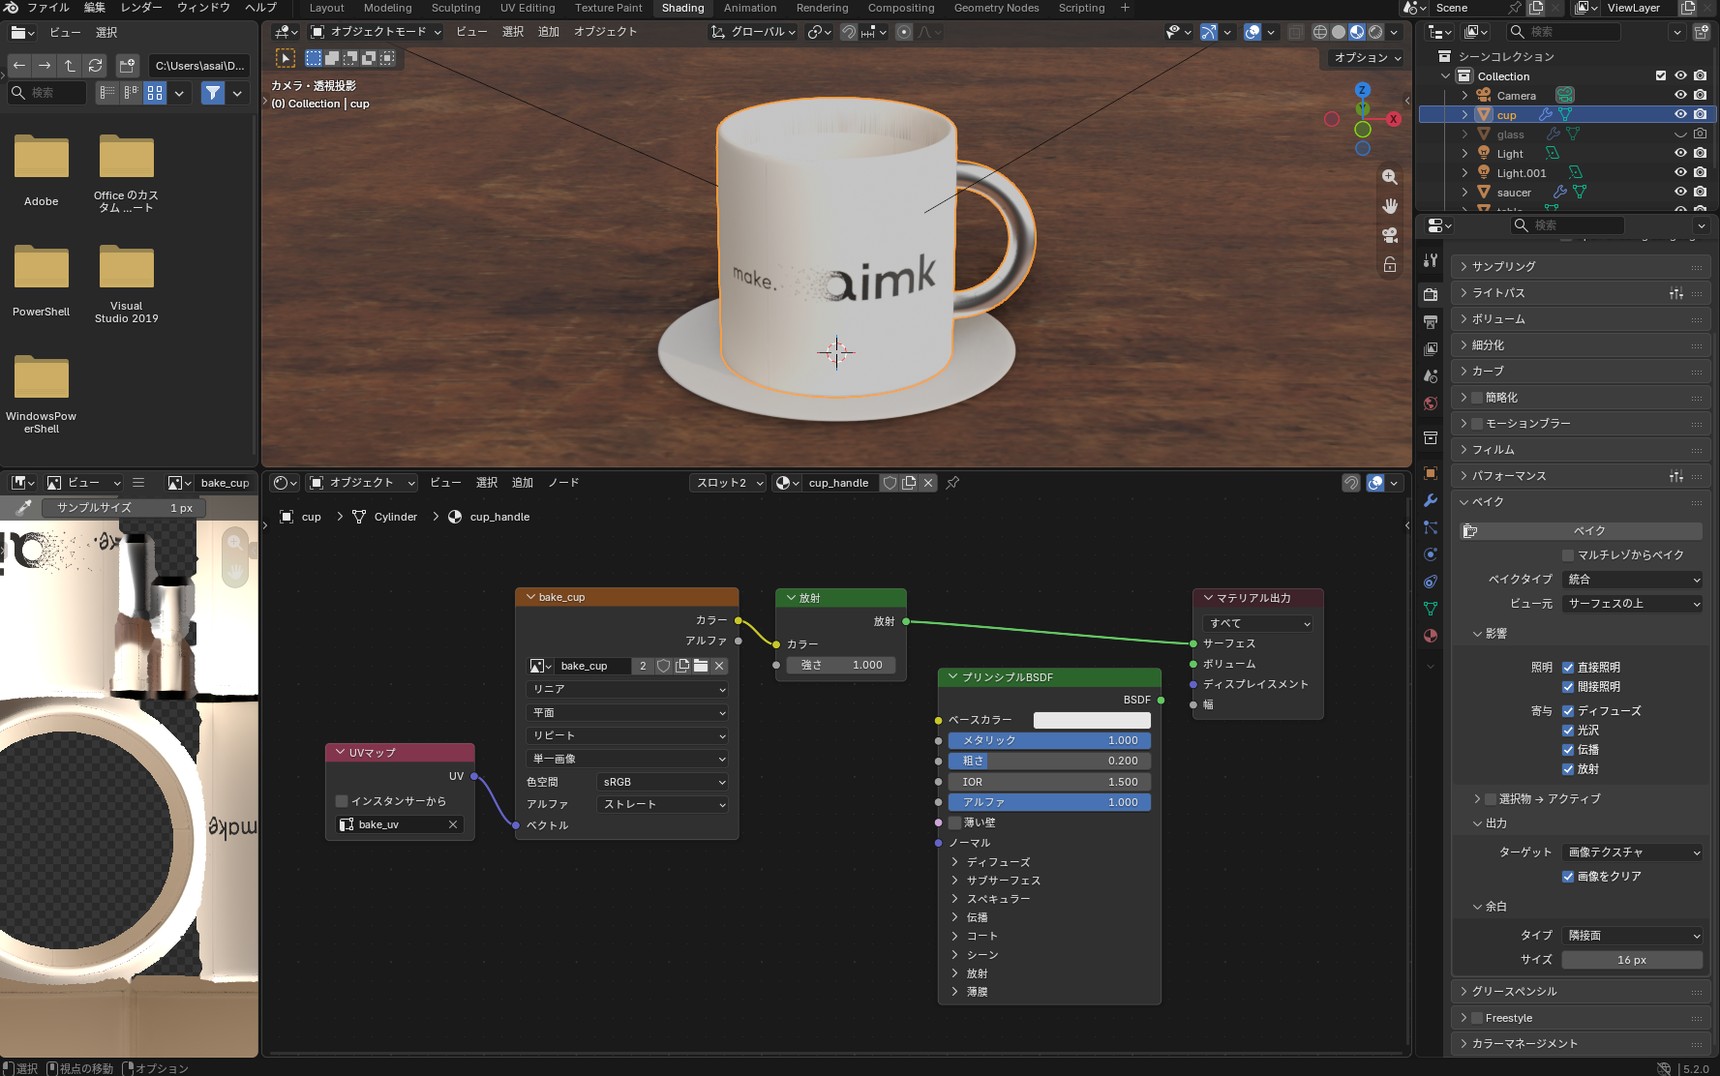
The image goes through Emission so it shows at exactly the brightness it was baked at. Connect it to the Principled BSDF instead and the lights hit the baked shading a second time. There's more on this in "Export the baked image as an unlit material".
Turn the lights off
Switch the viewport to "Rendered" and hide both lights with the eye icon in the Outliner.
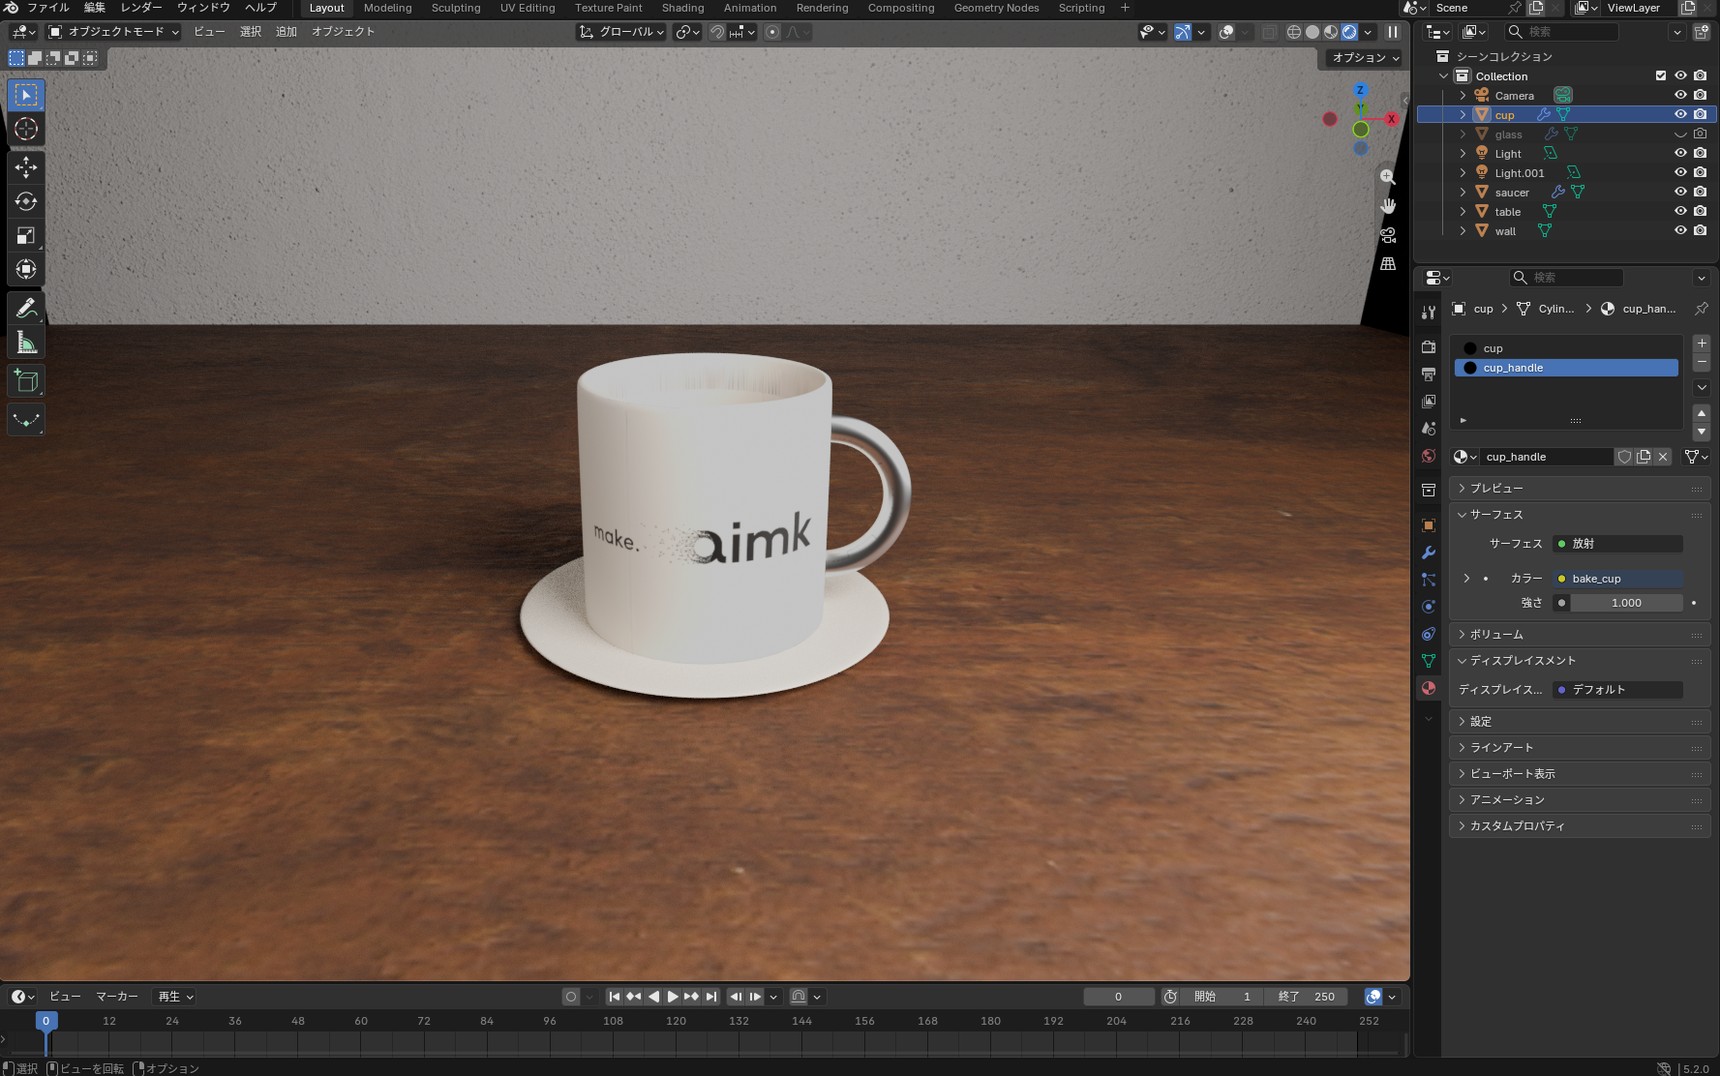
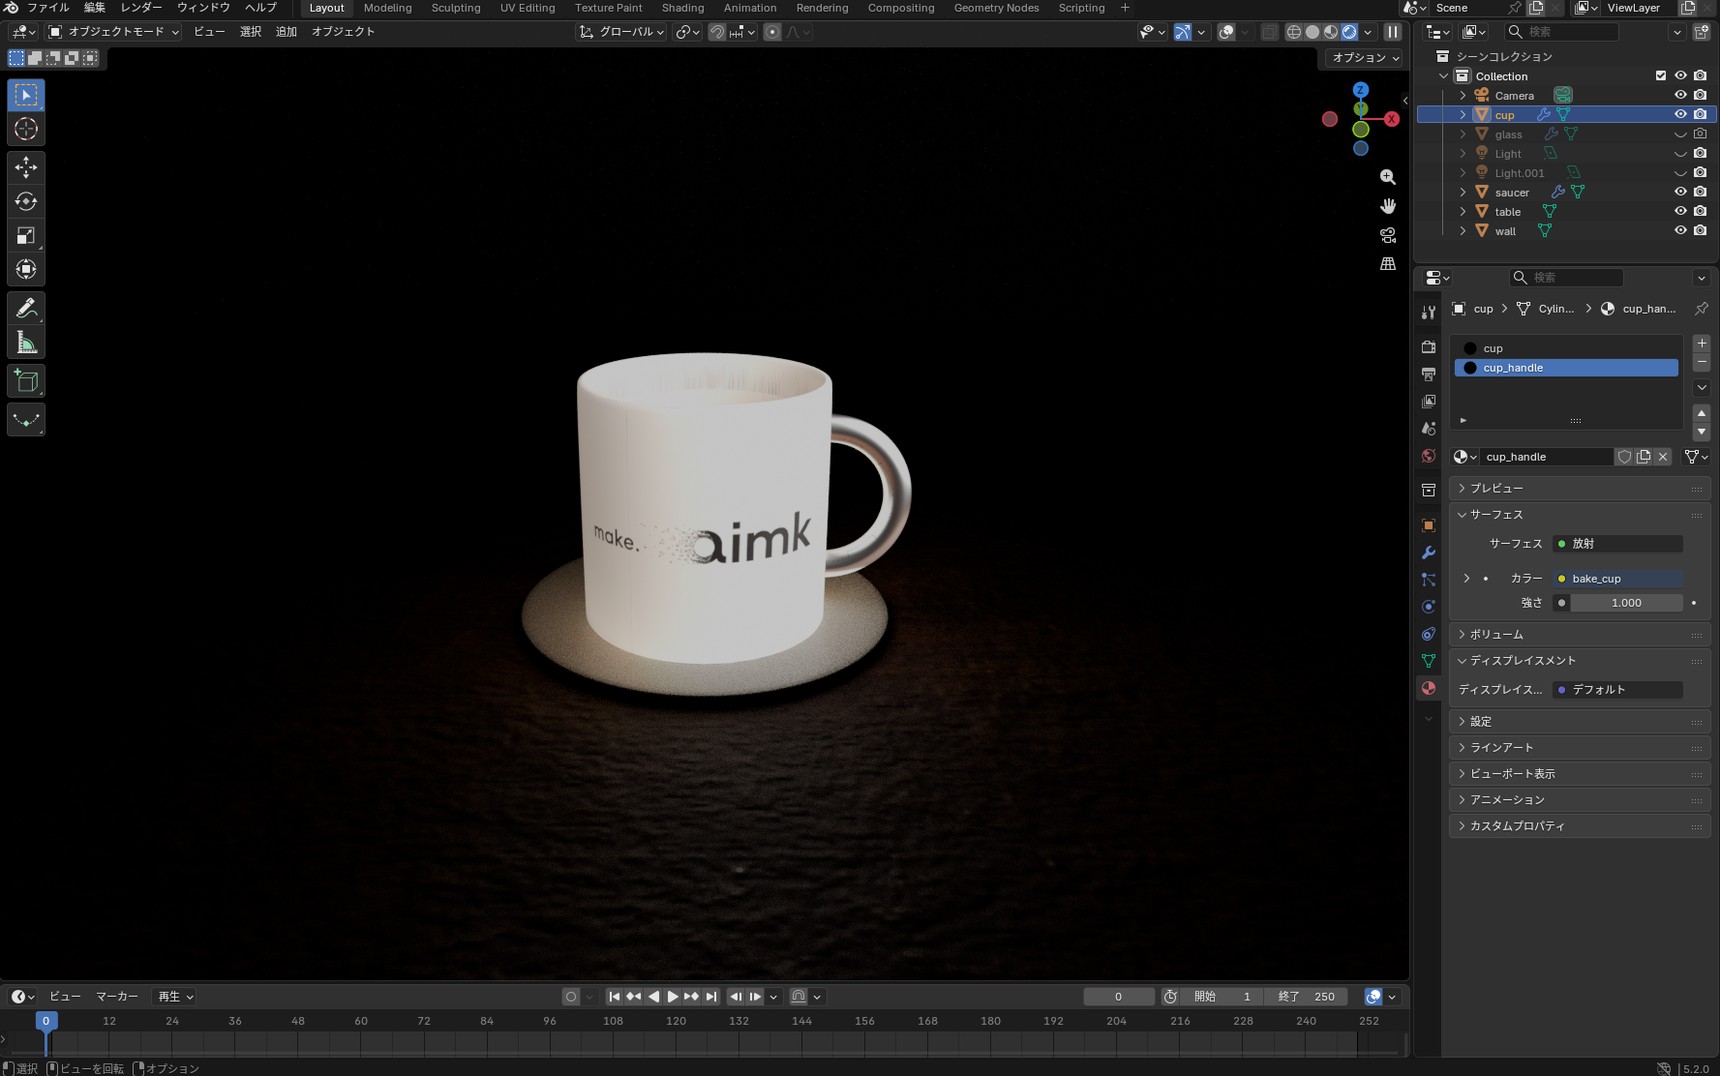
The table and wall went dark, but the cup keeps the brightness it had under the lights. The lighting and shading are baked into the image. The saucer looks bright because the cup, now using an Emission shader, is lighting it.
The baked shading doesn't change when the lights go off. Orbit the view and the bright and dark sides of the cup stay exactly where they were. If you change a light's position or strength, you need to bake again.
When you're done checking, turn the lights back on with the eye icon.
Bake the color only
If you plan to light the model again on the web or in a game engine, bake only the cup's color. An image baked with "Combined" already contains the lighting and shading, and lighting it again can give you a result you didn't intend.
Get ready to bake
Before baking, reconnect the "Surface" input of the Material Output to the Principled BSDF in both the cup body's and the handle's materials. While Emission is connected, the cup's Base Color on the Principled BSDF isn't included in the bake.
Set "Bake Type" to "Diffuse", and the "Influence" options change to three checkboxes. Uncheck "Direct" and "Indirect" and leave only "Color".
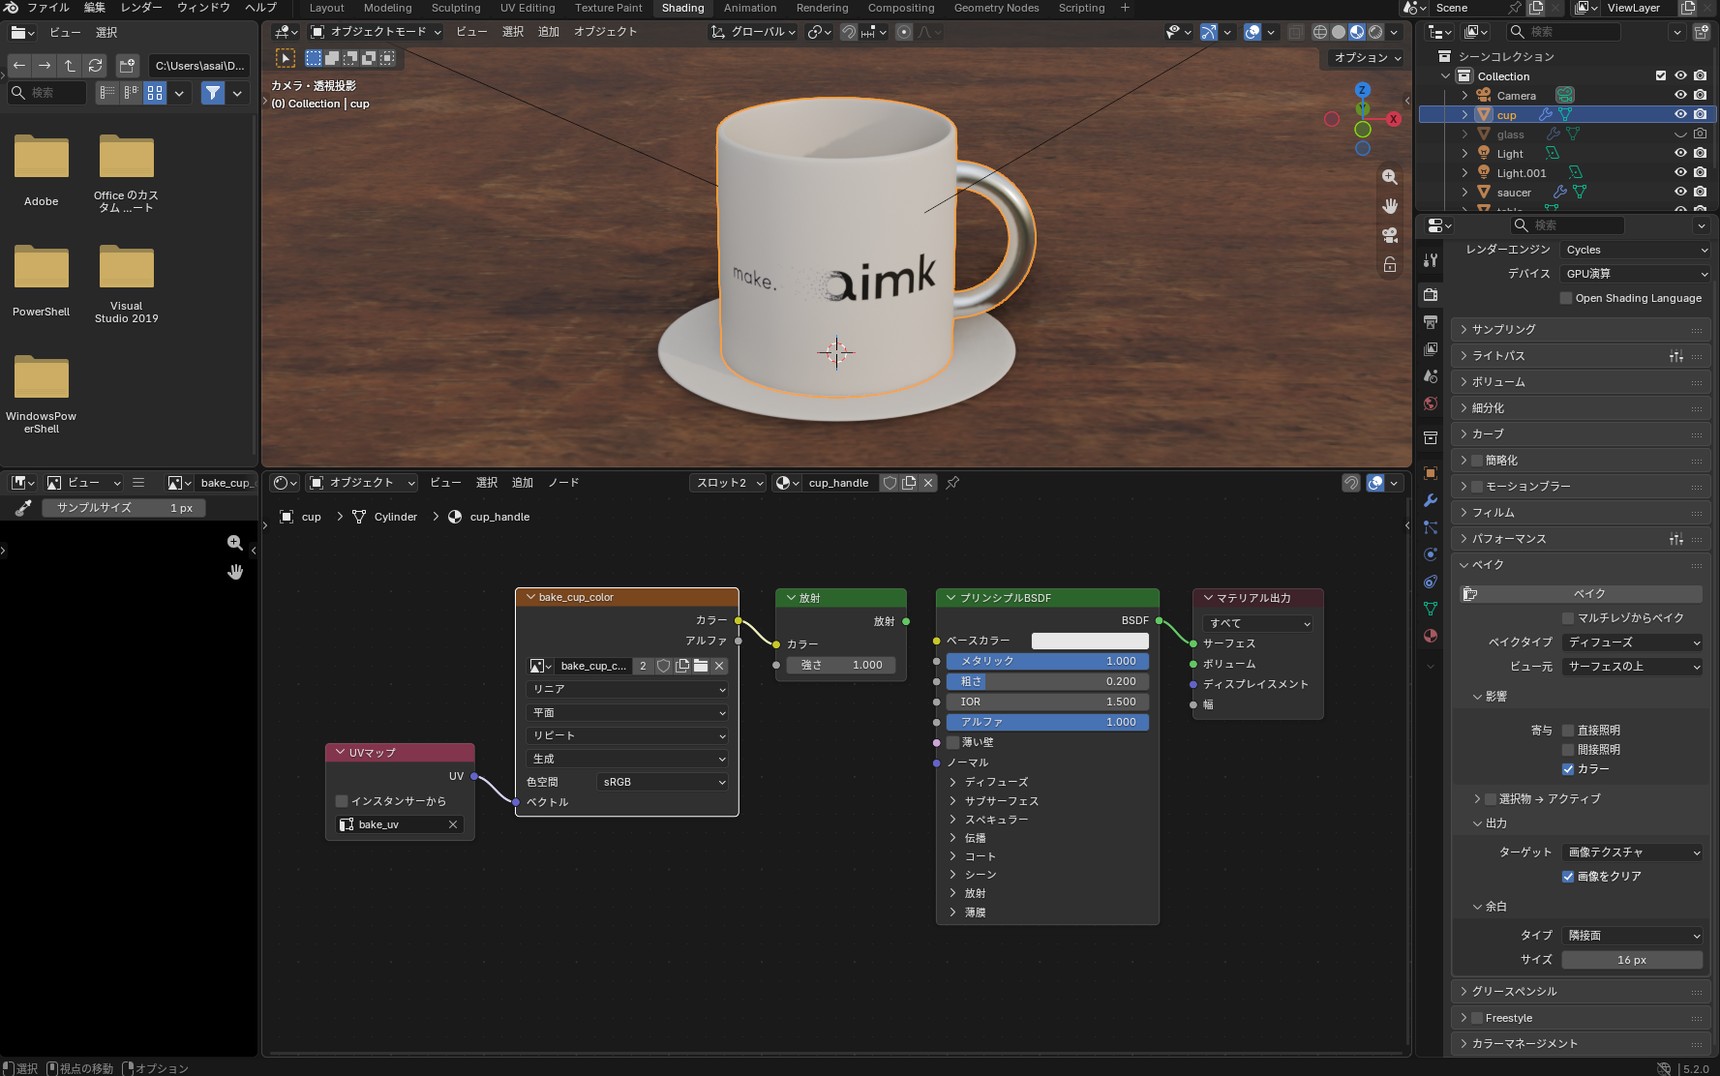
Baking with these settings overwrites the image you baked earlier with "Combined". To keep that image, create a new one first and switch the Image Texture in both the body's and the handle's materials to it before baking.
Bake with "Diffuse"
Select the cup and press "Bake". This time the image contains no lighting or shading. Only the cup's color is baked in.
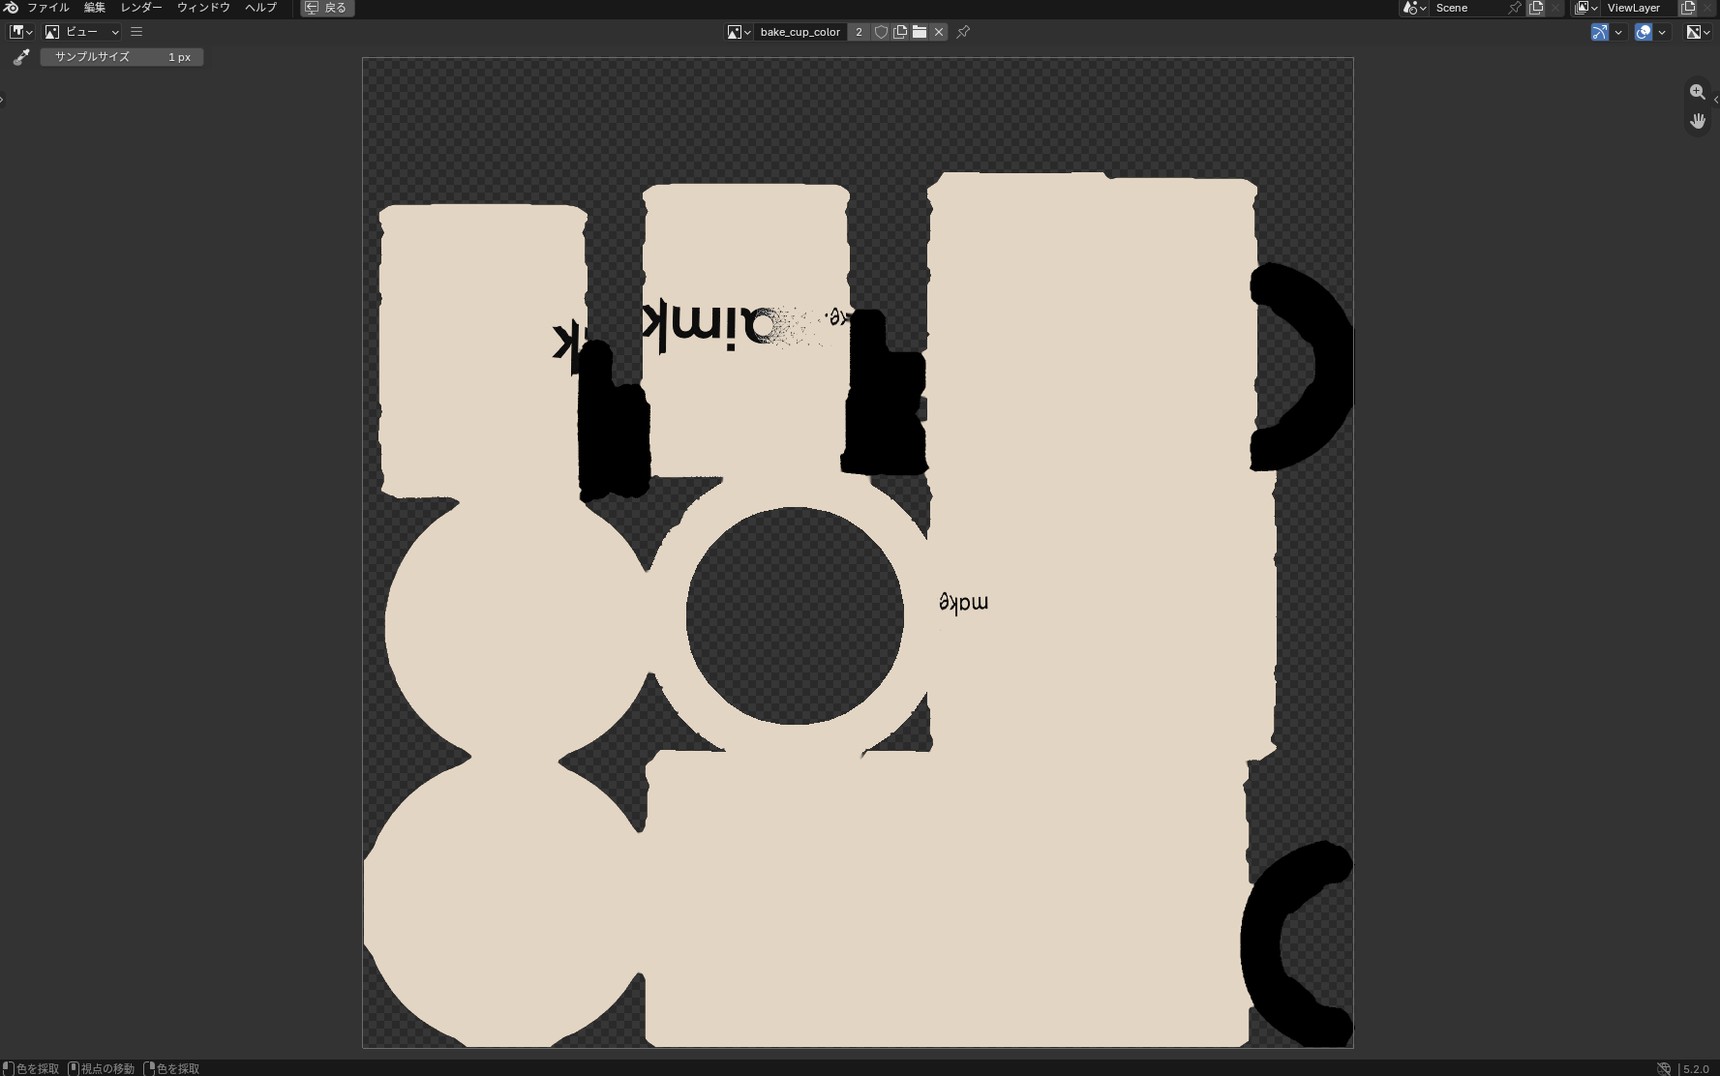
The handle, though, came out completely black. That's because the handle's material has "Metallic" set to 1. Why metal turns black, and how to fix it, comes next.
When the baked image comes out black
There are three main reasons a baked image comes out black.
A metallic material was baked with "Diffuse"
Bake a material with "Metallic" at 1 using "Diffuse" and the result is black.
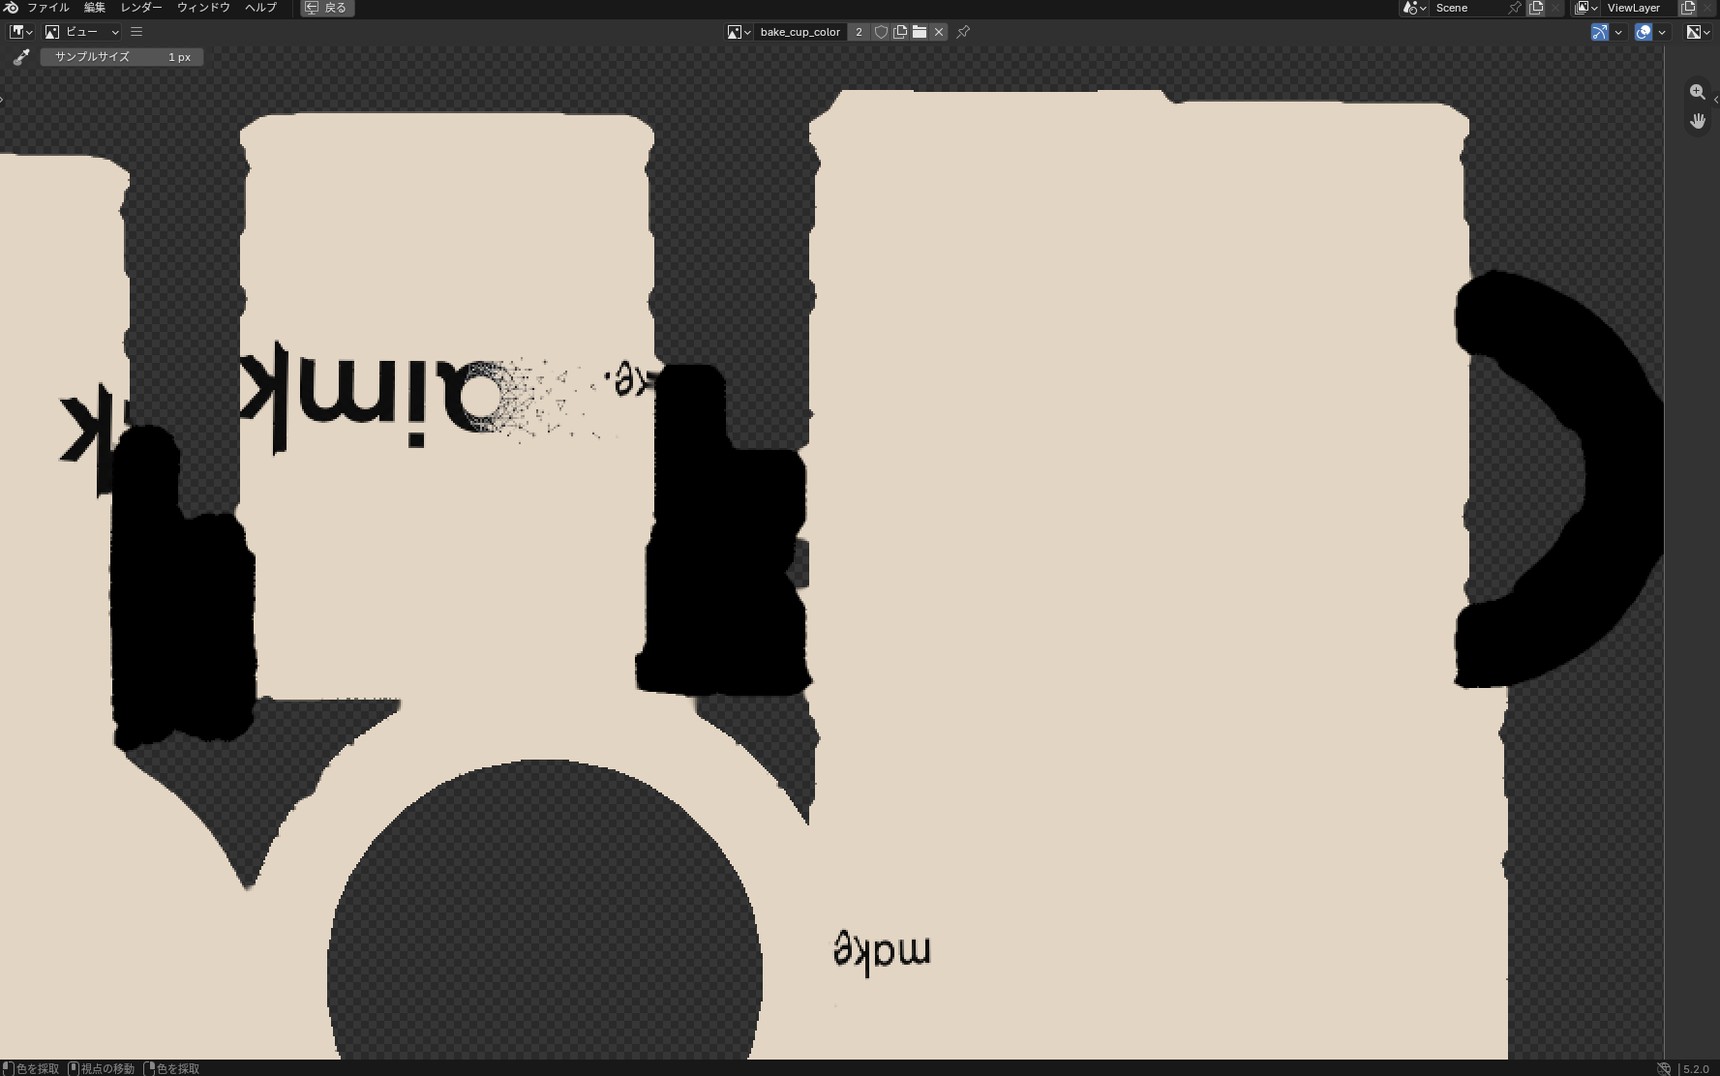
Diffuse bakes the color of non-metallic surfaces. A metal's color is what you see in the light reflecting off its surface, so Diffuse has no color to bake. That's why the cup's handle came out black.
Setting "Metallic" to 0 lets the color bake, but the material stops being metal. To get the color without changing the material, bake with "Emit".
- Add an Emission shader with Shift + A → "Shader" → "Emission" and connect it to the Material Output's "Surface"
- Connect whatever node feeds the Principled BSDF's "Base Color" to the Emission's "Color" as well. If nothing is connected there, set the Emission "Color" to the same color as the Base Color
- Set "Bake Type" to "Emit" and bake
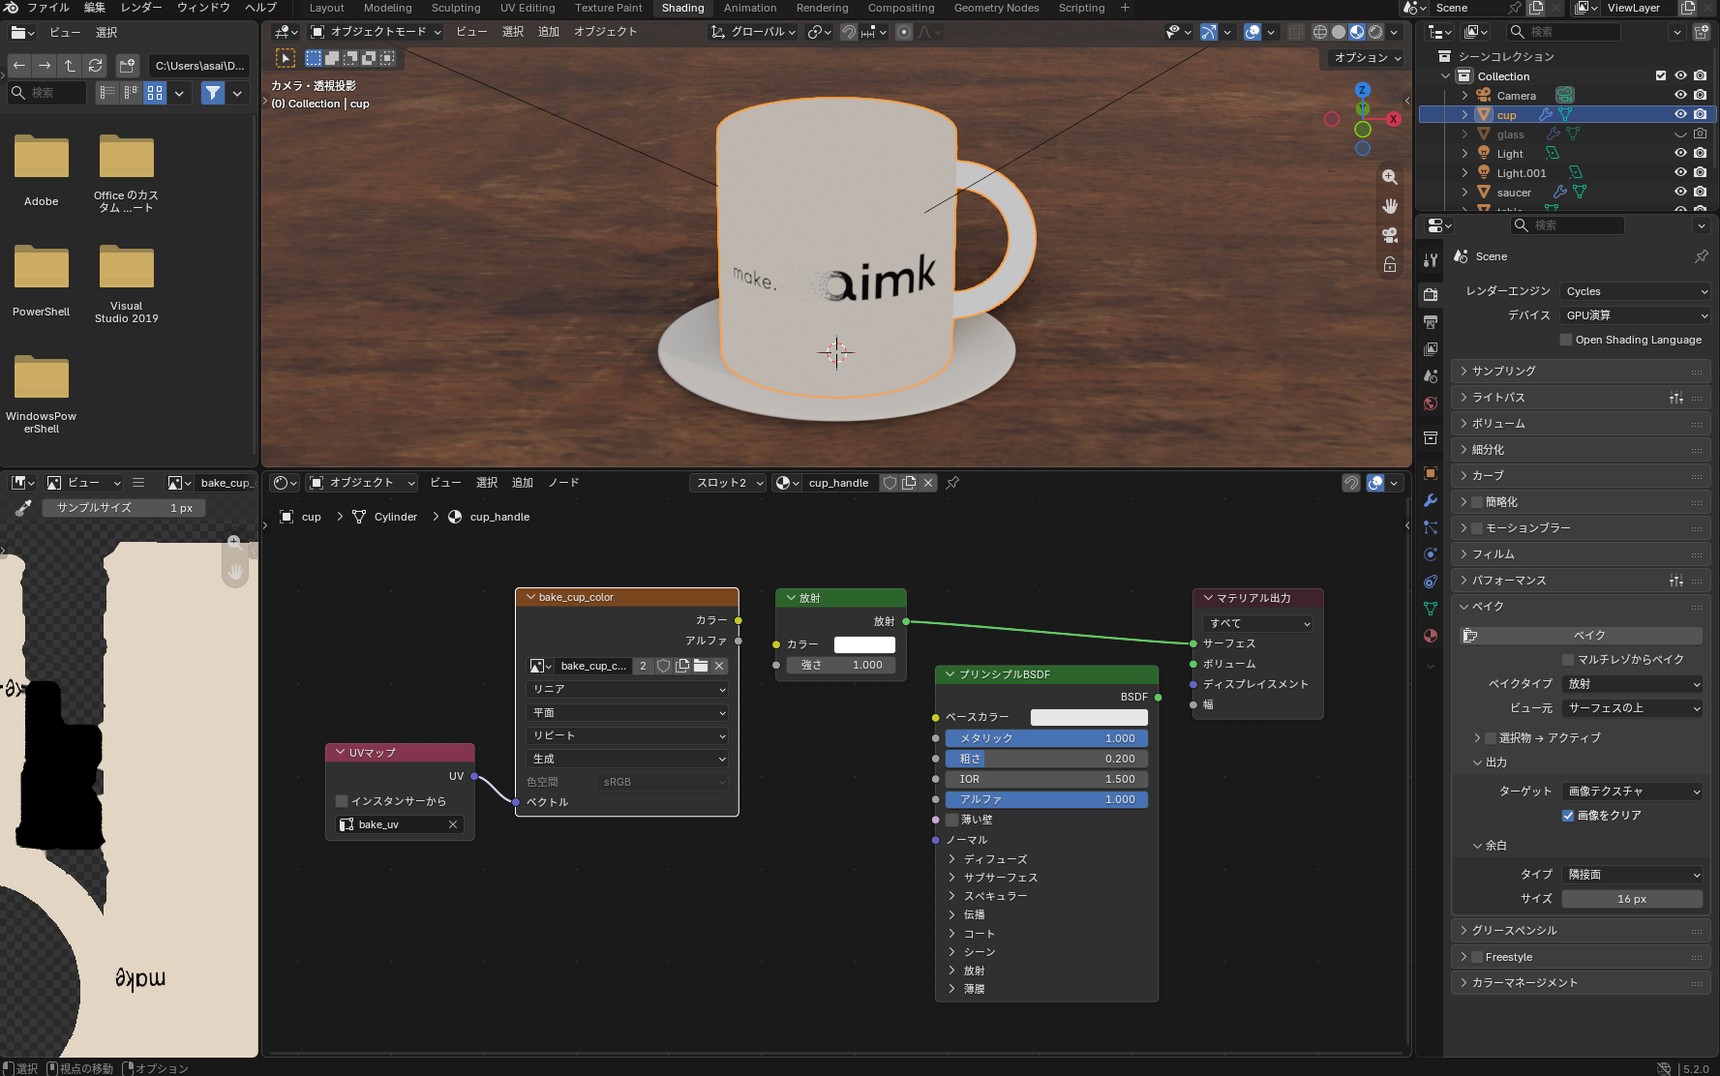
An Emit bake picks up the color whether "Metallic" is 0 or 1. When the bake is done, reconnect the Material Output's "Surface" to the Principled BSDF.
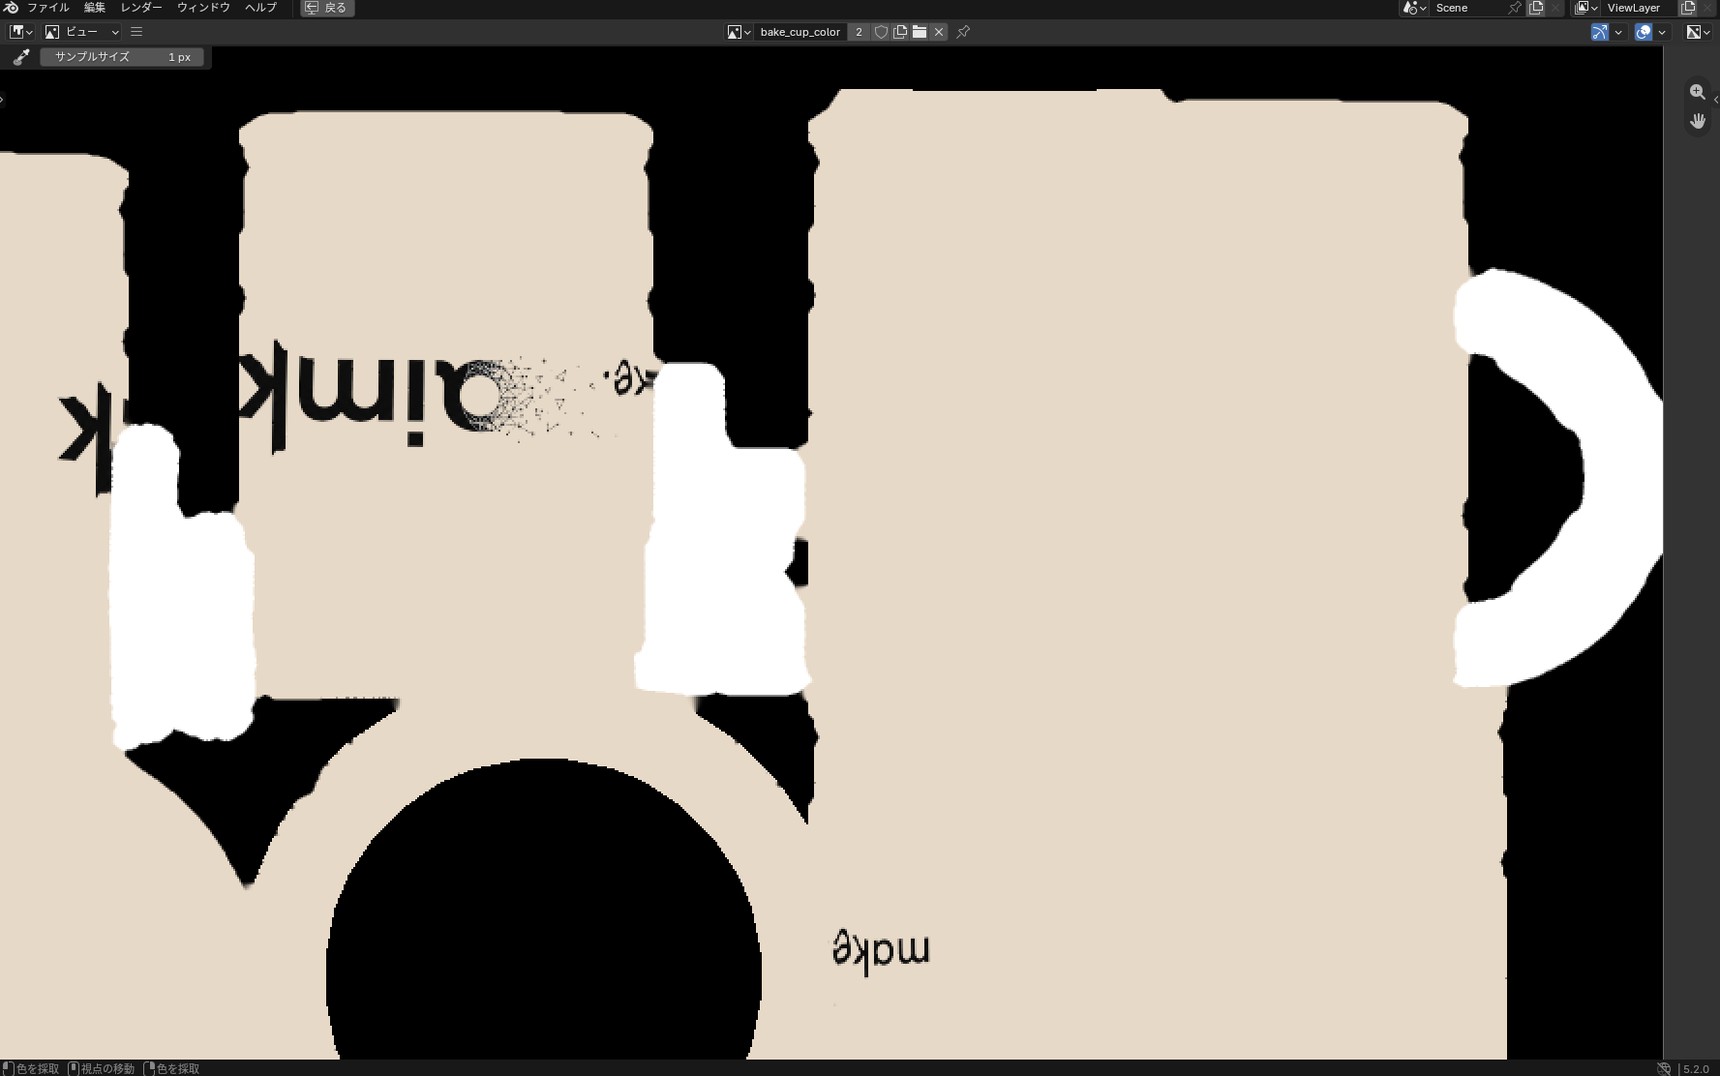
The black outside the islands is just space where nothing was baked. If you use a color-only bake, set "Metallic" again on the material in your web app or game engine to bring back the metal look.
"Combined" was baked with Direct and Indirect still unchecked
If you uncheck "Direct" and "Indirect" for "Diffuse" and then switch "Bake Type" back to "Combined" (and change nothing else), the image comes out black. Those two checkboxes stay unchecked when you change "Bake Type".
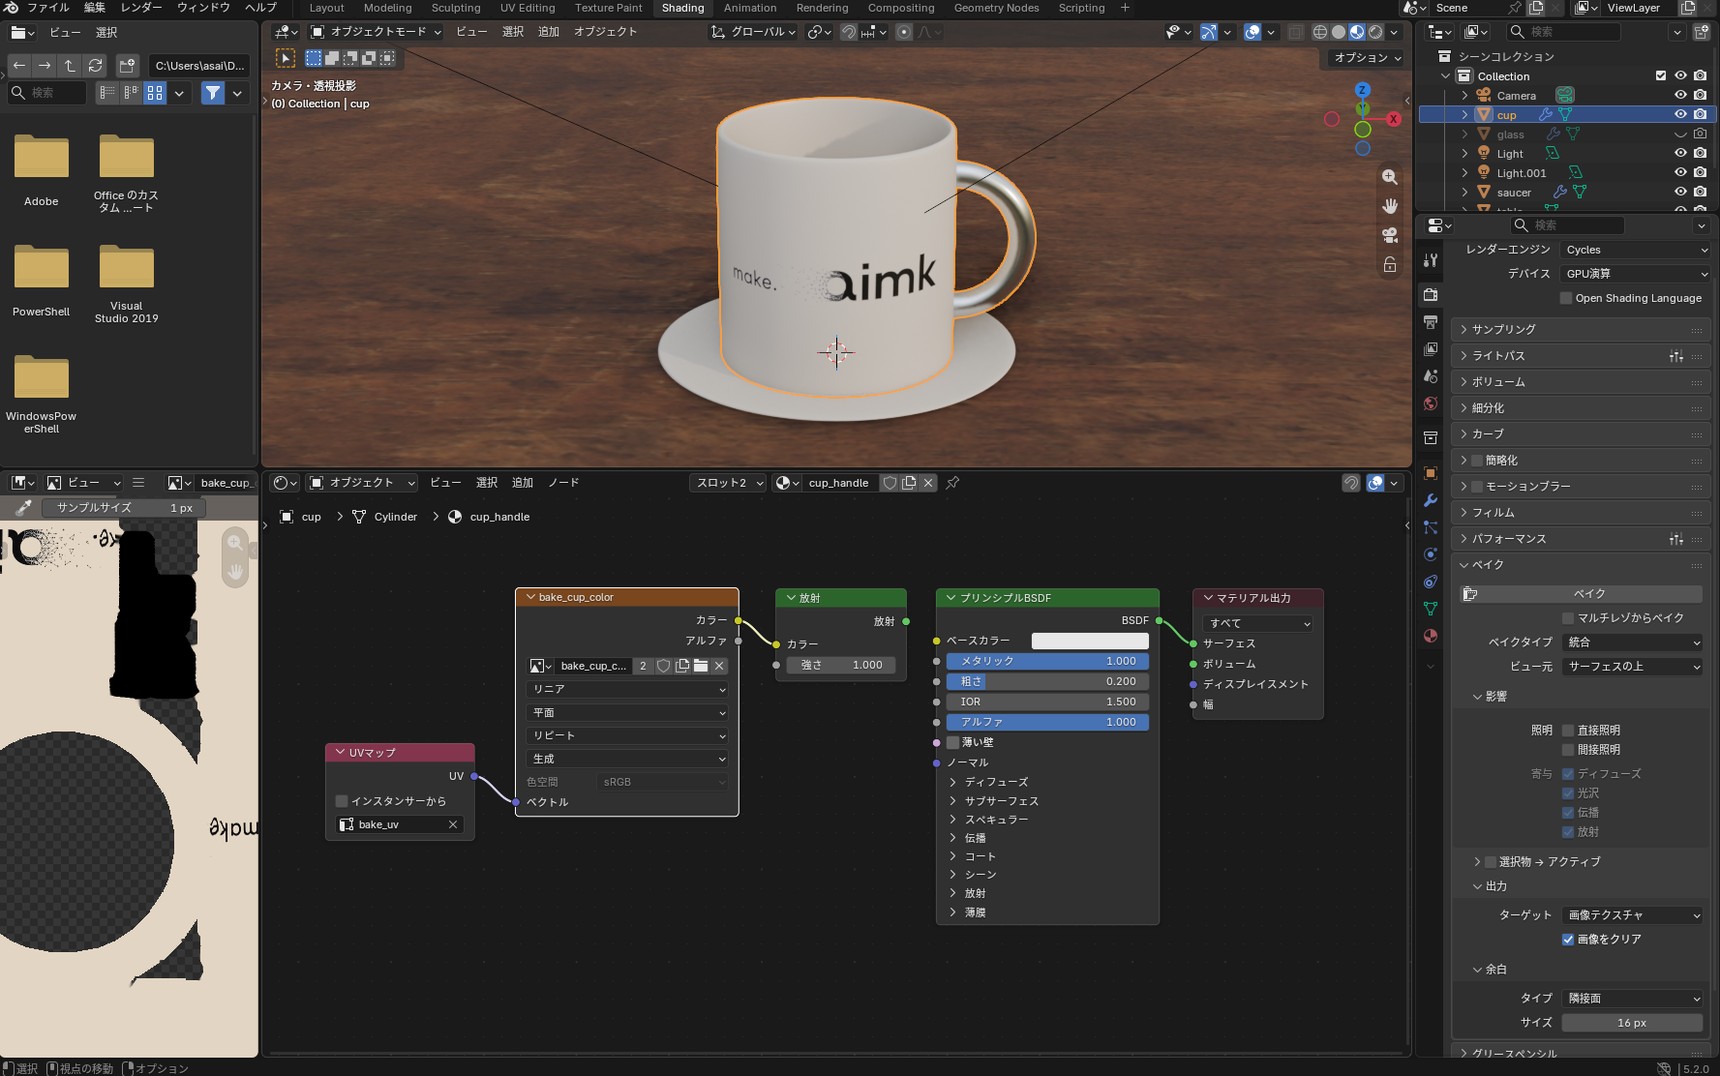
When this happens, the four options under "Contributions" for "Combined" are grayed out. Check "Direct" and "Indirect" again before baking.
The lights aren't illuminating the object
"Combined" bakes the light from your lights. If the lights are off, there's no light to bake, and the image comes out black. In this article's scene, the World "Strength" is set to 0, so the lights are the only
light there is. Check that the lights aren't hidden with the eye icon and that they're pointed at the cup.
If the image doesn't turn black but baking leaves it unchanged, the cause is something else. See "Checklist for when it isn't working".
Export the baked image as an unlit material
Connect the baked image to "Base Color" and it still reacts to the lighting on the web or in a game engine. To show it without being affected by lighting, you need to build the material differently.
Compare with the viewer's lighting off
Turn off the viewer's lighting and the cup connected through Base Color goes completely black. An image connected to Base Color depends on the viewer's lighting to be seen.
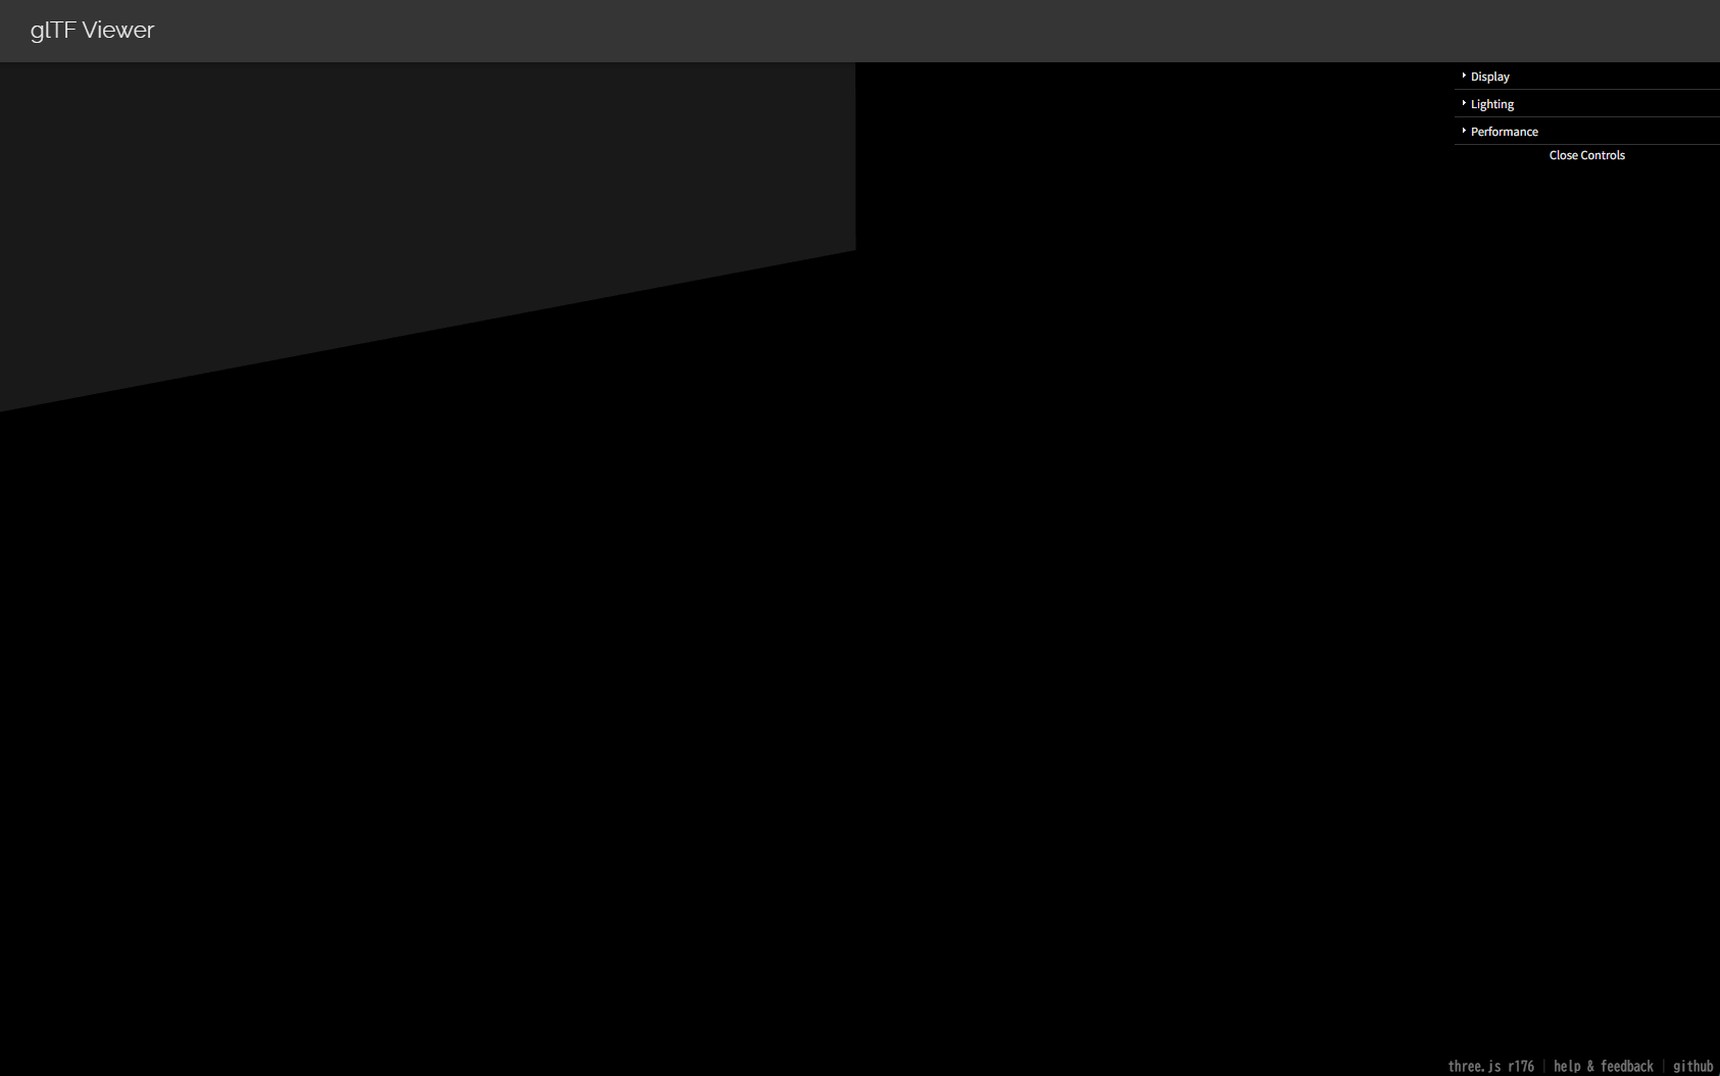
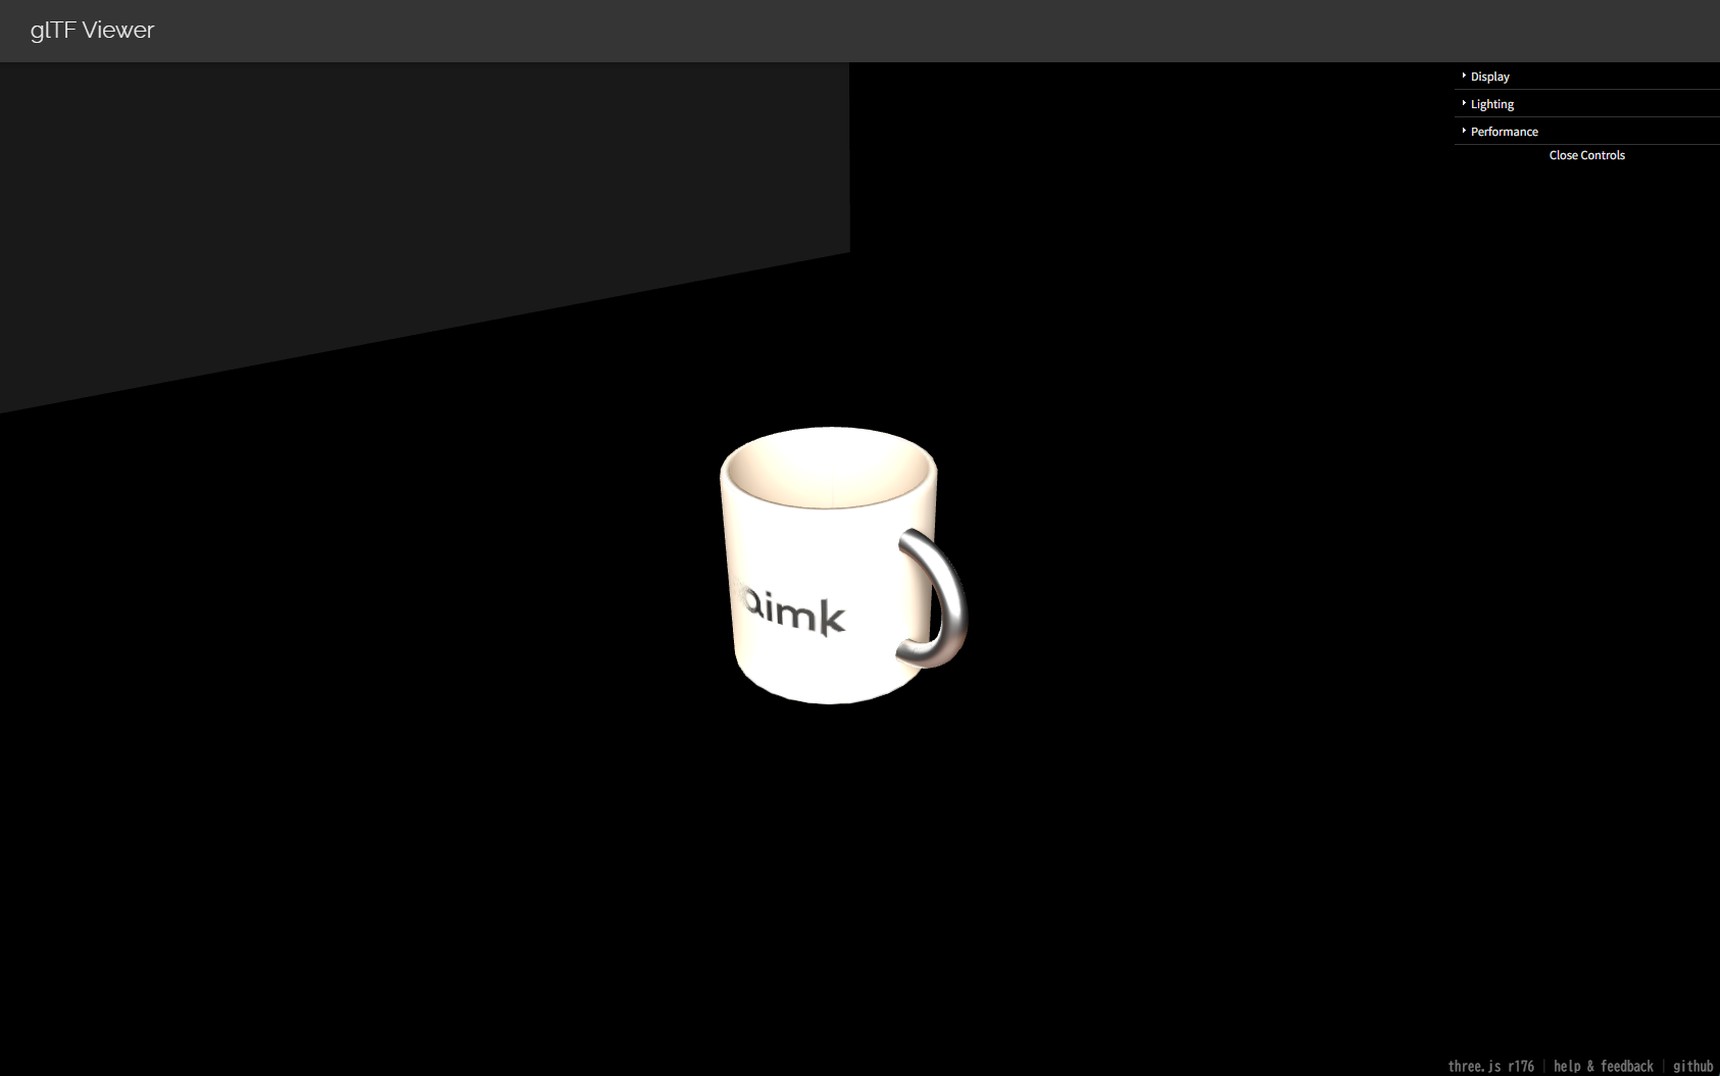
The cup exported as a material that ignores lighting (Unlit), on the other hand, stays bright with the lighting off. Whatever the viewer's lighting does, it shows the shading in the image exactly as it was baked.
If you export with the image connected only to Emission, you get a self-illuminating material rather than Unlit. Because it isn't true Unlit, it may look different depending on where you open it.
Build the material so it exports as Unlit
The glTF export settings have no option for Unlit. Connect the material's nodes as follows and it exports as Unlit.
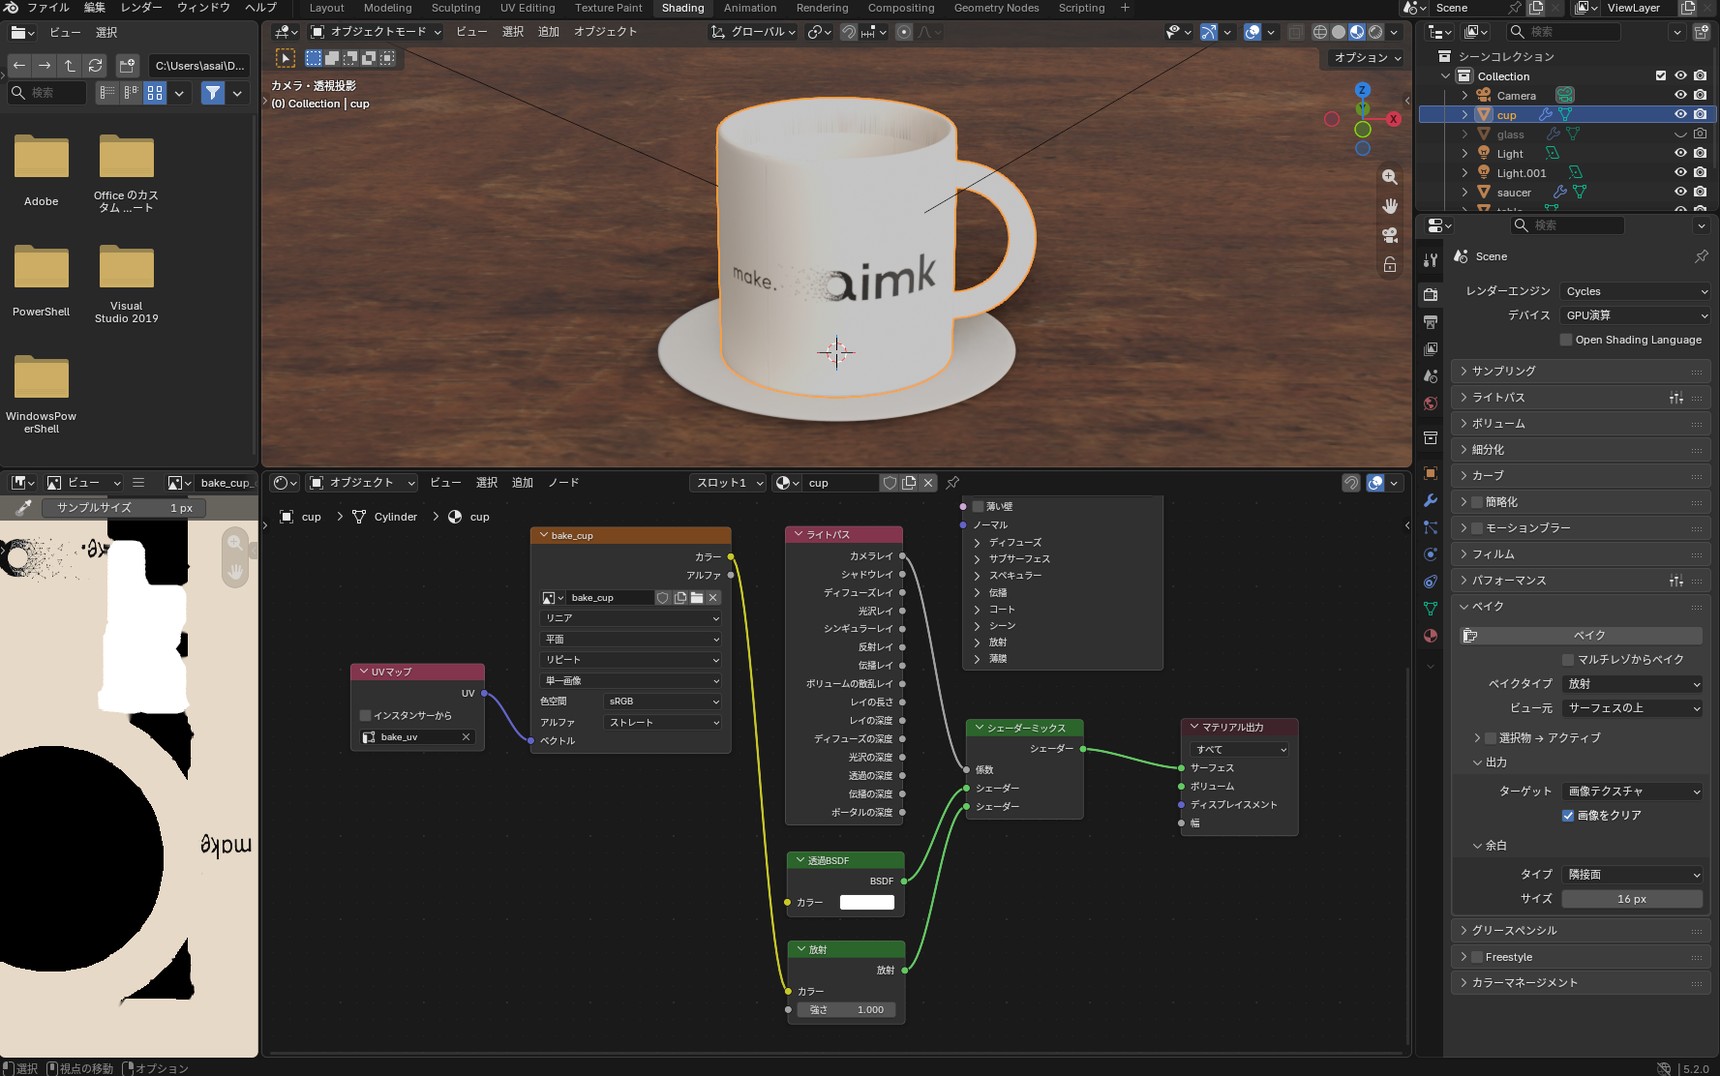
- With Shift + A, add these three: "Input" → "Light Path" / "Shader" → "Mix Shader" / "Shader" → "Transparent BSDF"
- Connect Light Path's "Is Camera Ray" to the Mix Shader's "Factor"
- Connect the Transparent BSDF to the Mix Shader's upper "Shader" input
- Connect the Emission shader using the baked image to the Mix Shader's lower "Shader" input
- Connect the Mix Shader's "Shader" output to the Material Output's "Surface"
This setup uses Emission for whatever the camera sees and Transparent BSDF for everything else. Build the handle's material the same way.
Export with "File" → "Export" → "glTF 2.0". The default settings are fine.
Checklist for when it isn't working
If baking isn't working, go through these five from the top.
- Baking doesn't change the imageCheck that the Image Texture node is selected (it has a white outline). If it isn't, "No active and selected image texture node found" appears at the bottom of the screen
- Part of the model doesn't bakeCheck that the material has an Image Texture for baking
- The baked image doesn't display correctly once appliedCheck that the UV Map node is set to
bake_uv, the same map you baked with - The cup turns solid pinkCheck that you haven't moved the saved image file to another folder or renamed it
- The baked image looks grainyCheck that "Denoise" is checked under "Sampling" → "Render" in Render Properties
If the image comes out black, see "When the baked image comes out black"
Wrapping up
We baked the lighting and shading on the cup into an image and checked that the brightness stays with the lights turned off. Along the way we also covered baking the color only, why a baked image comes out black and how to fix it, and how to build the material for glTF export.
If that feels like a lot to hold on to, these five points are enough for a successful bake.
- Add a UV map for baking and lay its islands out inside the square without overlapping
- Leave the Image Texture you bake into unconnected, and keep it selected
- If the model uses more than one material, like the cup body and handle, give each one an Image Texture with the same image
- Save the baked image right away
- When you apply the baked image, set the UV Map node to the UV map you baked with
That completes our tour of Blender basics. We built a coffee cup, set up its materials, added a logo, then lit and rendered it. Last of all, we baked the lighting and shading into an image so the look carries over to the web and game engines. All the articles are collected in "Blender Basics".
FAQ
Q. What is baking, and how is it different from rendering?
A. Rendering produces a single image of what the camera sees. Baking writes the lighting and shading, or just the surface color, into a texture (an image). Apply the baked image to the model and export it as a material that ignores lighting (Unlit), and the baked shading shows up as it is on the web or in a game engine.
Q. Can I export lights to glTF?
A. Turn on "Punctual Lights" in the export settings and Point, Spot, and Sun lights are exported. Area lights can't be exported.
Q. Can I bake in EEVEE?
A. No. With the render engine set to EEVEE, the "Bake" panel disappears from Render Properties. Switch to Cycles before baking.
Q. My baked image disappeared.
A. Right after baking, the image only exists inside Blender. Save it from the Image Editor with "☰" > "Image" > "Save As". If you try to close Blender without saving, the confirmation dialog shows "Save 1 modified image(s)". Uncheck it and close, and the baked image is gone.
Q. If I set Metallic to 0, does the black bake go away?
A. Setting "Metallic" to 0 fixes the black bake, but the surface no longer looks like metal. To bake the color and keep the metal look, connect the base color to an Emission shader and bake with "Bake Type" set to "Emit".
Q. What happens if UVs overlap?
A. You won't get an error, but where islands overlap, only the color of the face baked last is kept. Apply that image to the model and every face that overlapped shows that same color. Check that no islands overlap before you bake.
Q. If I move a light, does the shading in the baked image change?
A. No. The shading is baked into the image, so moving a light afterwards doesn't change it. If you change a light's position or strength, bake again.
Q. Colors look different in Blender and after export.
A. Blender's "View" setting under Color Management defaults to "AgX", which displays the image a little darker than it appears after export. On the coffee cup in this article, white areas measured about 195 in Blender and about 254 in a web viewer (pixel values on a 0-255 scale). Setting "View" to "Standard" narrows that kind of difference.
Columns
Viewing the exported glTF in a web viewer
You can check an exported glTF in a viewer that runs in the browser. For this article we used glTF Viewer, which is built with Three.js. Drag and drop the exported file onto it and the 3D model appears.
If you chose "glTF Separate" for "Format" when exporting, drag and drop the .gltf, the .bin, and the image files together.
The coffee cup in this article looks brighter in the viewer than in Blender. That's because Blender's "View" under Color Management is set to "AgX". Switch it to "Standard" and Blender's display comes closer to what the viewer shows.
An image baked with bake_uv is exported to glTF set up to use the second UV map. If you use it in a game engine, check that the second UV map is being read correctly.
Glossy surfaces look different once baked
On a glossy surface, the bright spots where light reflects move as your viewpoint changes. In a baked image, the shading stays put whichever way you look. So with glossy materials, baking can't fully reproduce the original look.
This cup isn't very glossy, so the difference was small. The glossier the material, the more noticeable it becomes.
"Combined" includes Glossy too
Under "Influence" for "Combined", "Contributions" has four options, "Diffuse", "Glossy", "Transmission", and "Emit", and all of them are checked by default. "Glossy" is the brightness that comes from light reflecting off the surface.
Uncheck "Glossy" and bake, and that reflected brightness is left out. On this cup, the black parts of the logo got darker, dropping from 83 to 26 in pixel value (on a 0-255 scale). Even the black areas had been brightened by reflected light.
There are 12 bake types
"Bake Type" offers these 12 options.
Combined / Ambient Occlusion / Shadow / Position / Normal / UV / Roughness / Emit / Environment / Diffuse / Glossy / Transmission
This article used three of them: "Combined", "Diffuse", and "Emit". To carry the look of a material over to the web or a game engine, bake more than the color, such as "Roughness" and "Normal".
"Selected to Active" is a setting used for things like baking the fine surface detail of a high-detail model onto a lower-poly one. This article doesn't cover it.