
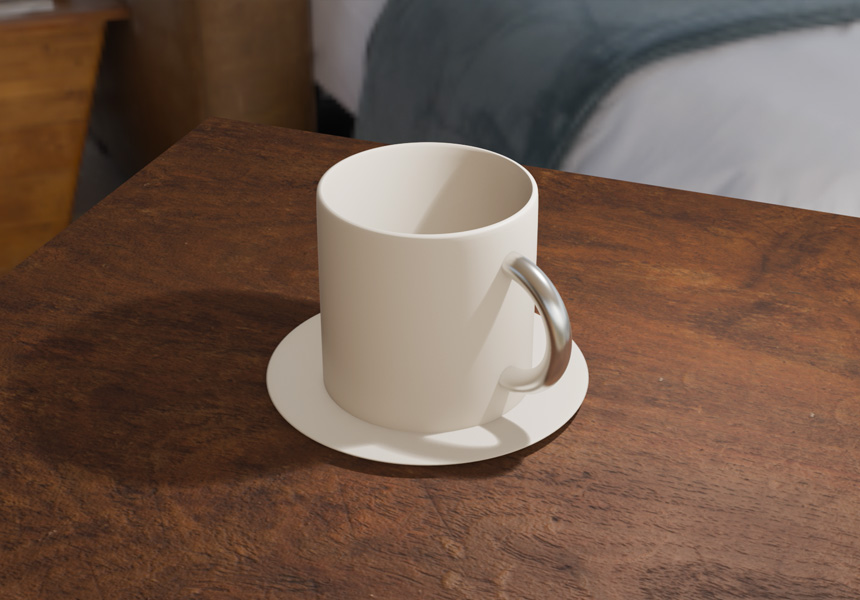
In the previous article, Blender Material Nodes Explained: Building a Glass Material in EEVEE, we built a glass material out of nodes. This time we'll put a wooden table under that coffee cup, using textures — images that carry the detail of a surface.
A photo of wood grain, on its own, won't read as a wooden board. We'll start from that single image, look at what's missing, and layer several images together until the surface looks like wood.
* This article was verified with Blender 5.2 LTS. The render engine is EEVEE, the default.
What a texture actually is
Blender lets you set a surface with numbers alone: pick a color in Base Color, adjust the shine with Roughness. Try to build a wooden table that way and you get the color of wood, but no grain.
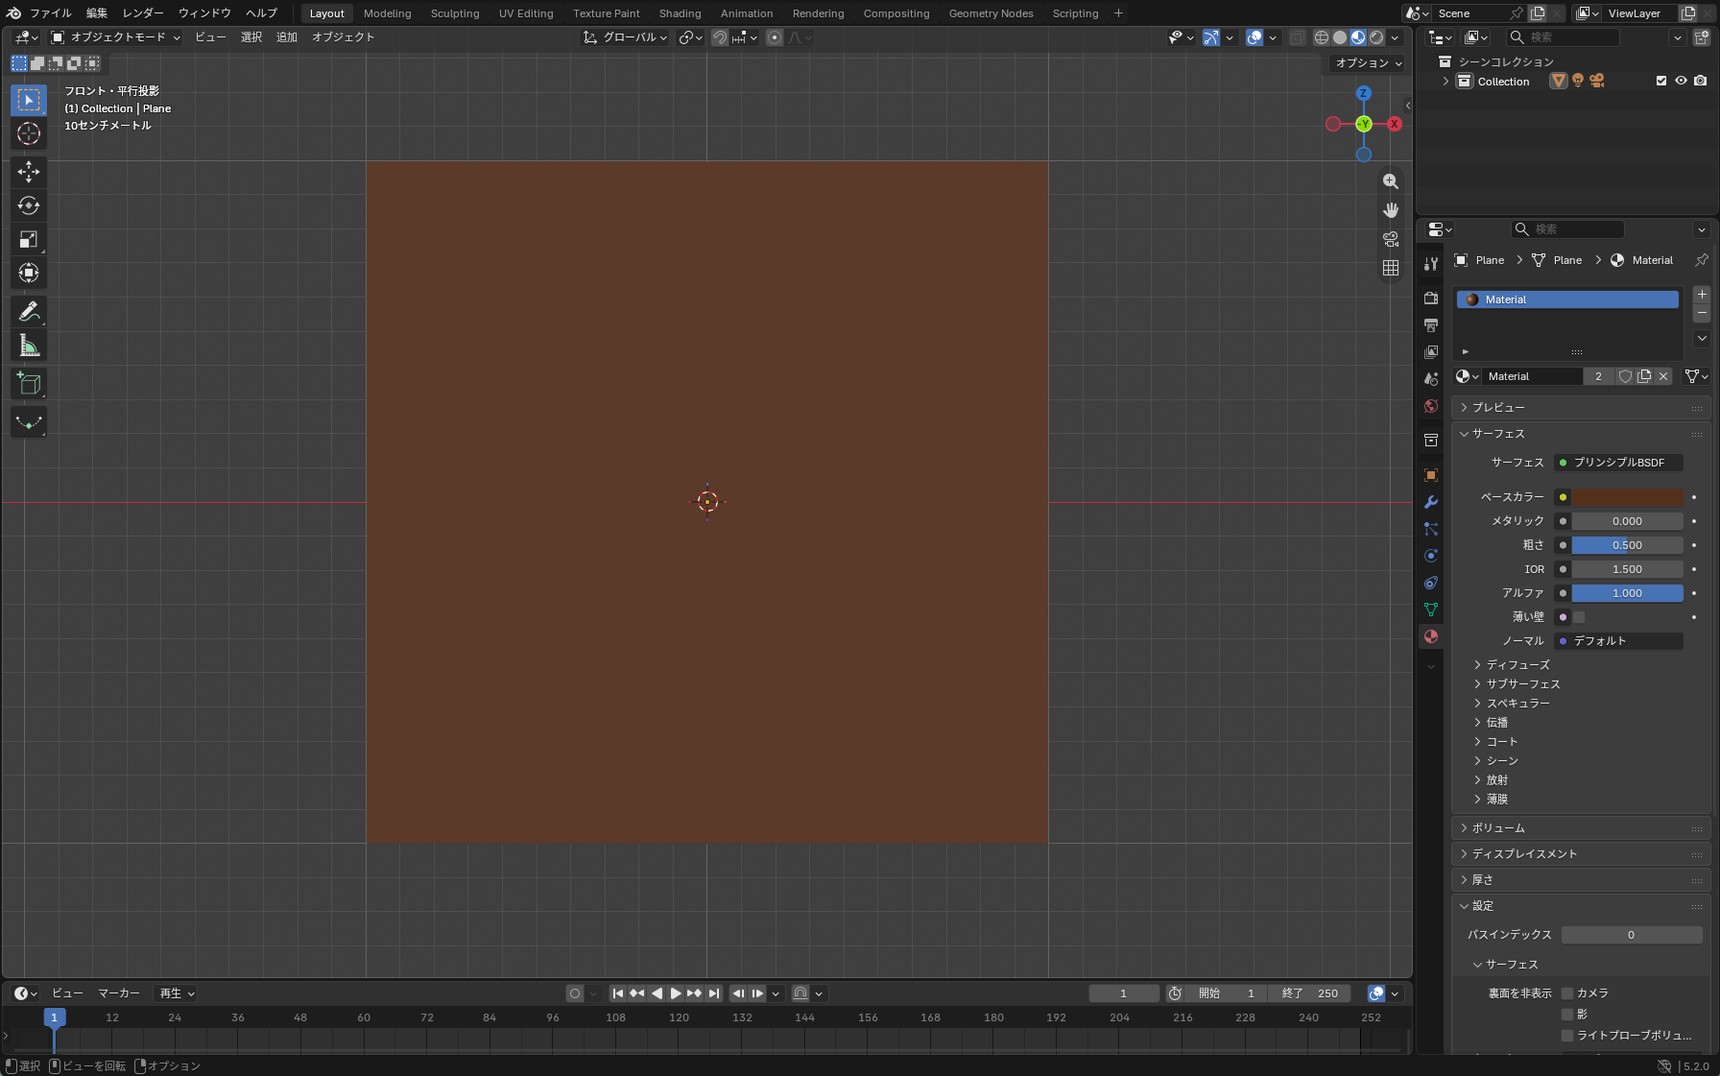
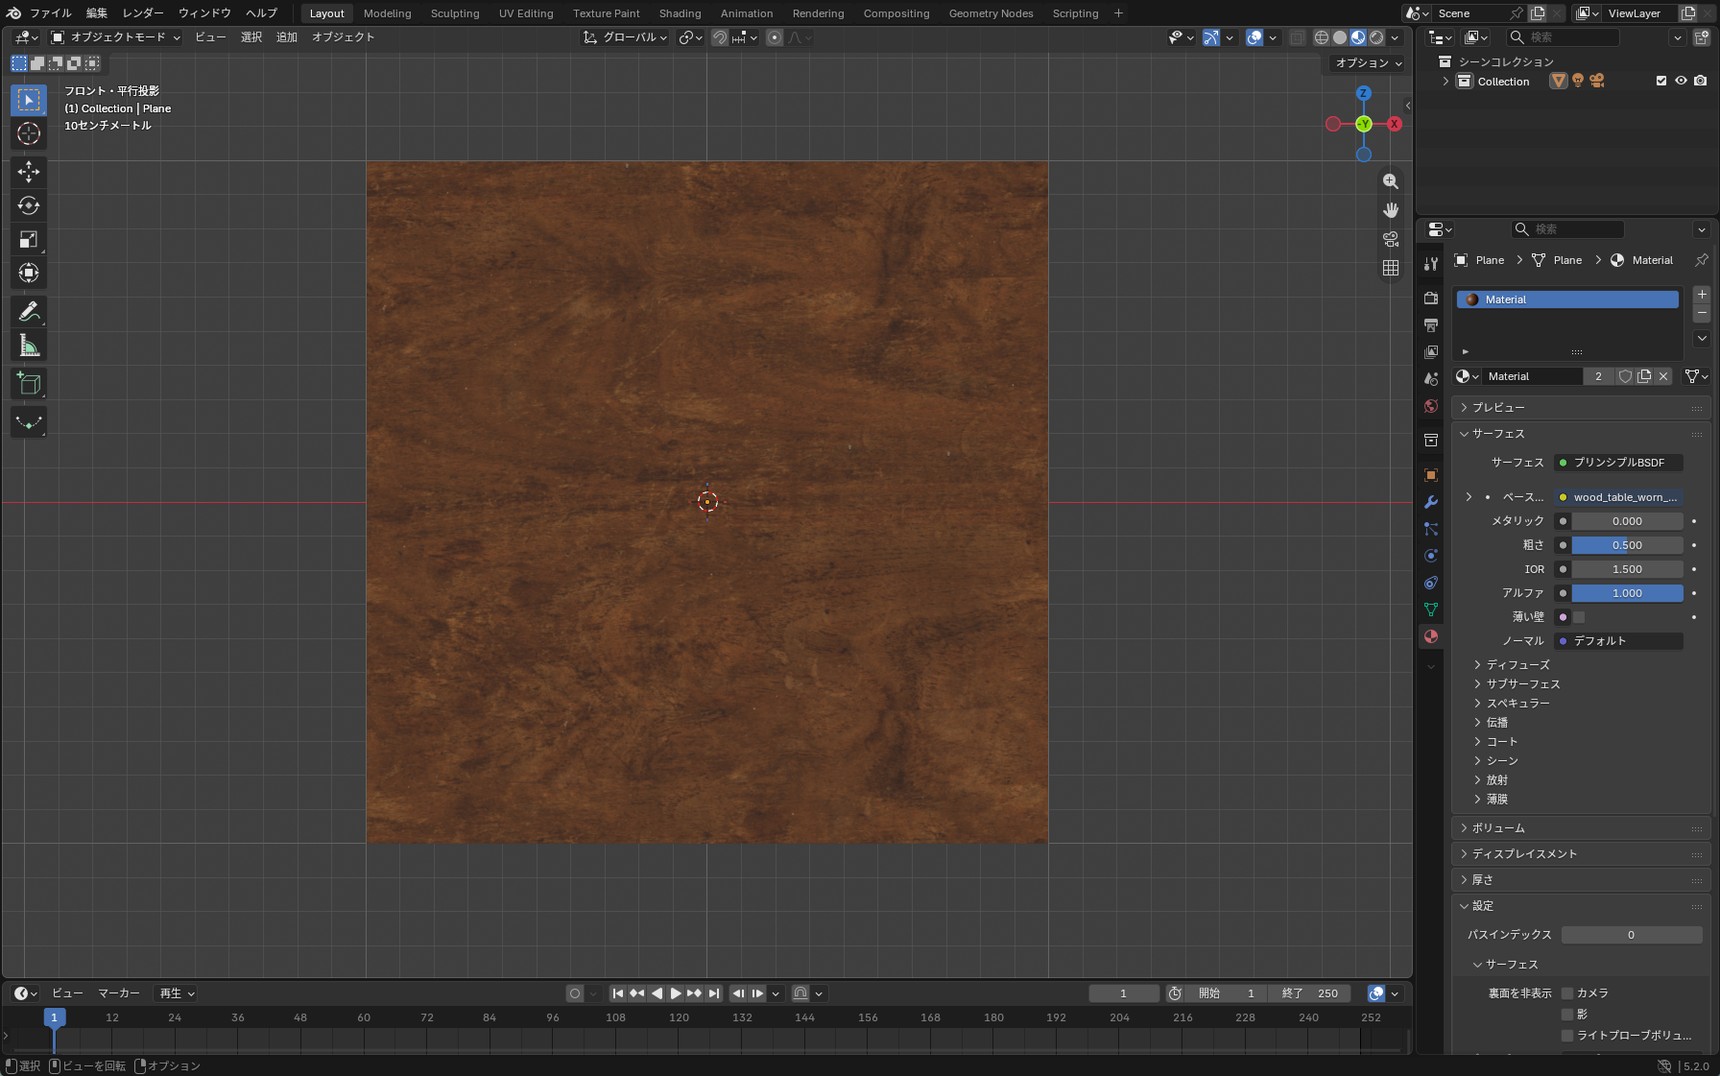
Set color and shine with numbers and the entire surface ends up looking identical everywhere. The surface of real wood isn't uniform: the color is deeper in some places, it catches the light differently in others. No single number can describe that.
Making the wooden table read as real
Whether the wooden table we're about to build reads as real comes down to three things: how light hits it, its shape, and the surface. We set up the light in the previous article, with an HDRI environment image. The shape is fine as it is, since the tabletop is a flat board.
That leaves the surface. Textures are what you use to create it — wood grain, fabric, and the like, applied as images.
Downloading the texture images
First you need the images. We'll get them from Poly Haven, the same site we used for the environment image last time.
Poly Haven releases its assets under CC0, a license that requires no credit and permits commercial use.
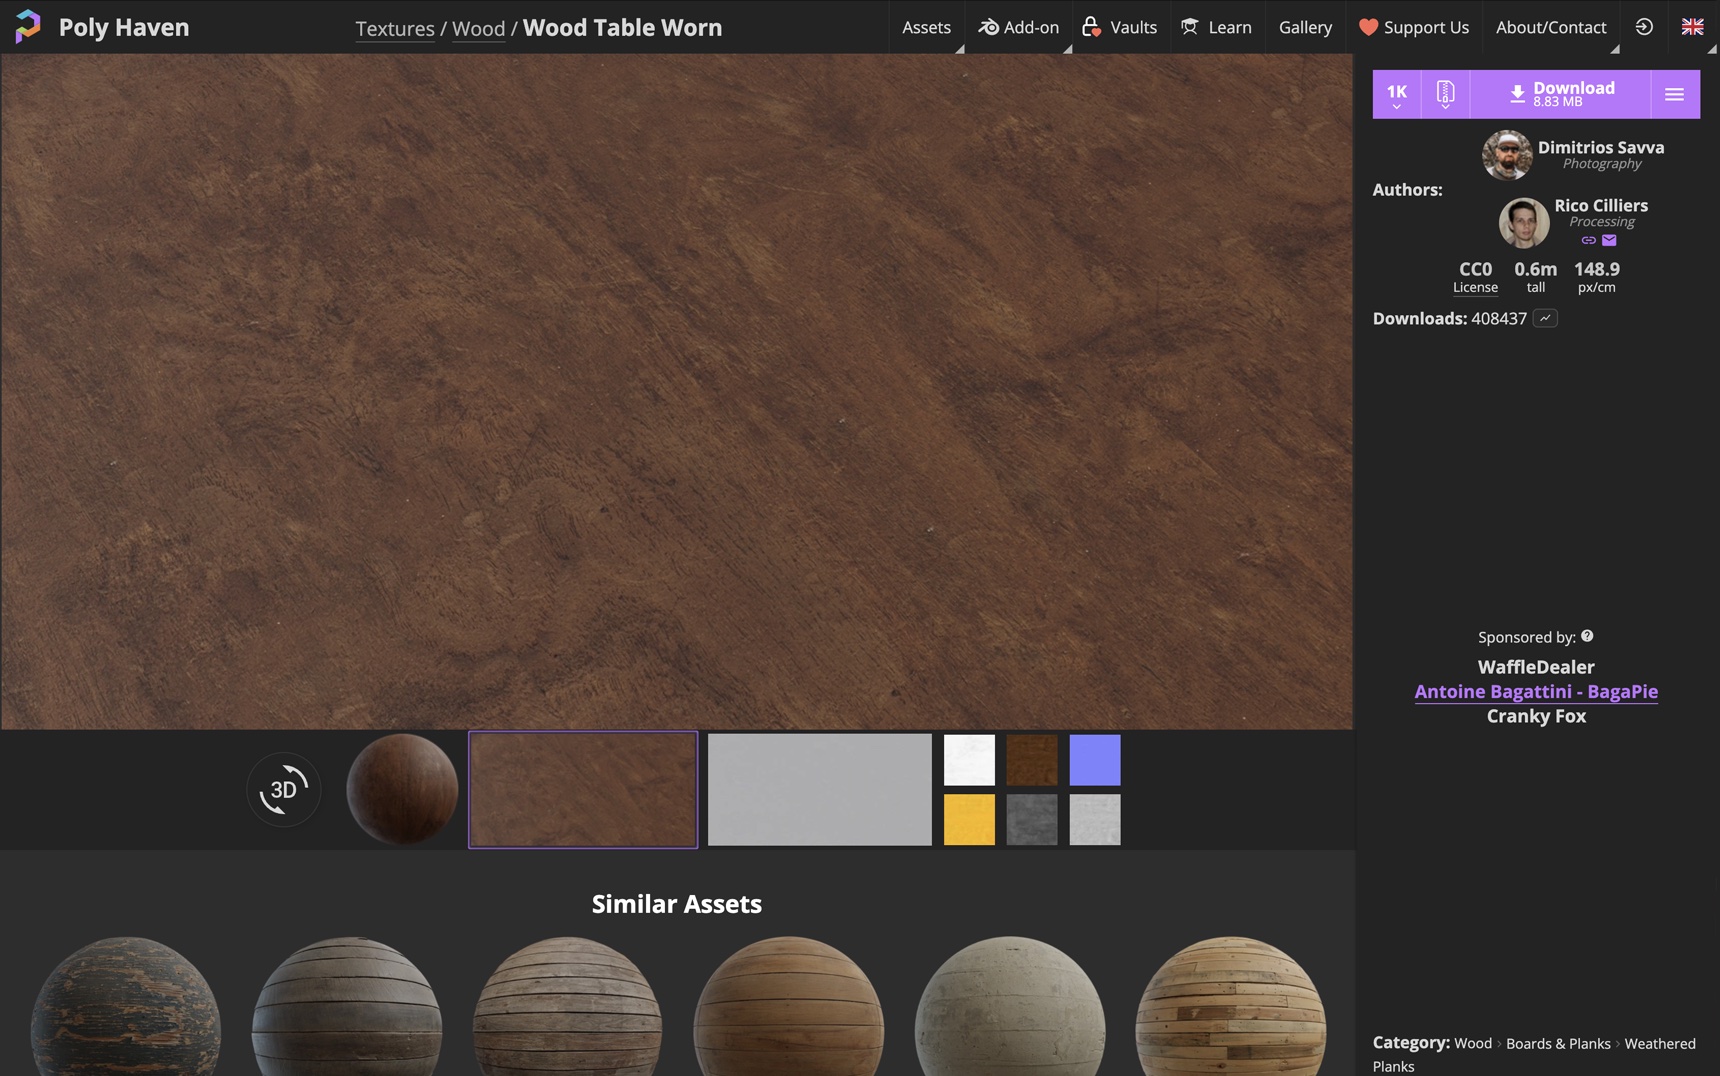
There are plenty of other texture sites, but free doesn't always mean unrestricted. Some assets are personal use only; others require a credit. Check the license, and if it says CC0, you can use it without worrying about what for.
Finding a wood texture
Search for wood table and you'll get a row of wooden table textures. This article uses "Wood Table Worn," but pick whichever you like.
Choosing what to download
Poly Haven lets you decide what goes in the download before you start it. Click the icon in the middle of the download button to open the file format menu, then choose "ZIP" to bring up a list headed
Choose ZIP contents:.
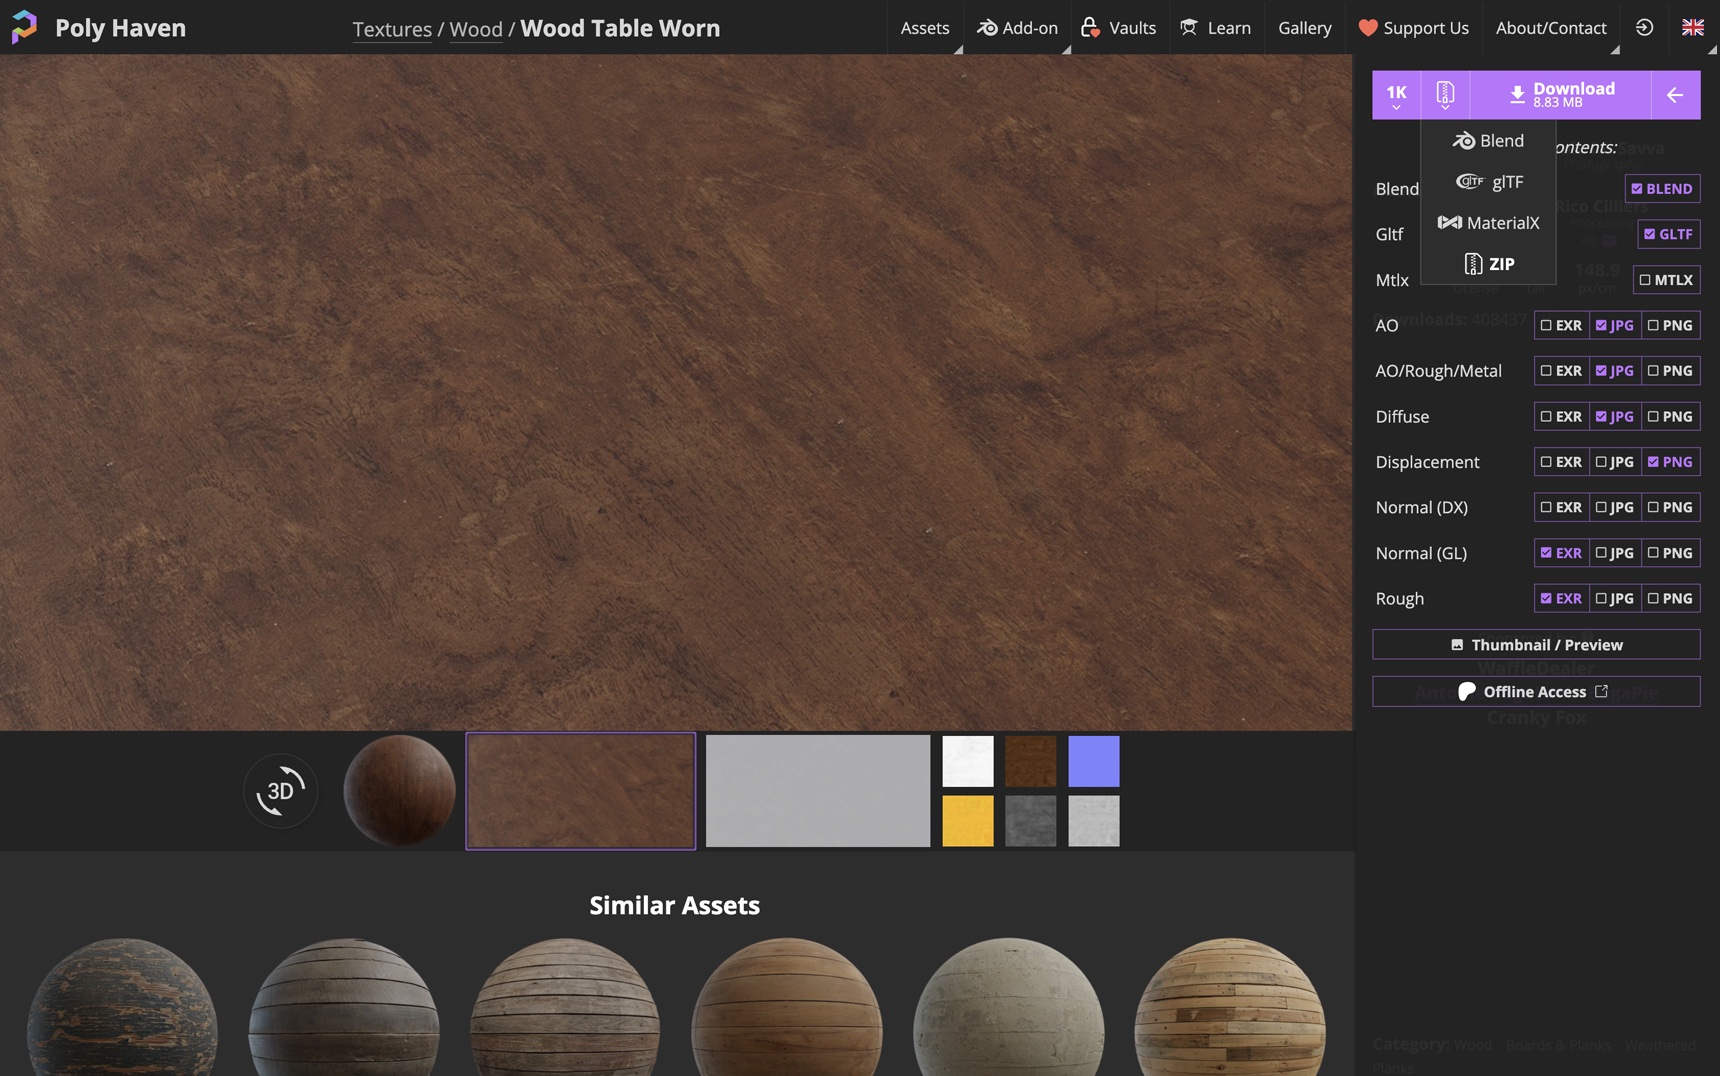
By default this includes a .blend file and images we won't be using. Narrow it down to these three.
| What to tick | Format | What it holds |
|---|---|---|
| Diffuse | JPG | Color |
| Normal (GL) | EXR | Surface bumps |
| Rough | EXR | How it catches light |
Set the resolution to 1K. Untick every other row, Blend and Gltf included.
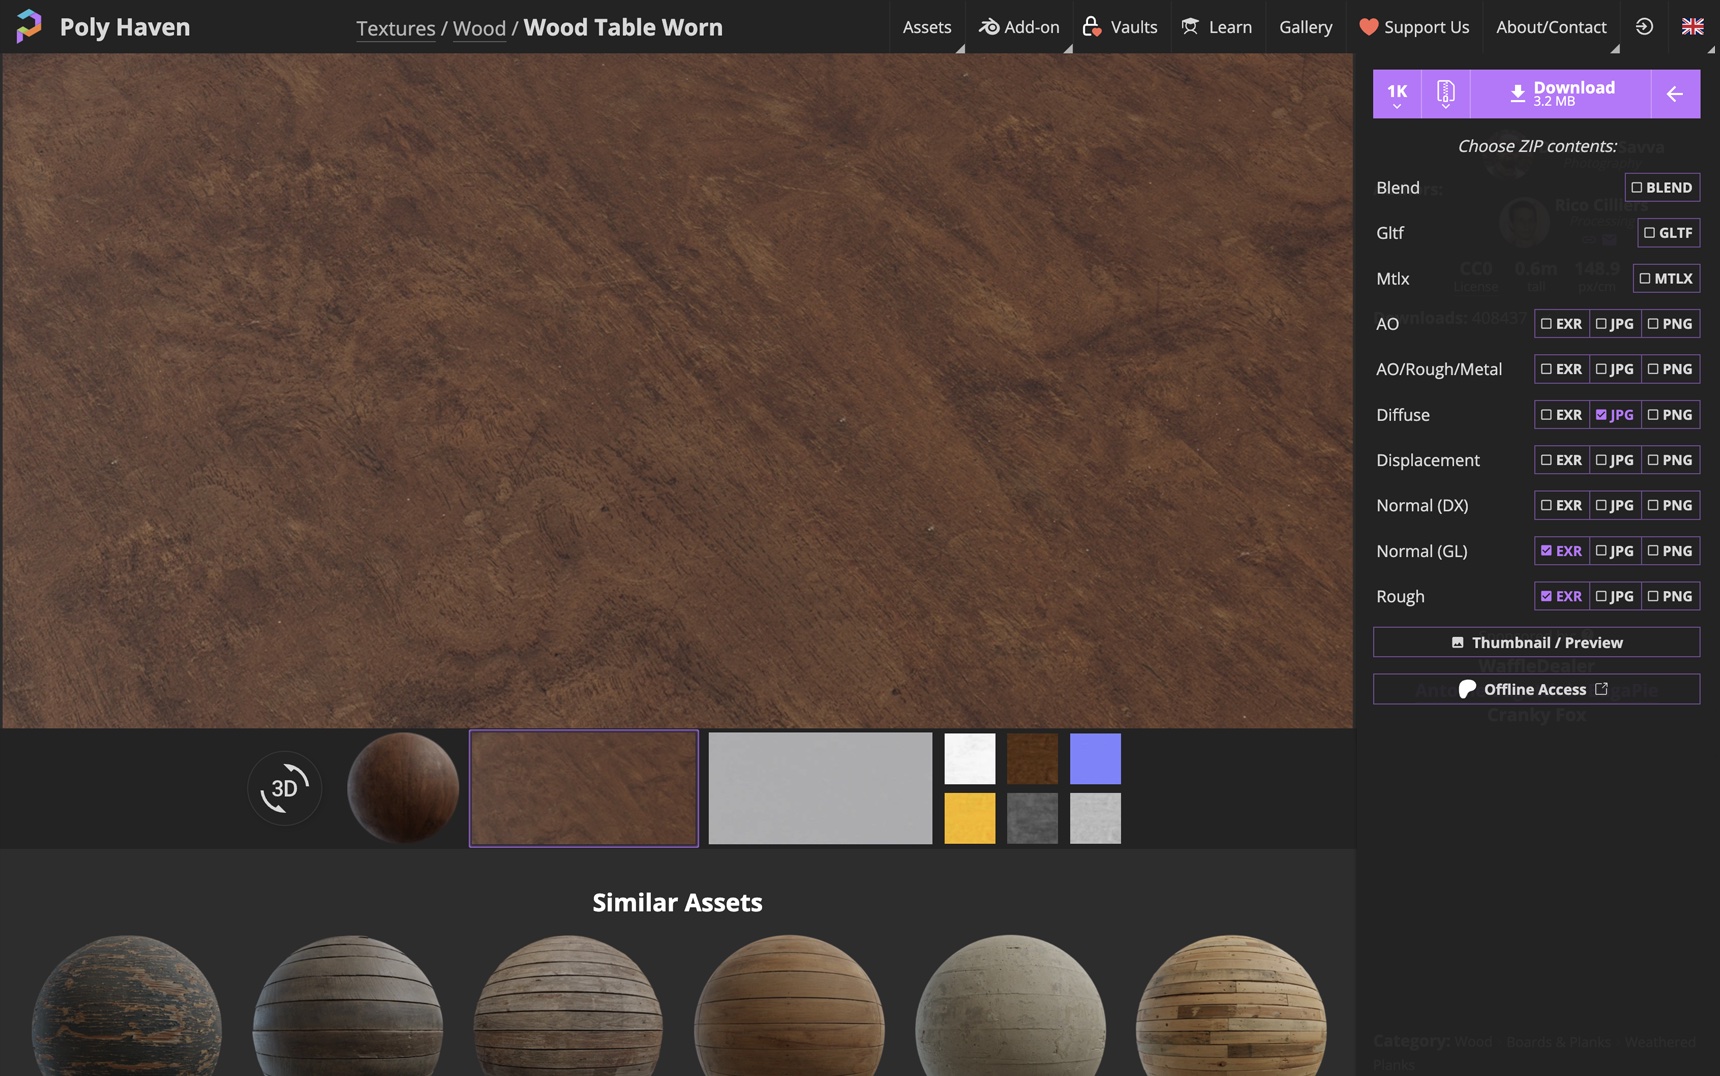
Ticking Blend gets you a .blend file with the nodes already wired up. We're connecting the nodes ourselves in this article, so you don't need it.
Unzip the download and you'll find the three images inside a folder named textures.
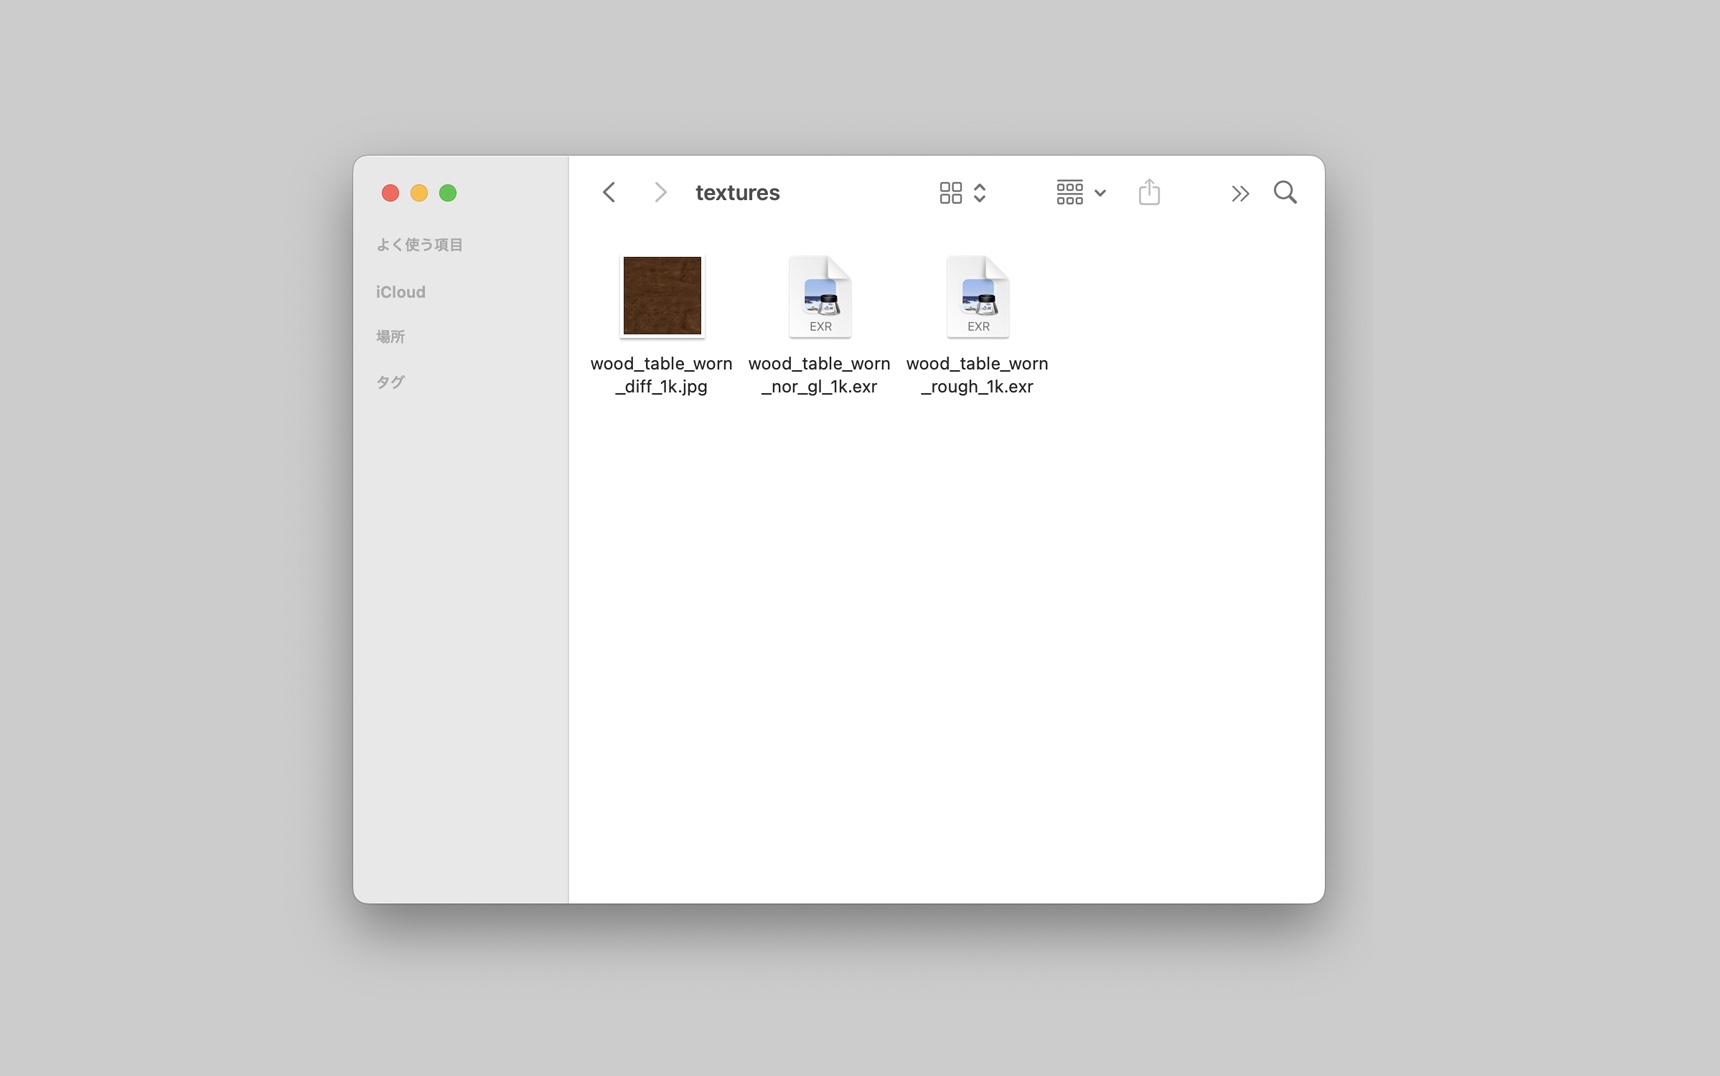
In the filenames, diff is the color, nor_gl is the bumps, and rough is how it catches light. diff is short for diffuse, though the socket you'll connect it to is called
Base Color — the texture site and Blender use different names for the same thing.
nor_gl and rough come as EXR, an extension you may not have seen before. Blender reads it without any extra steps.
Building the table and applying one image
We'll start with the color image, the first of the three.
Adding a plane
Switch to the "Layout" tab at the top of the screen and add a plane with Shift + A, then "Mesh" then "Plane." If you're continuing from the previous article, add it to that file; if you're starting here, a new file with a cube or similar in it works fine.
Press S to scale it up to something table-sized — the screenshots use a scale of 5.
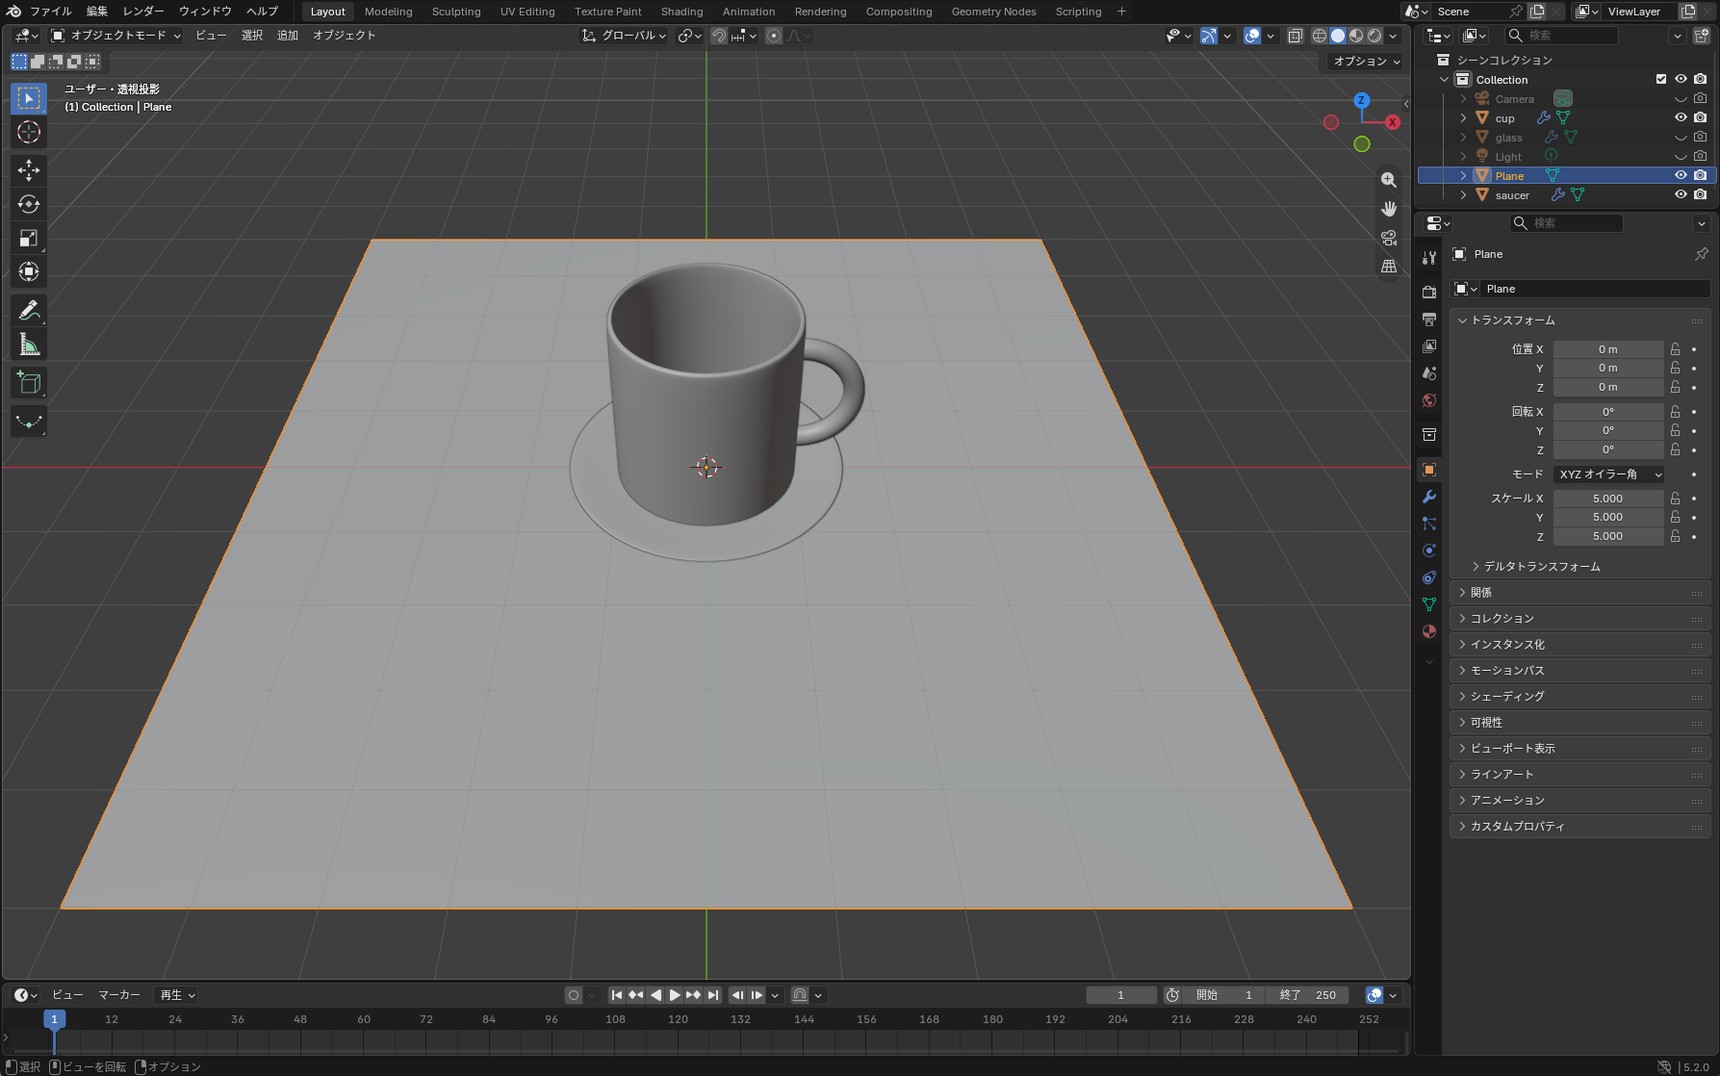
Next, press Ctrl + A and choose "All Transforms." This locks in the object's size — the same step we took in the previous article before giving the glass its thickness.
Connecting the image
Switch the tab at the top to "Shading" to open the Shader Editor we used last time.
The plane has no material yet, so click "New" to create one. Two nodes are placed automatically: the Principled BSDF and the Material Output.
Add an image texture node with Shift + A, then "Texture" then "Image Texture."
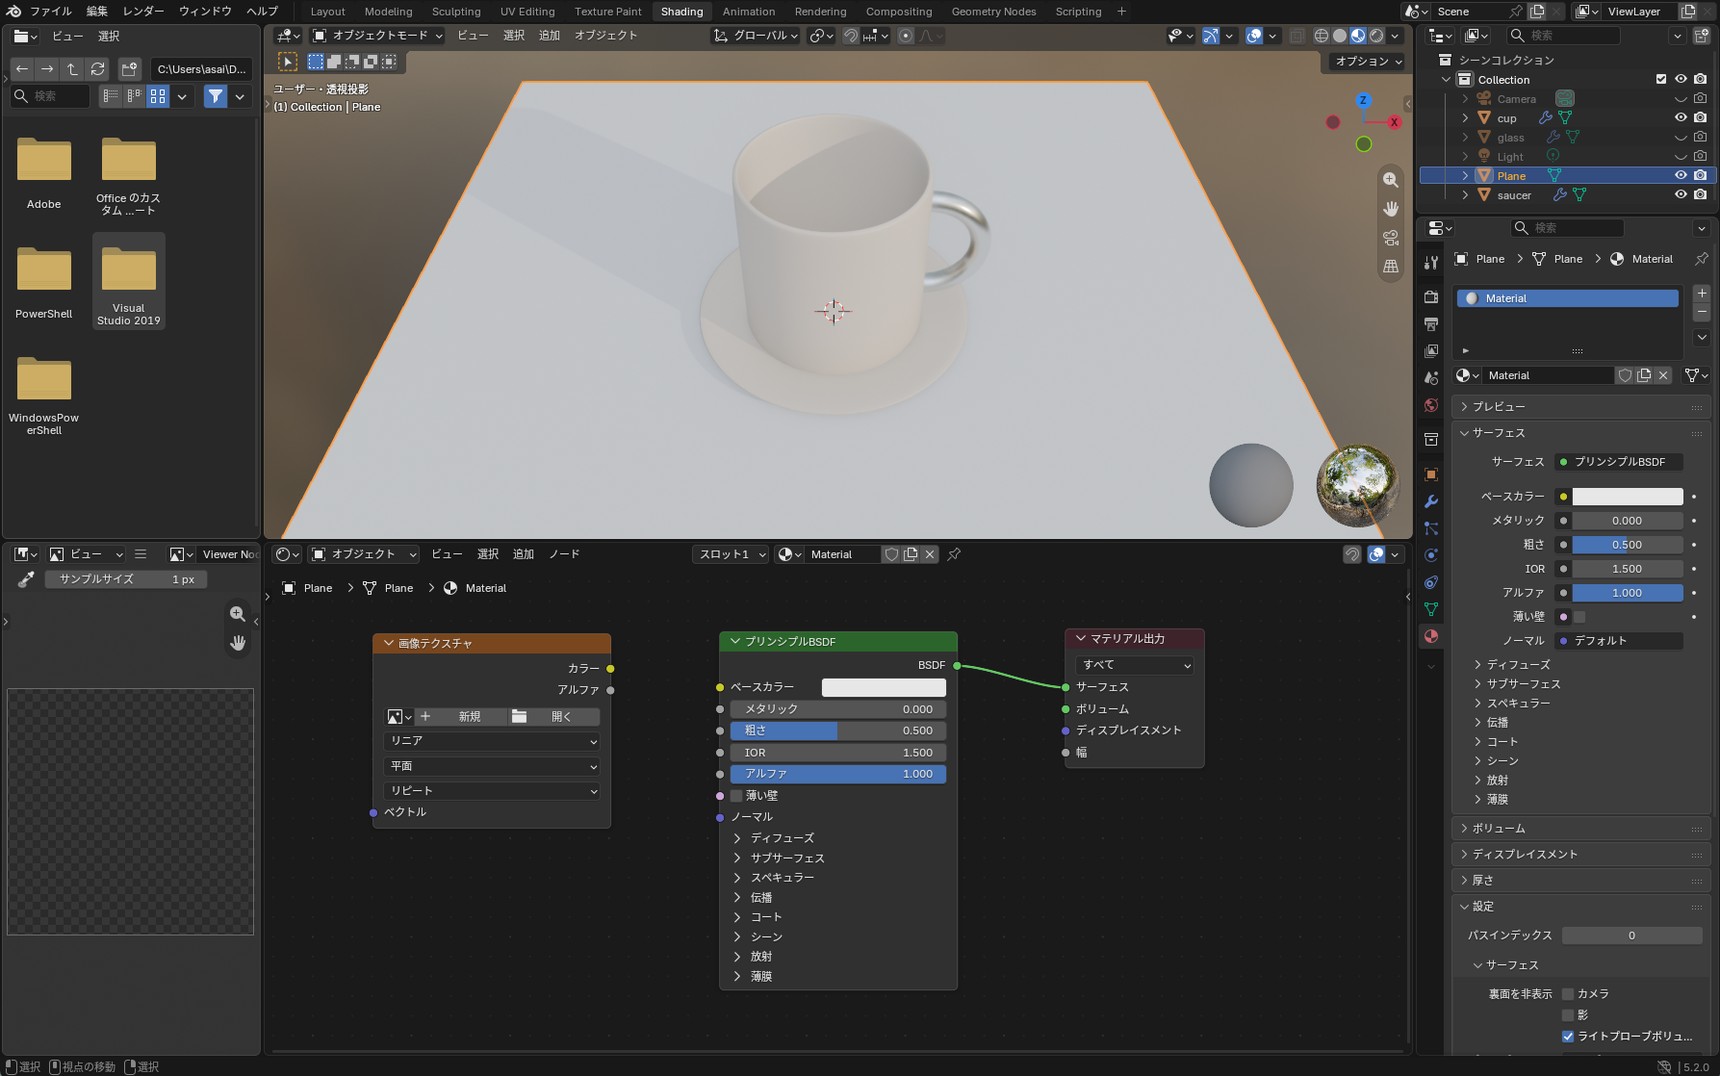
Click "Open" inside the node and load wood_table_worn_diff_1k.
Then connect "Color" on the Image Texture to "Base Color" on the Principled BSDF, the same way you connected nodes in the previous article: click a socket, drag, and drop on the socket you're connecting to.
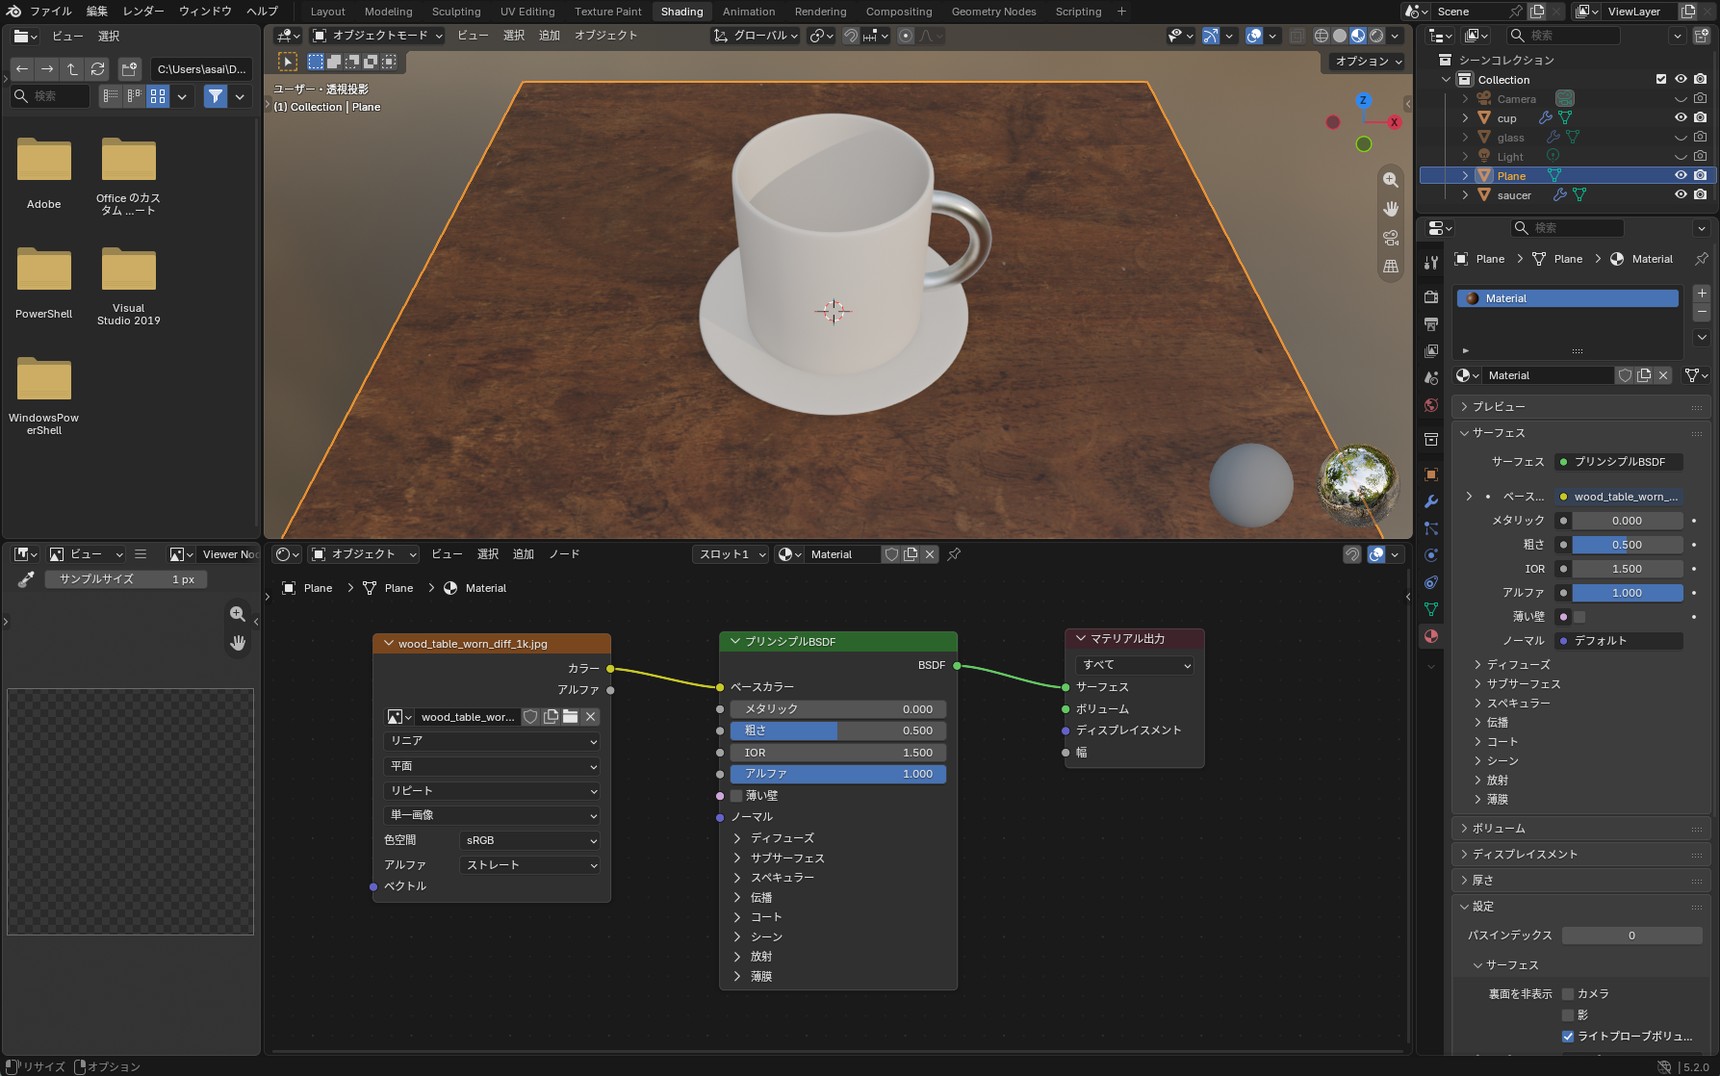
The wood grain shows up.
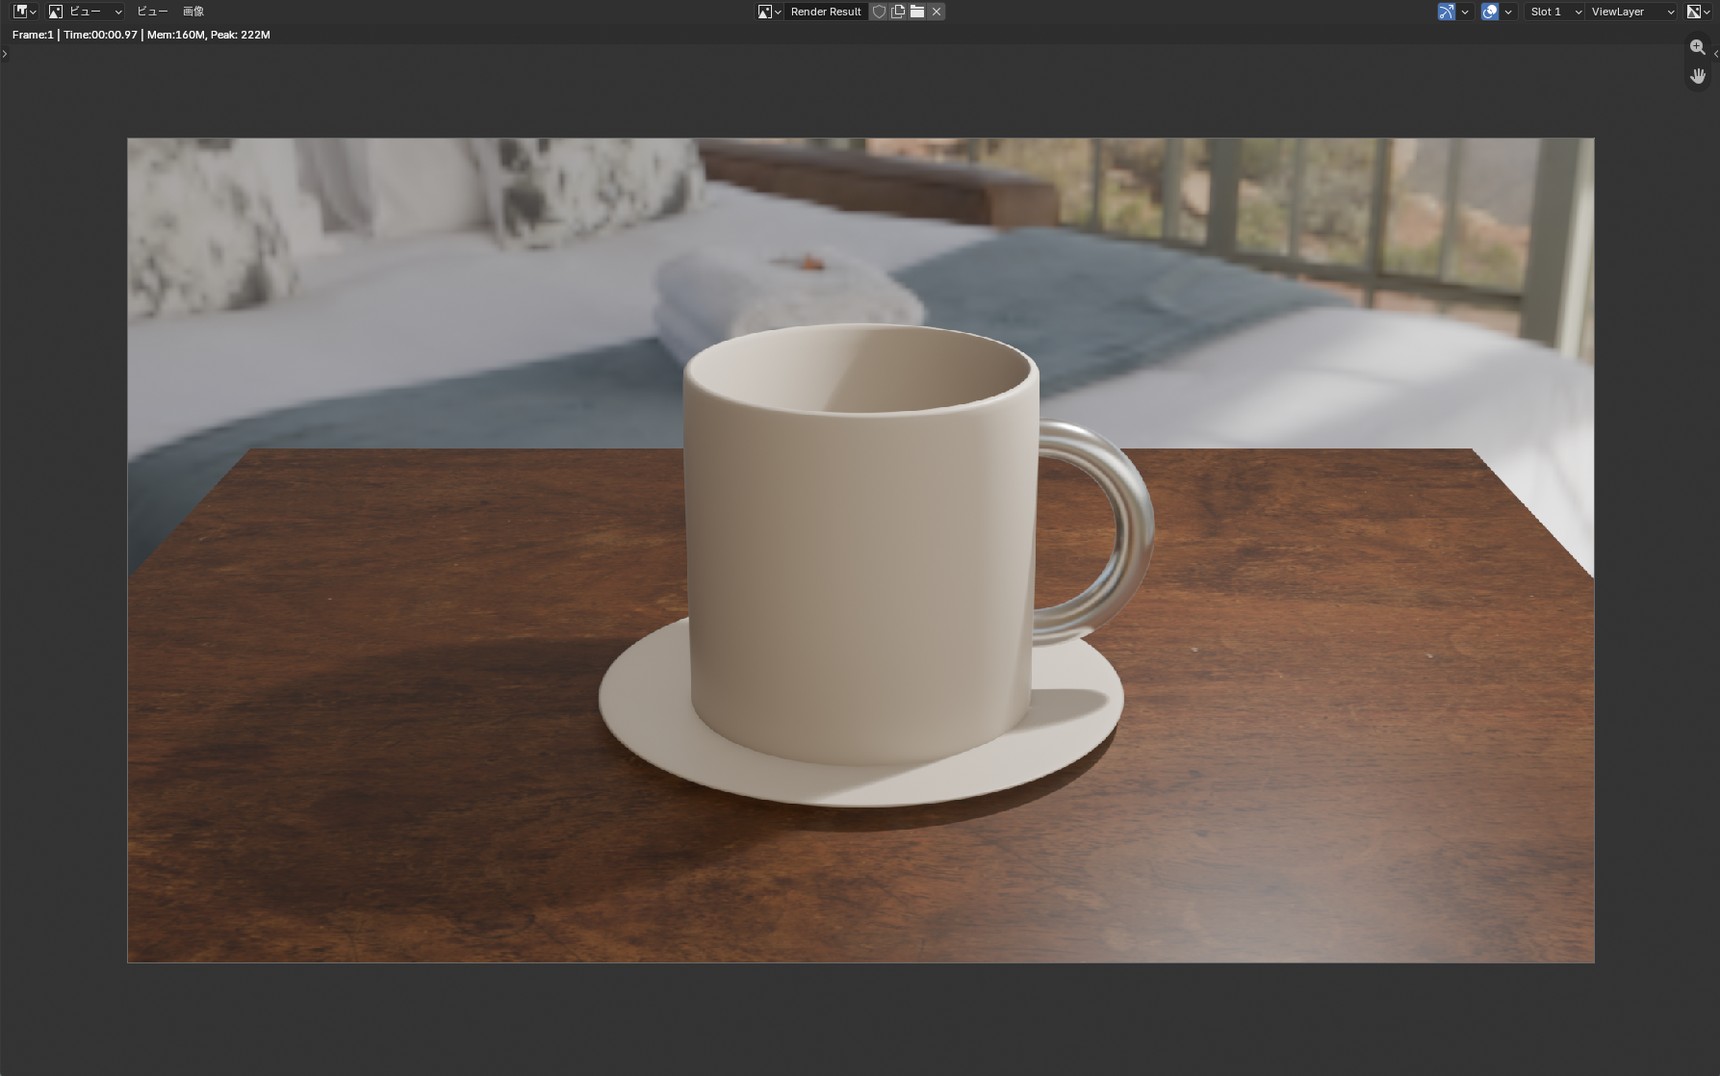
Why it lined up without you positioning it
You haven't told Blender where to put the image or how big to make it. The grain still sits neatly across the board.
That's because a plane comes with UVs already set up. UVs are the information that decides where on a surface each part of an image goes, and Blender's primitive shapes — planes, cubes, and the like — have them from the start.
It's often assumed the image won't appear unless you connect a Texture Coordinate node. On a primitive shape, it appears without one. Texture Coordinate becomes necessary when you want to adjust the scale or orientation of the pattern.
Base Color alone gets you a photo on a board
The grain is there. Move in closer, though.
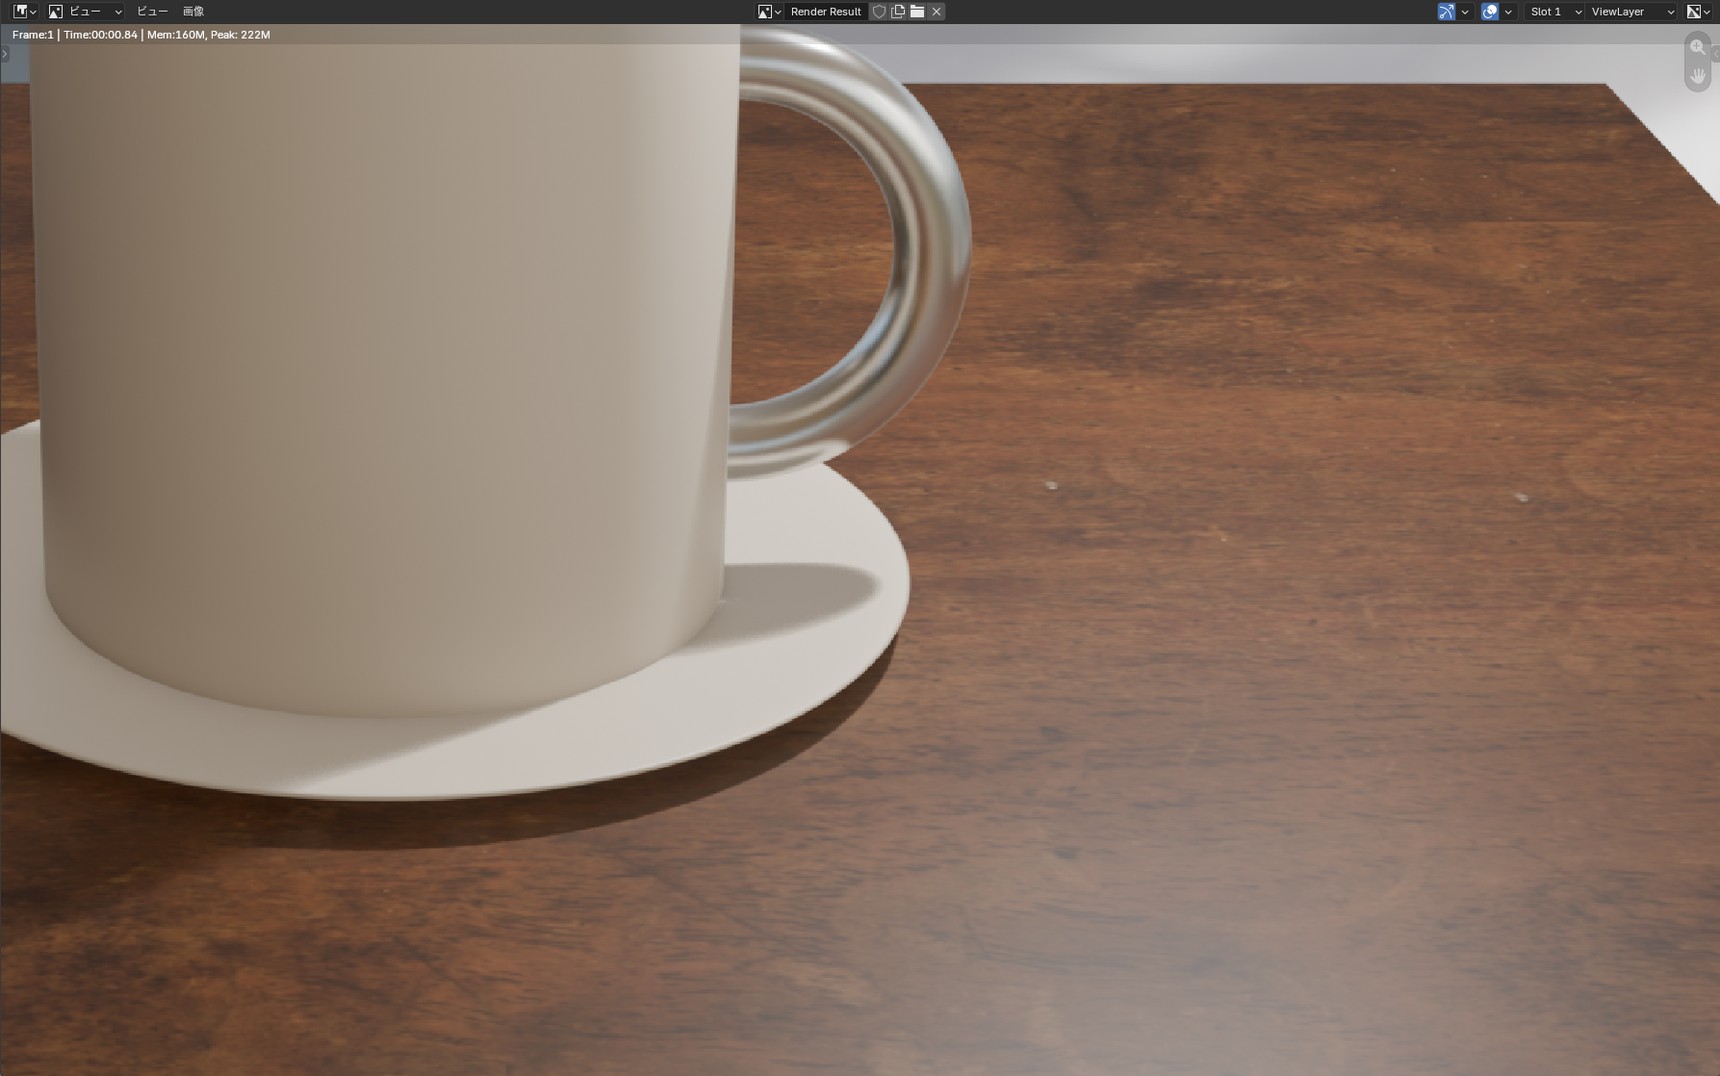
The whole surface catches the light the same way, smooth and flat. The pattern of the grain is there, but it doesn't read as wood. What you have is a photo on a board.
Two more images go on top of this.
Layering the Roughness and Normal maps
Time to connect the other two.
Images that hold color, images that hold numbers
The diff image you've already connected was meant to be looked at — it's the wood grain you see. The two images coming up are not.
roughrecords how much each spot catches the light, stored as brightnessnor_glrecords which way each spot faces, stored as three RGB numbers
They look like images, but what's inside them is numbers. So you have to tell Blender they aren't color, which is what the Color Space setting is for. Images that hold color stay on sRGB; images that hold
numbers go to Non-Color.
Leave a data image on sRGB and Blender corrects it as if it were color, changing the numbers that were recorded. The surface comes out wrong as a result.
Connecting Roughness
Add another Image Texture with Shift + A, then "Texture" then "Image Texture," and load wood_table_worn_rough_1k.
Once it's loaded, change "Color Space" inside the node to Non-Color.
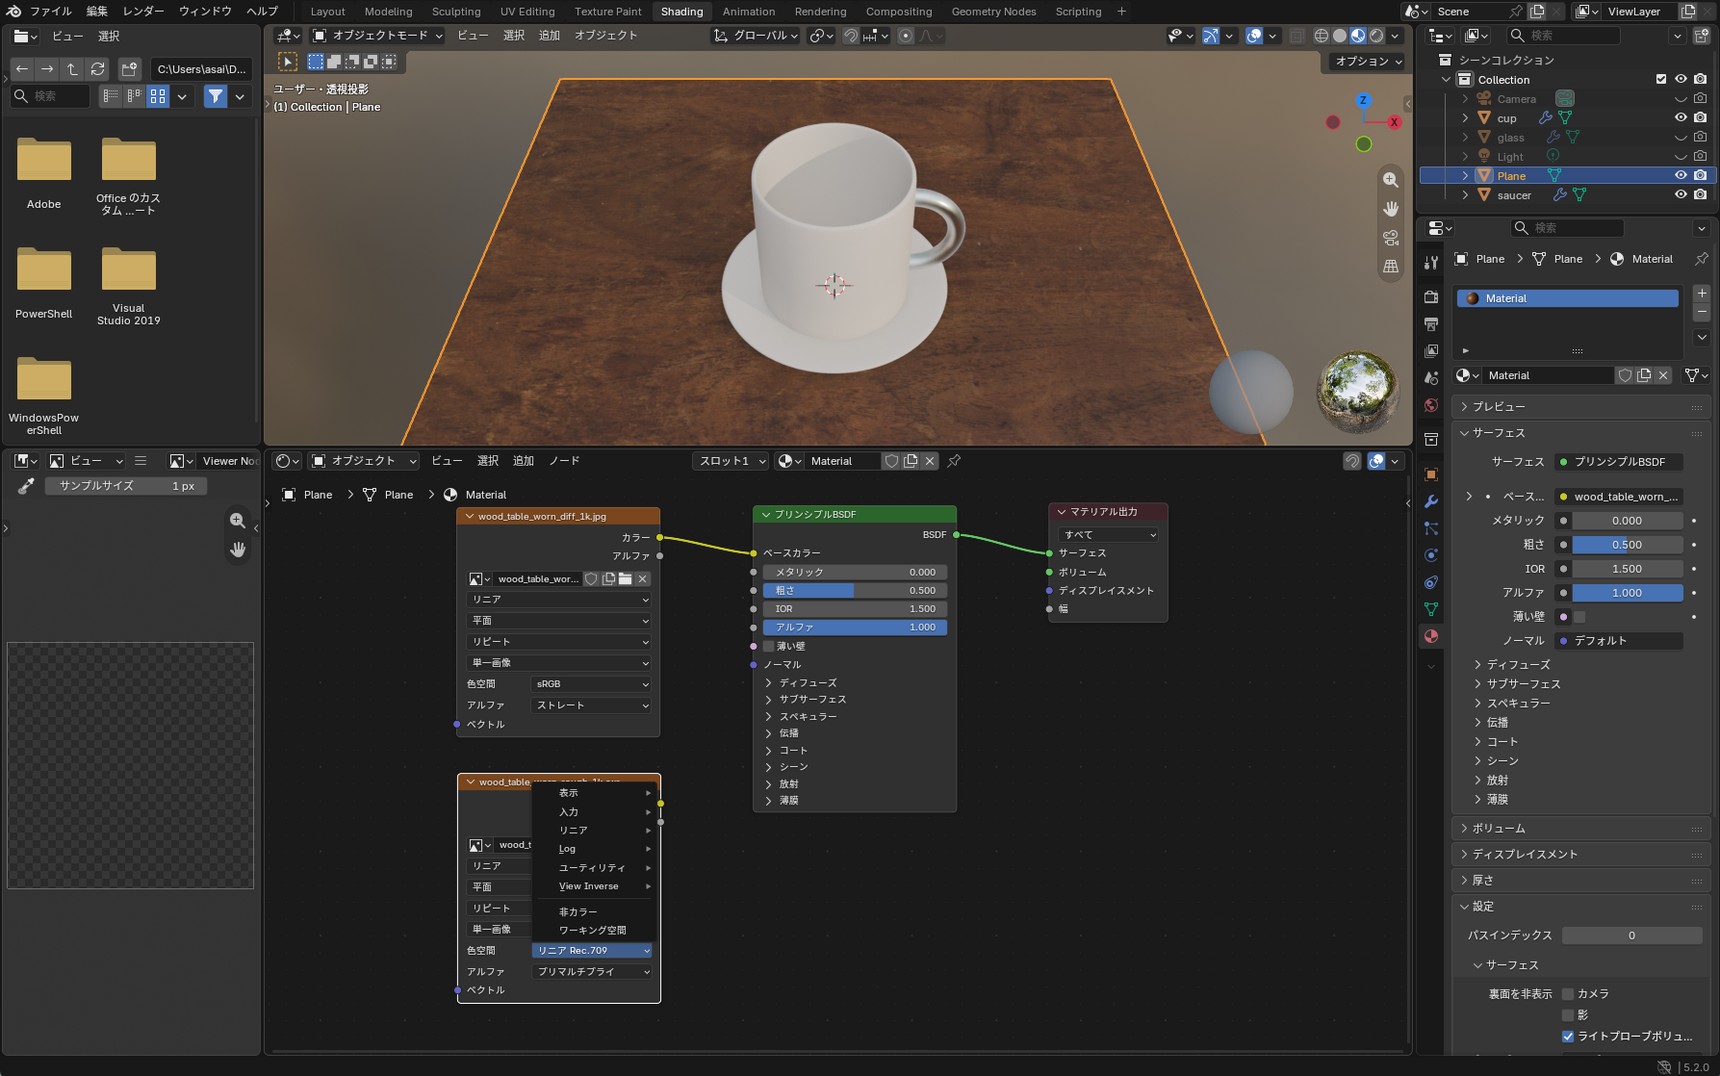
The dropdown opens with several entries marked "▶" near the top. Don't open those — Non-Color is further down the list.
With that set, connect "Color" on the Image Texture to "Roughness" on the Principled BSDF.
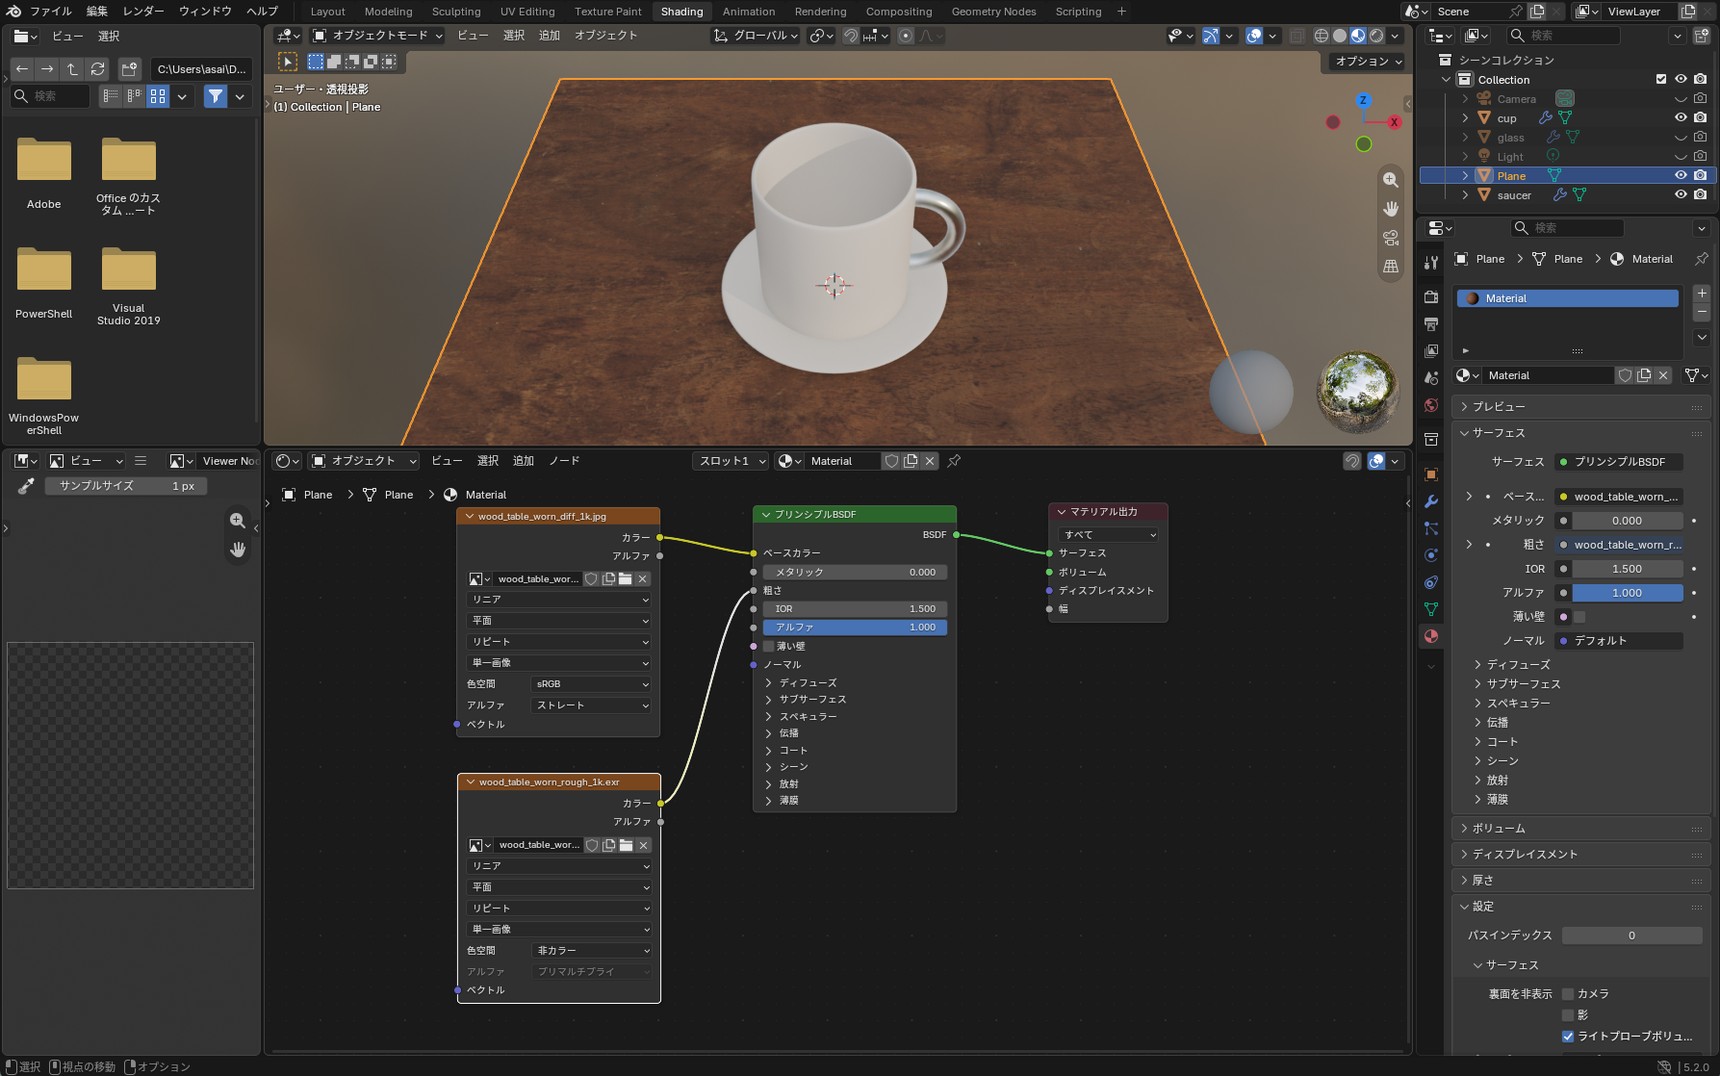
The look changes.
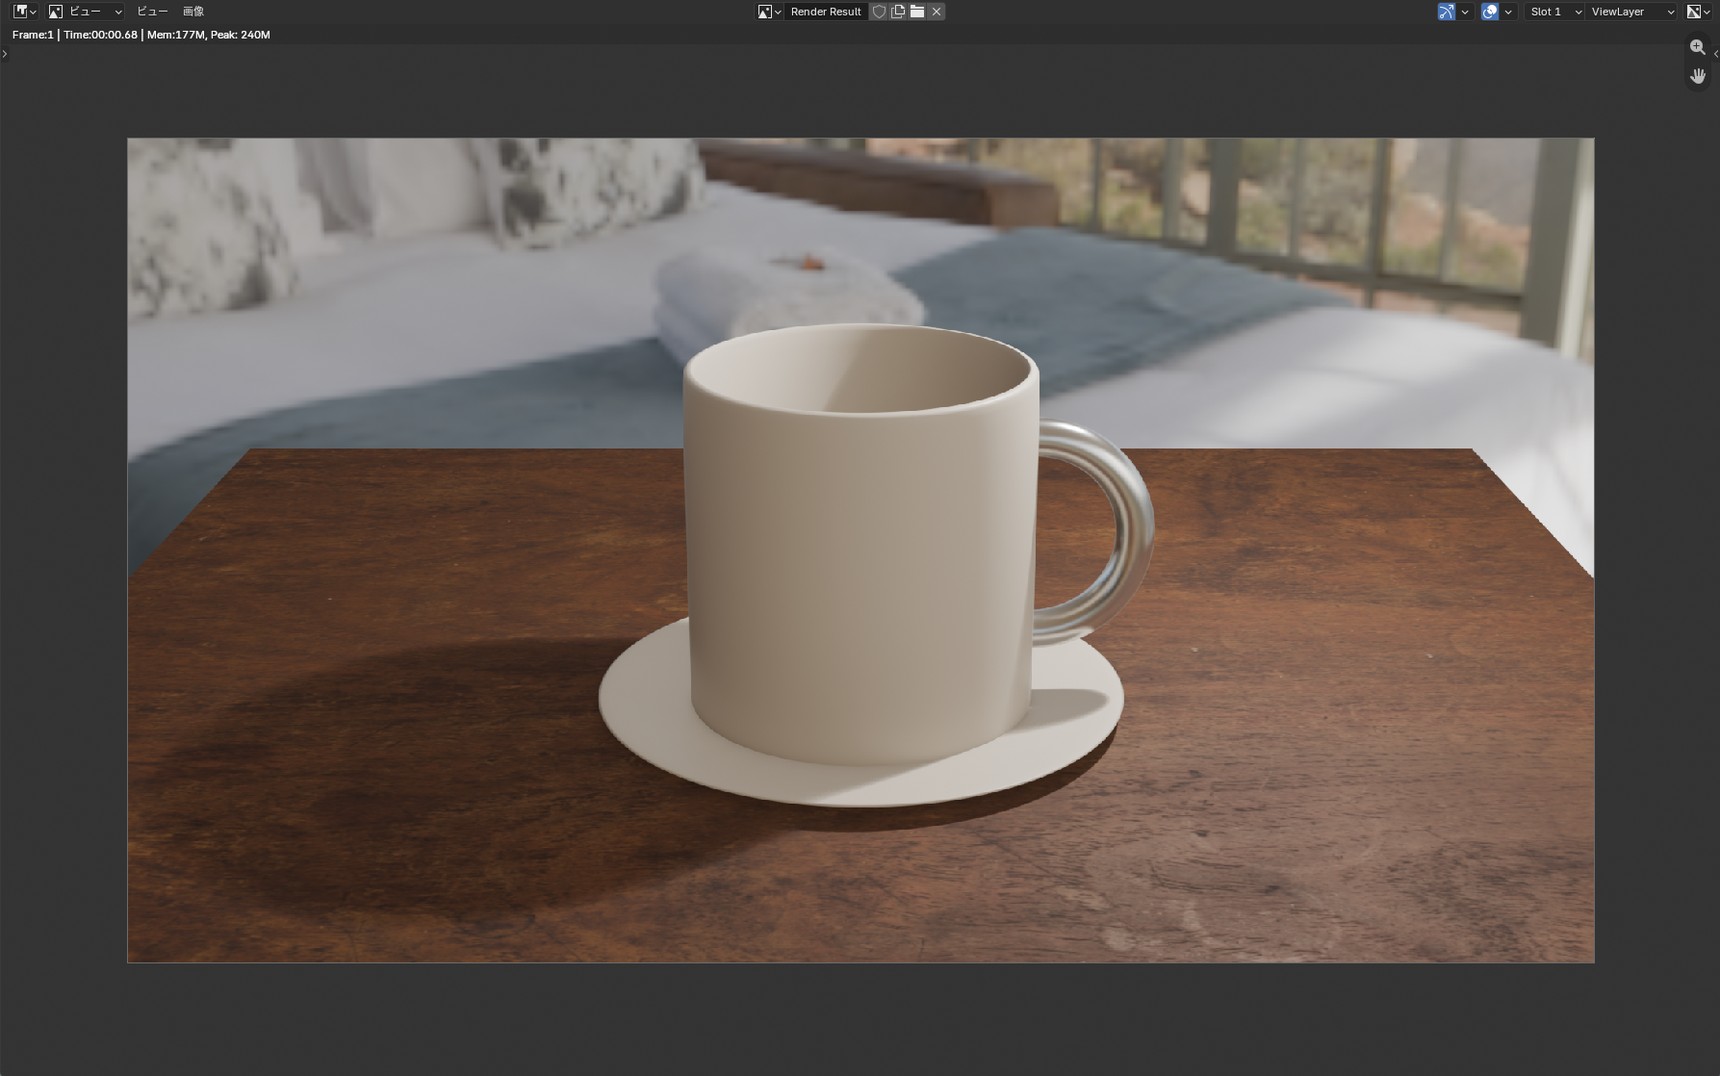
Where the surface caught the light uniformly a moment ago, it now varies. The areas where the finish survives are glossy; the areas worn back to bare wood have lost their sheen.
If Base Color decides what color something is, Roughness decides how it catches the light.
Connecting Normal
One image left. Add an Image Texture with Shift + A, then "Texture" then "Image Texture," and load wood_table_worn_nor_gl_1k. Set its Color Space to Non-Color, same as the
roughness map.
This one doesn't connect directly, though. It goes through one node on the way.
Add it with Shift + A, then "Displacement" then "Normal Map," and connect things in this order.
- "Color" on the Image Texture → "Color" on the Normal Map
- "Normal" on the Normal Map → "Normal" on the Principled BSDF
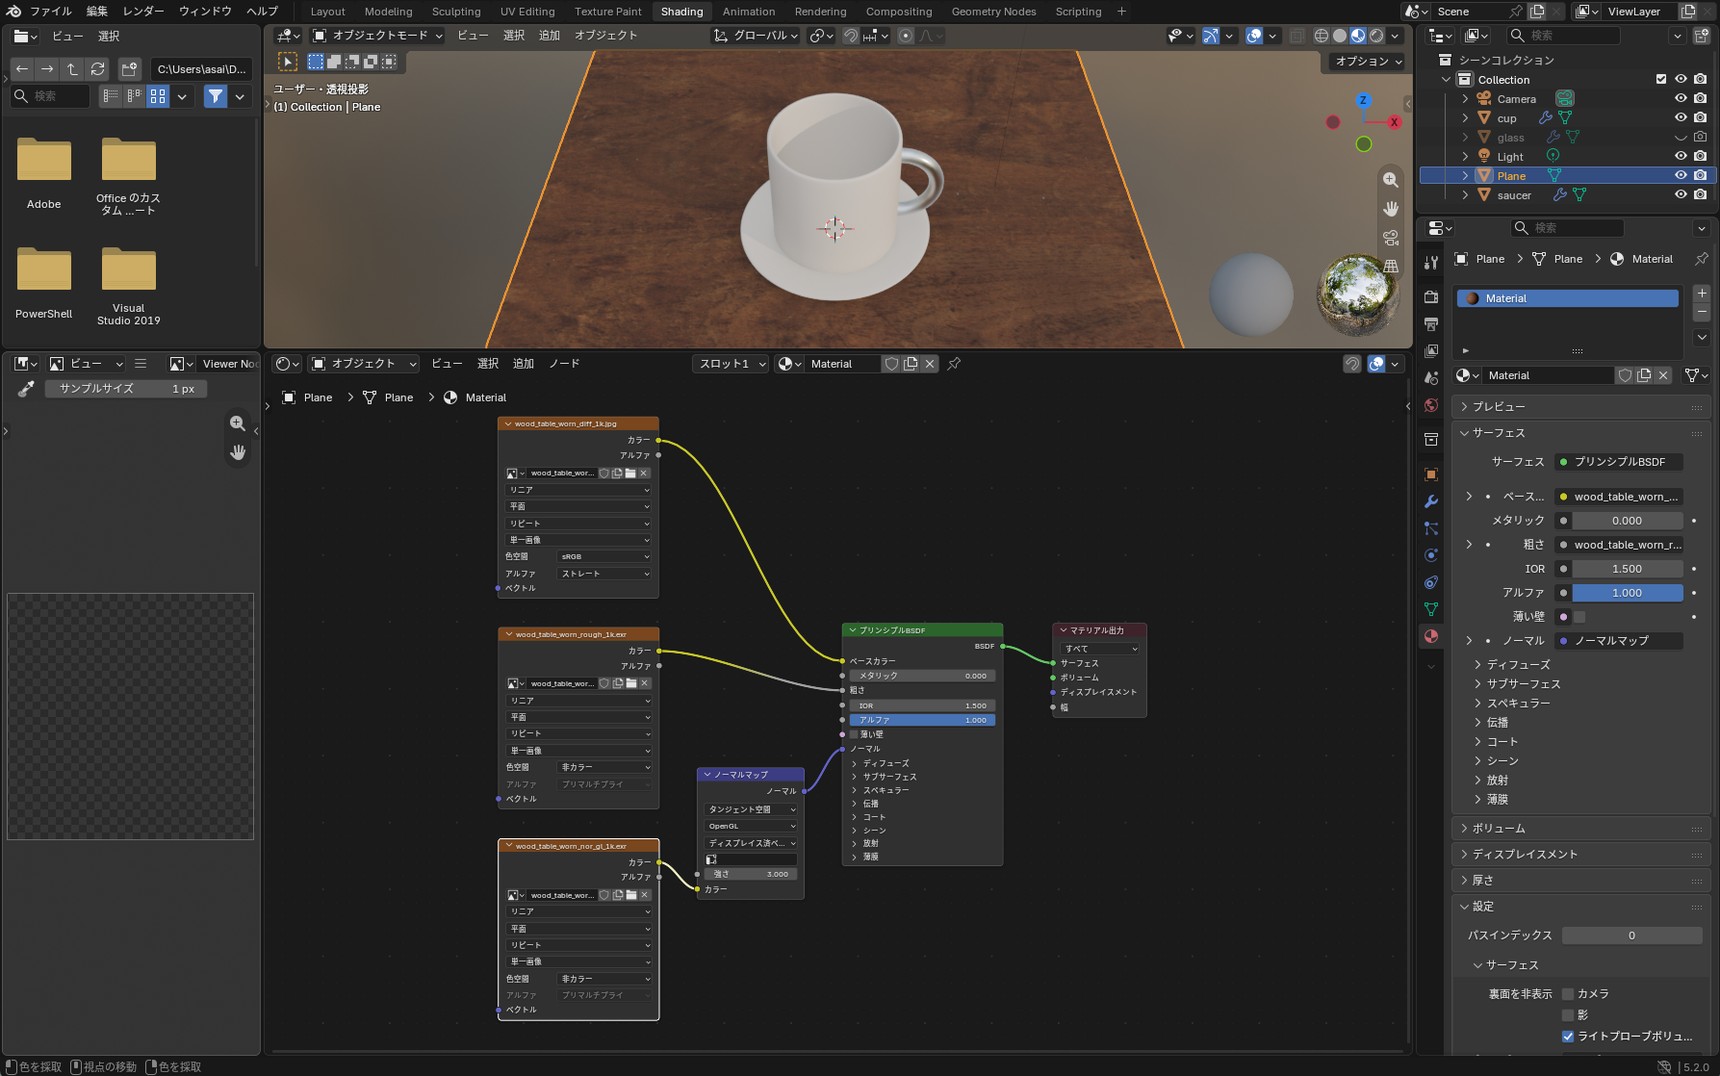
Light and shadow appear in the grooves and the grain of the wood.
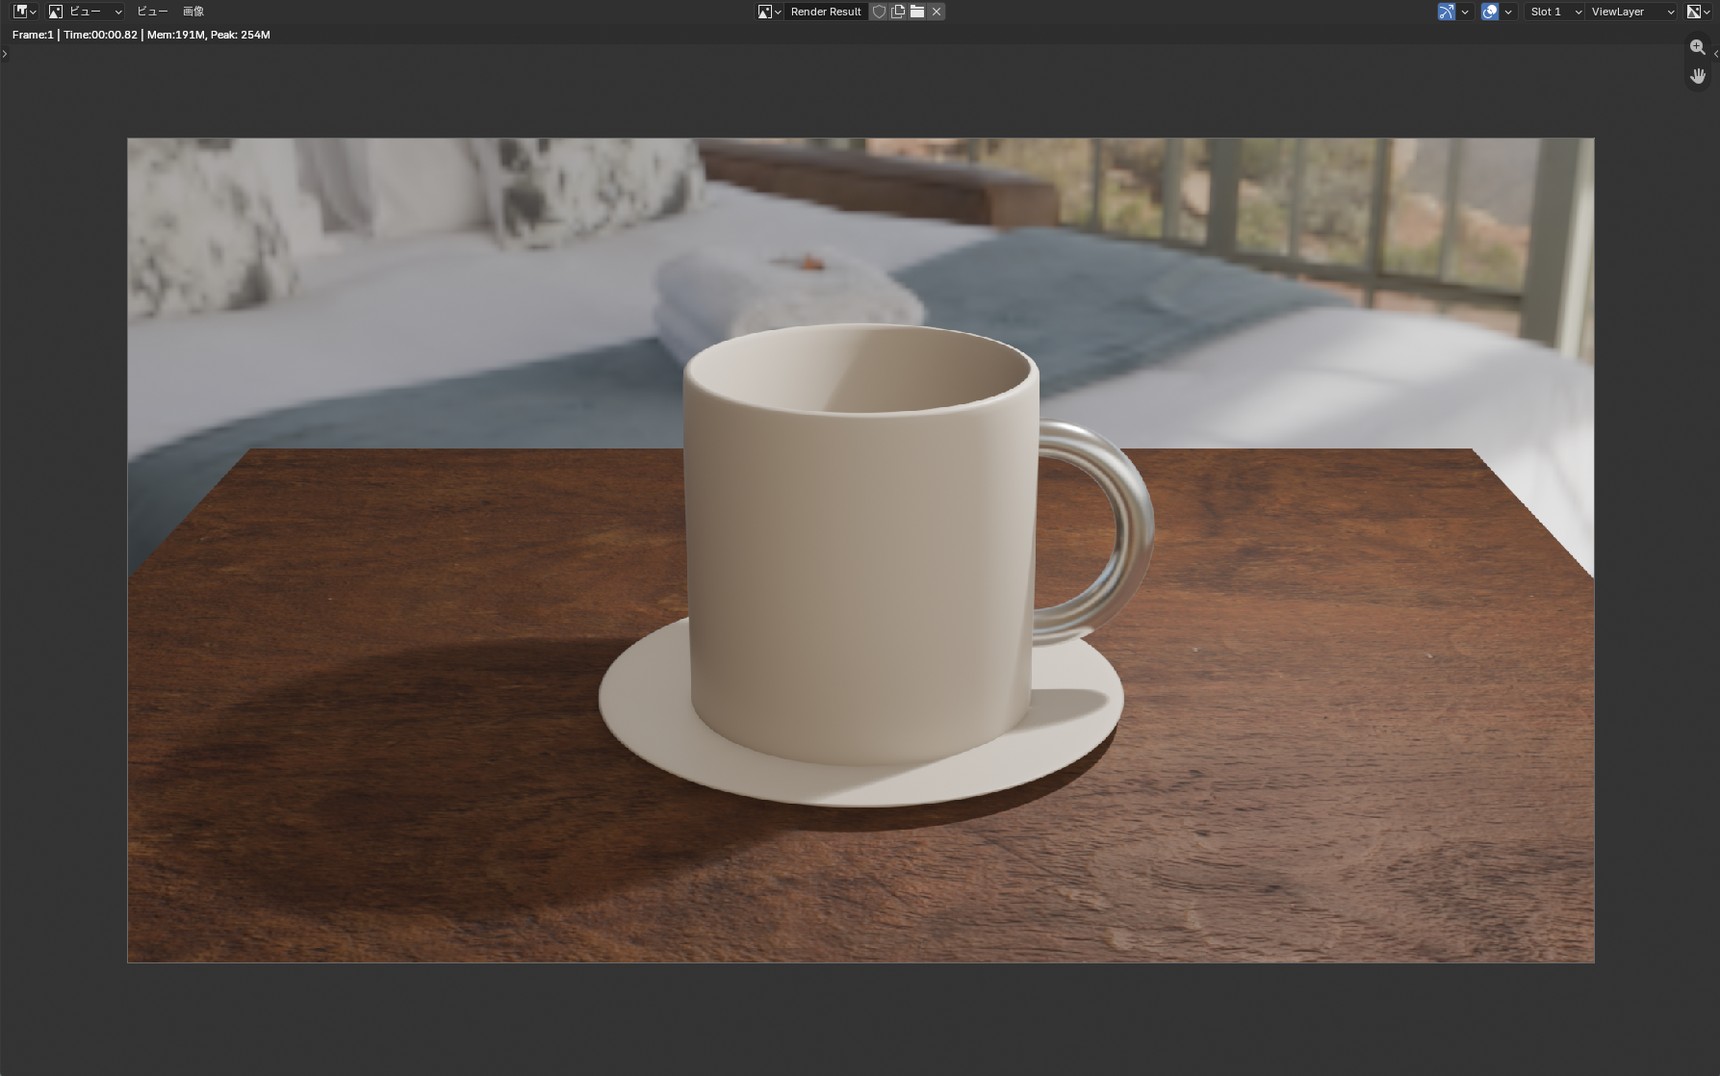
This image needs the extra node because the Normal Map node is what reads those RGB numbers back as direction. Skip it and Blender takes them as color instead. No error is raised, and nothing happens.
If the change is hard to make out, raise "Strength" on the Normal Map node — the screenshots in this article use 3.0.
Bear in mind that this only looks like relief. The geometry hasn't changed: view the board from the side and it's still flat.
All three, layered
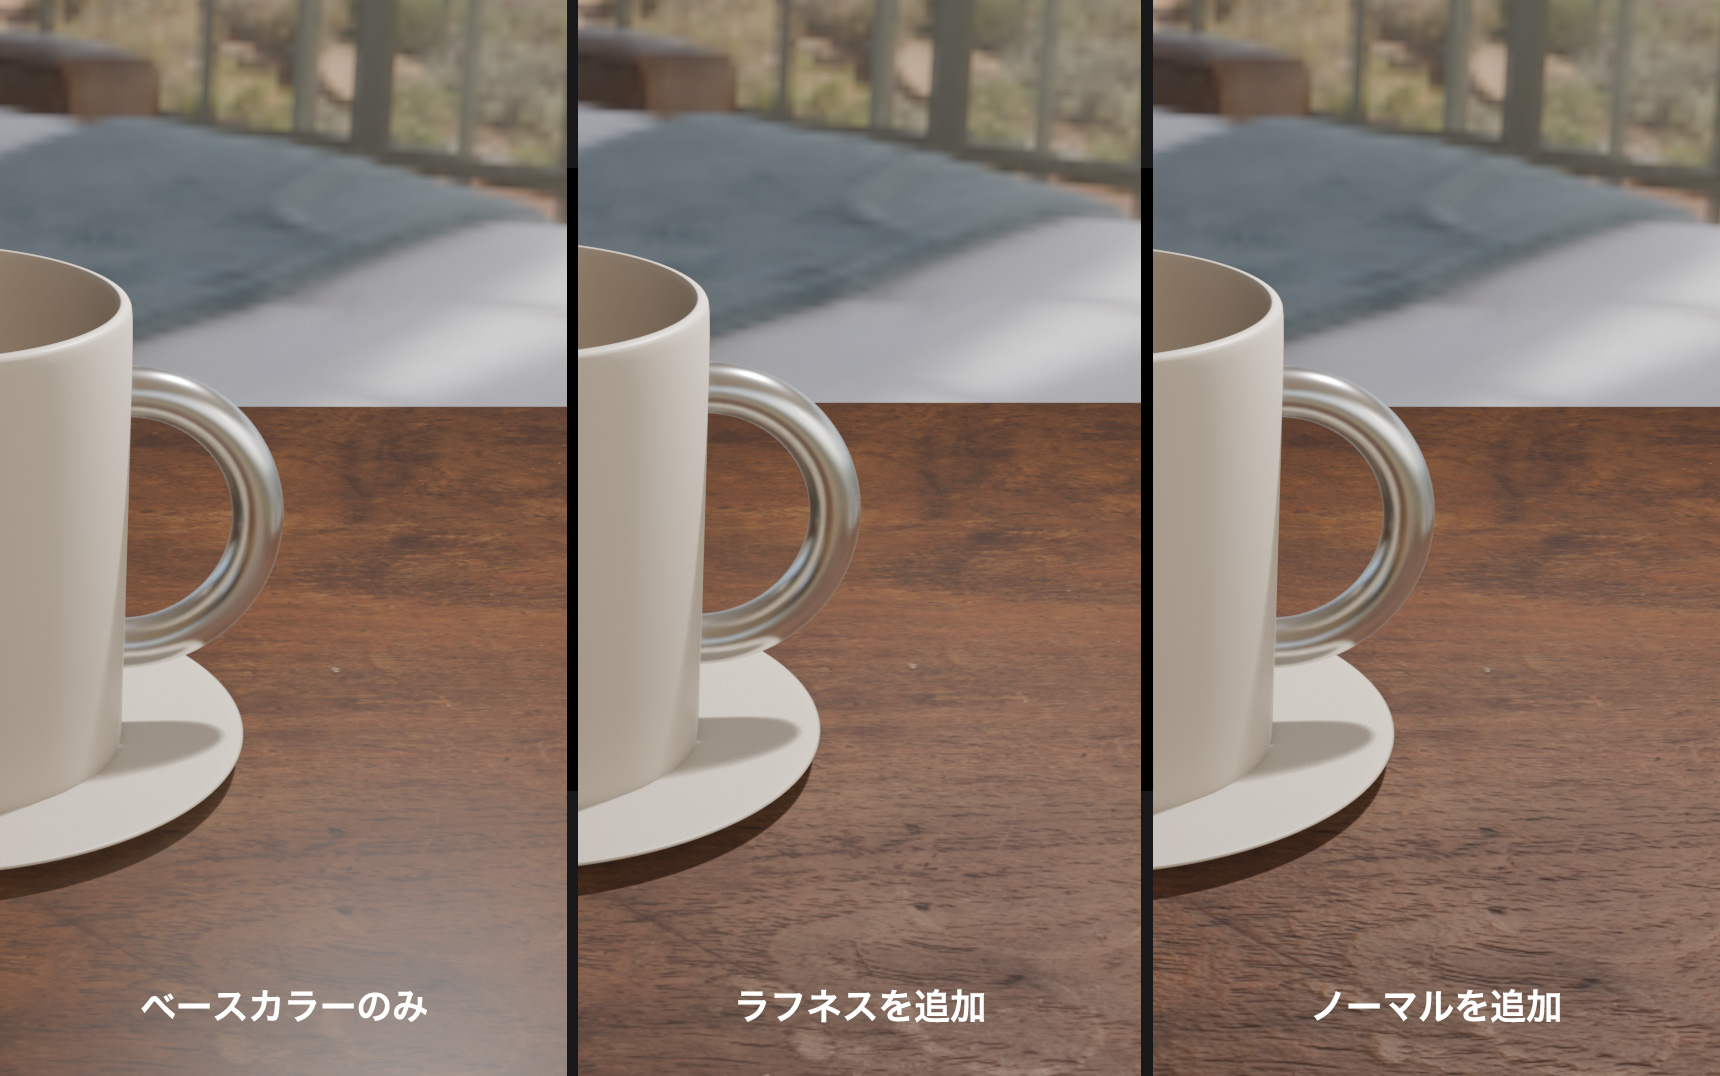
Two images is all we added, and it's no longer the photo on a board we started with.
The Base Color image never changed from beginning to end. What changed is how that surface reflects light. Whether something reads as wood comes down less to the image itself than to the way light comes off it.
If it stops working
With three images in play, it's easy to lose track of what connects where — wiring the roughness image into Base Color, for instance.
When that happens, go back to Base Color on its own. Remove the roughness and normal links and you're back at the state from Building the table and applying one image. Reconnect them one at a time from there and you'll find where it went wrong.
Sizing and orienting the pattern
The grain is applied, but nothing has been done about its scale yet. As it stands, a single plank reads wider than it would on a real table. Let's adjust it.
UVs are like transparent graph paper
Picture a sheet of transparent graph paper laid over the surface, marked from 0 to 1. UVs are the information that decides which part of the image sits where on that sheet. A plane comes with UVs already, which is why the grain lined up neatly without you setting anything.
- Texture Coordinate is the node that selects which reference the image is placed against — UV is one of the options
- Mapping is the node that moves, rotates, and stretches those coordinates
Move the UVs and the image looks different. What you're changing isn't the image itself — it's how the image is applied.
Connecting Texture Coordinate and Mapping
Add both with Shift + A: "Input" then "Texture Coordinate," and "Utilities" then "Vector" then "Mapping."
Connect them in this order.
- "UV" on the Texture Coordinate → "Vector" on the Mapping
- "Vector" on the Mapping → "Vector" on the Image Texture
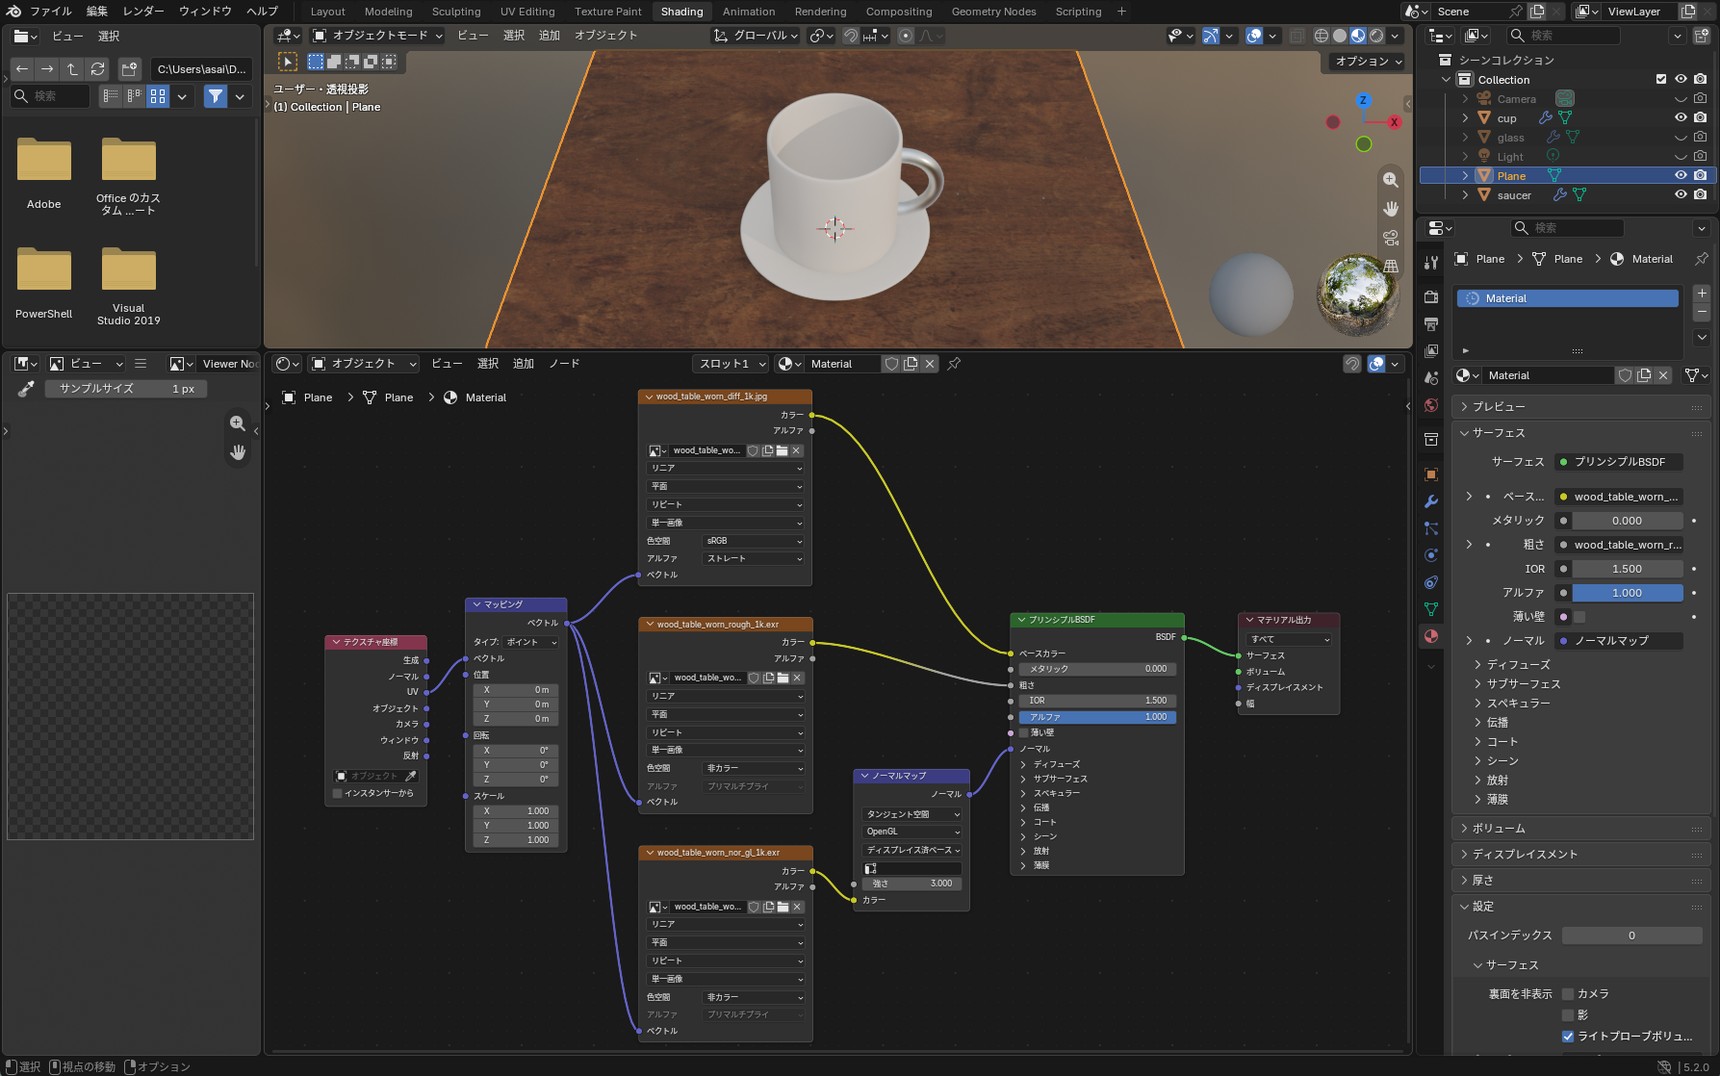
Texture Coordinate has seven outputs. The one you want is "UV," third from the top. The topmost, "Generated," will apply the image too, but it comes out looking different.
A bigger number makes a smaller pattern
Set X and Y under "Scale" on the Mapping node to 4.0.
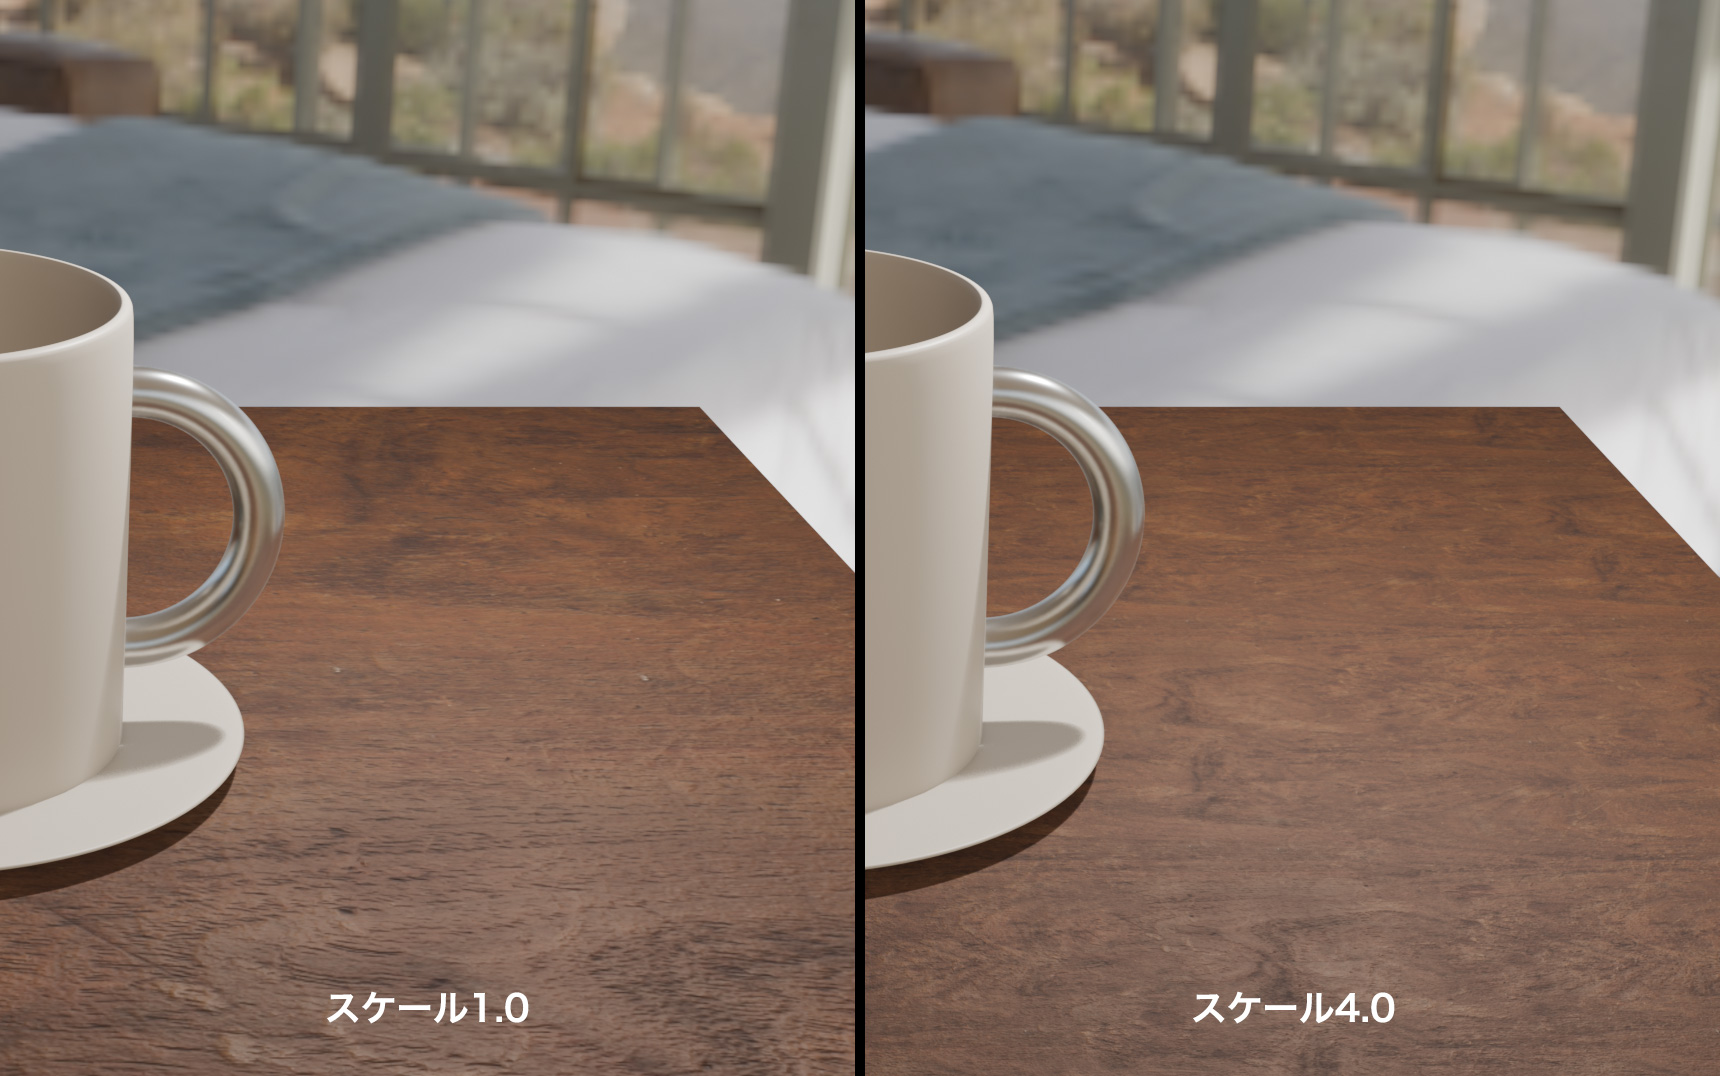
The pattern gets smaller and repeats more often. You raised the number, and the image shrank.
That's because what you're scaling is the UVs, not the image. Stretch the UVs to four times their size and the image sitting on them becomes proportionally smaller, repeating across the board.
Deciding on a size
If you're not sure what number to use, judge it by how fine the grain looks.
Too low and the grain stretches out, making the board read as larger than it is. Too high and the grain gets so fine it starts to look more like fabric than wood. Compare it against the cup sitting on the table and stop where the grain looks about right.
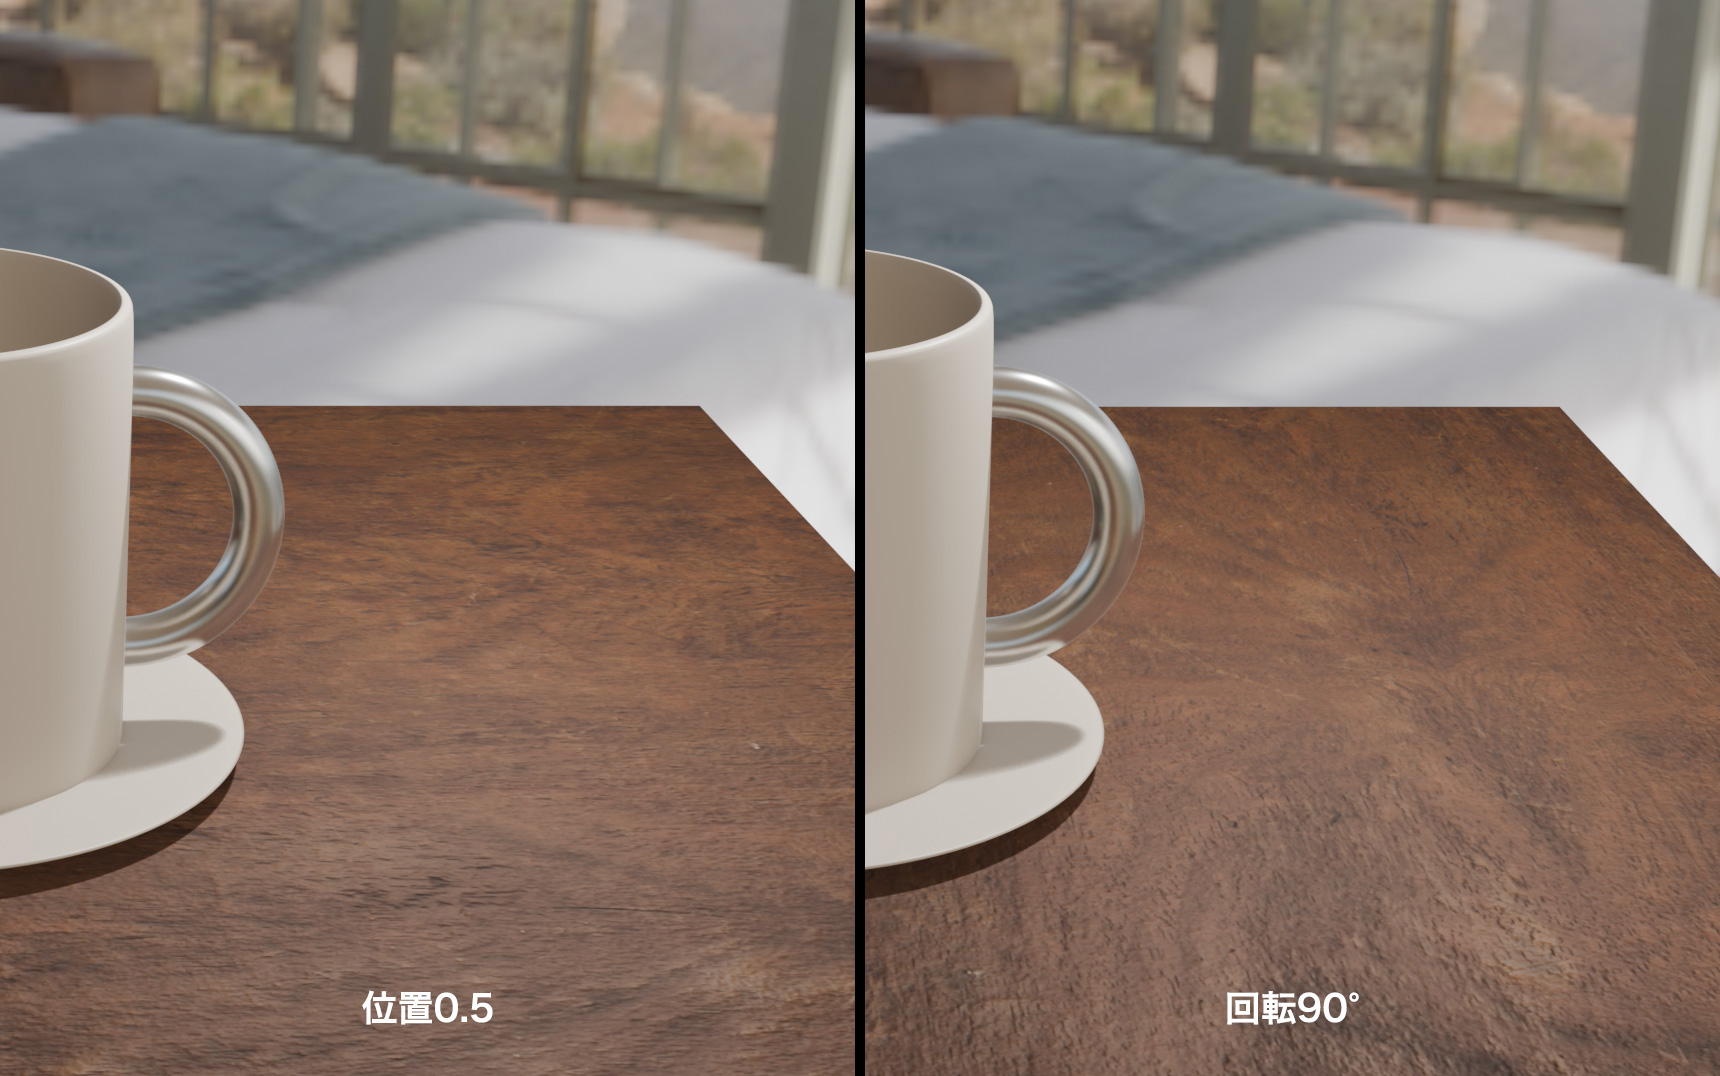
Mapping adjusts more than size. Changing "Location" shifts the pattern, and setting Z under "Rotation" to 90 turns the direction of the grain.
When you actually need to UV unwrap
We've been adjusting the pattern by moving UVs around. What we haven't done once, though, is UV unwrapping — the staple of texture tutorials. UV unwrapping is the work of building those UVs yourself.
For putting a pattern across a surface — wood, stone, and the like — not knowing how to unwrap won't hold you back. UV unwrapping becomes necessary when you need to decide which part of an image lands on which part of an object.
A label on a can, a print on a T-shirt, a character's face. When the artwork has a position it has to be in, that's when you unwrap.
It depends on the shape
| Shape | Applying a pattern | Placing artwork |
|---|---|---|
| Plane | Works | Needs unwrapping |
| Cube | Works | Needs unwrapping |
| Cylinder / sphere | Mostly works | Needs unwrapping |
| Character | Needs unwrapping | Needs unwrapping |
Cylinders and spheres are the only ones marked "Mostly works," because parts of them take the image cleanly and parts of them don't. Here's the same wood grain from this article applied to a sphere.
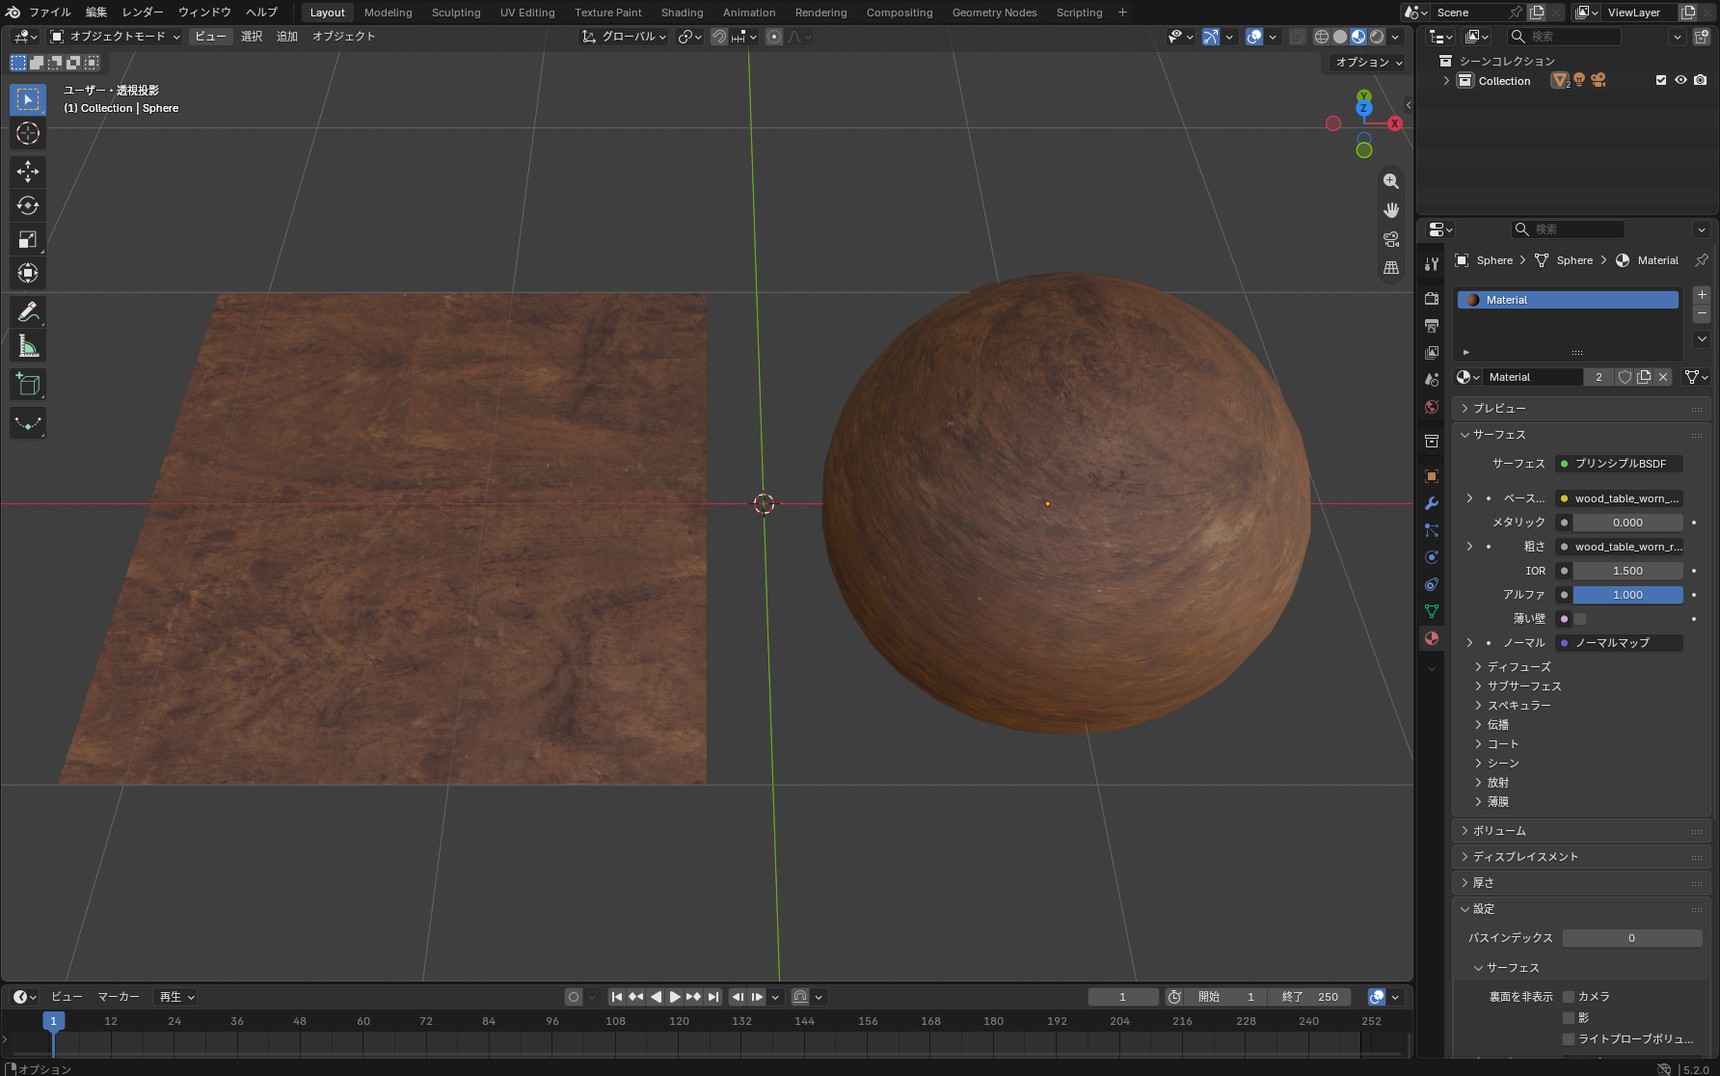
The sides come out fine. The only trouble is at the poles, where the pattern collapses inward in a spiral. It isn't that you can't texture a sphere — it's that it breaks down at two specific points.
Change the proportions and the pattern stretches
Even a plane will stretch its pattern if you change its proportions much.
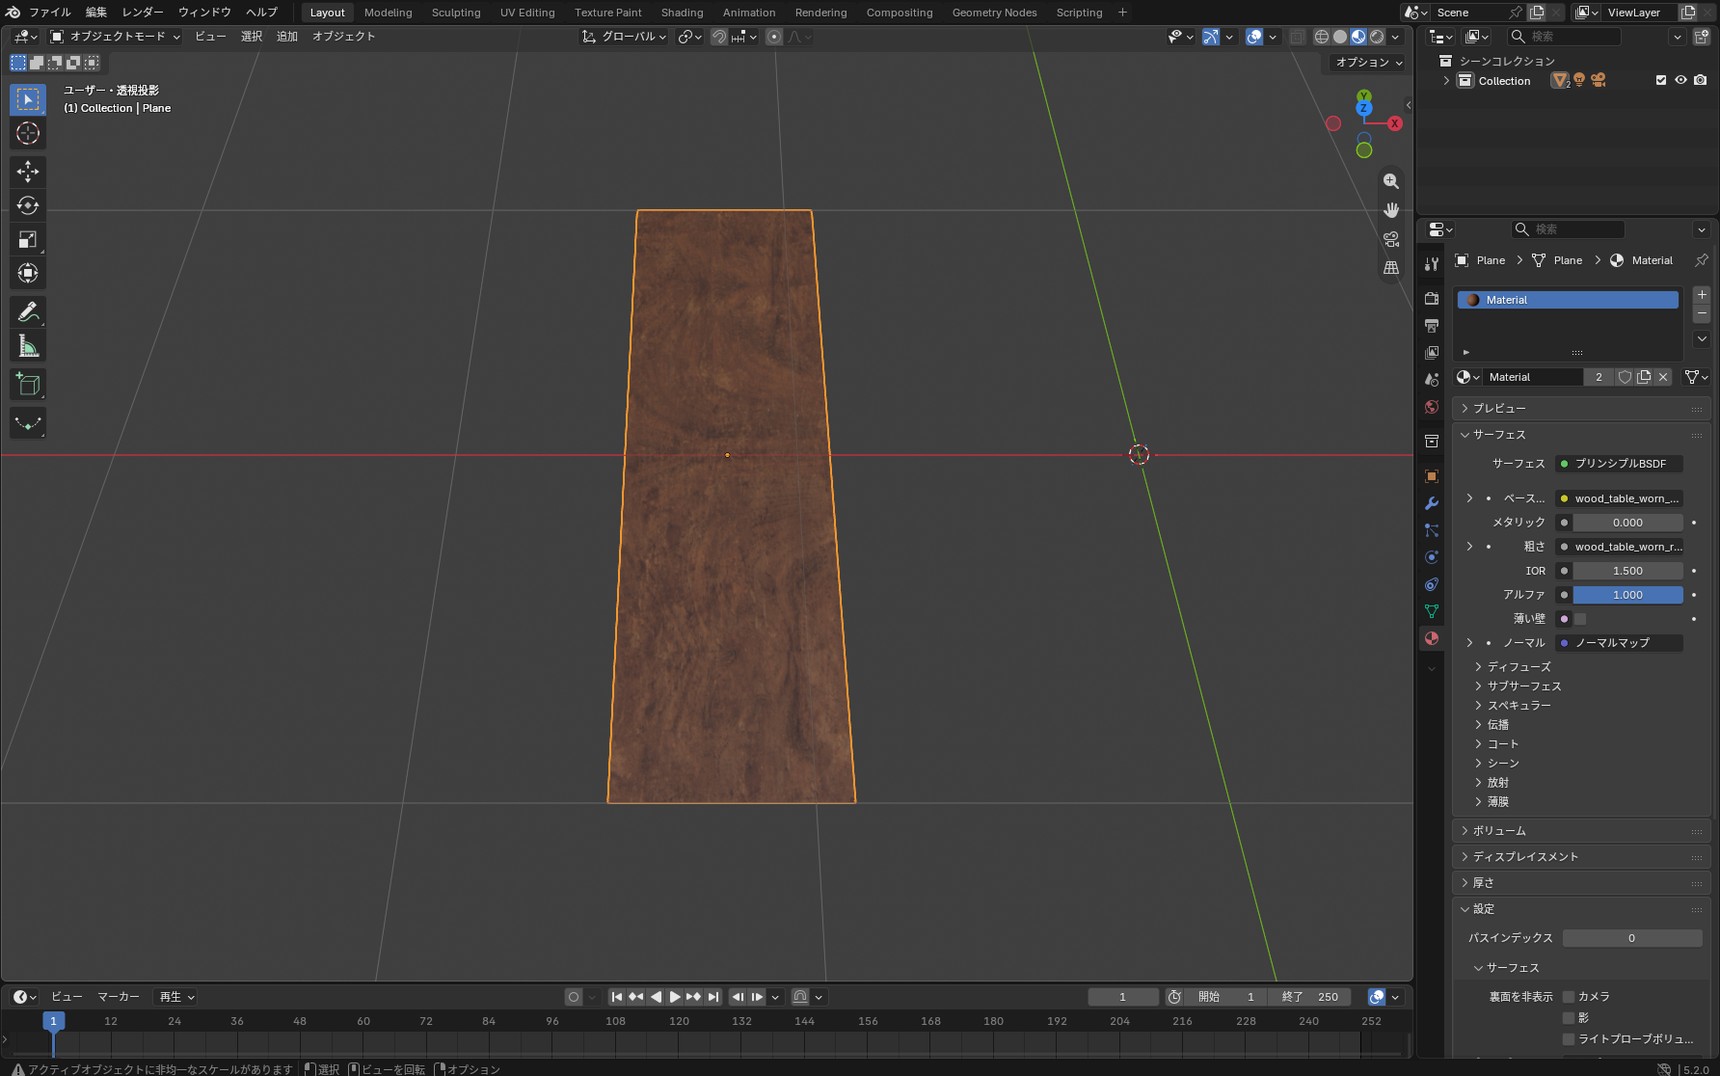
When this happens, "Object has non-uniform scale" appears at the bottom left of the screen, telling you the object hasn't been scaled by the same factor on every axis.
Clearing that message won't fix the pattern, though.
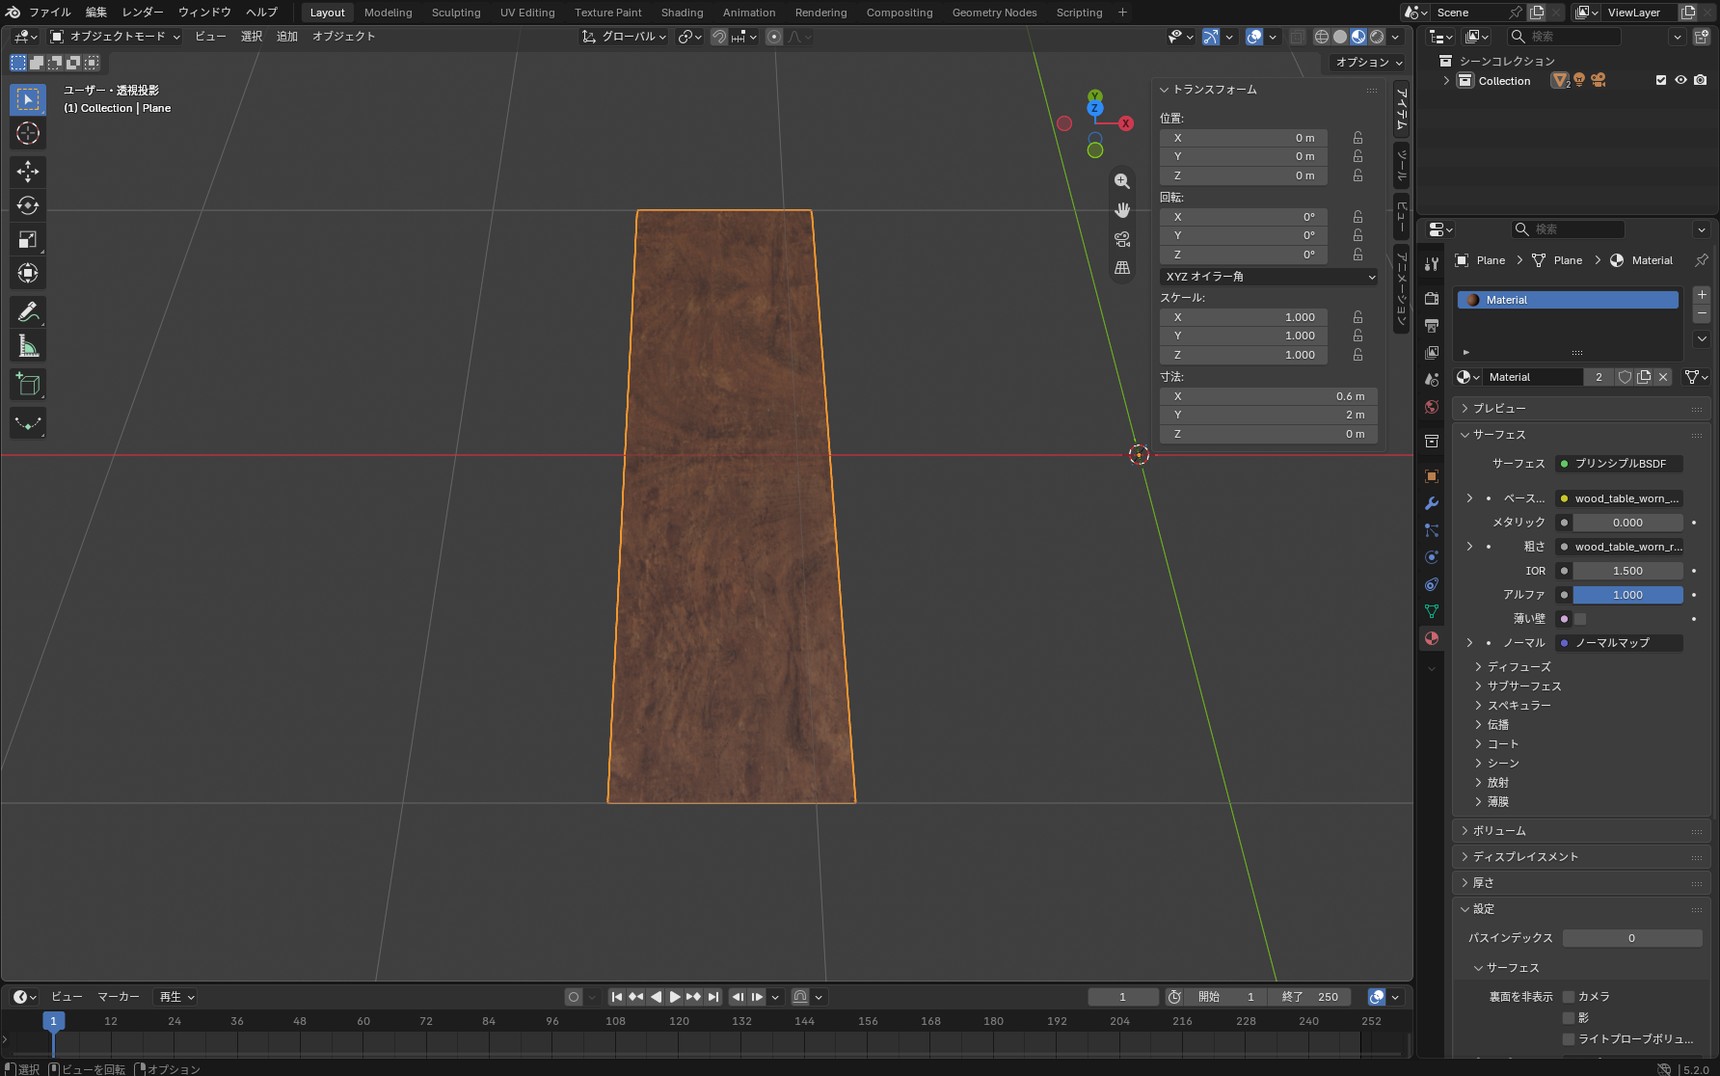
Run Ctrl + A then "All Transforms" and the scale values return to 1 and the message disappears, but the pattern stays stretched.
That's because applying scale doesn't touch the shape of the UVs. They're already stretched, so short of rebuilding them, the grain stays that way.
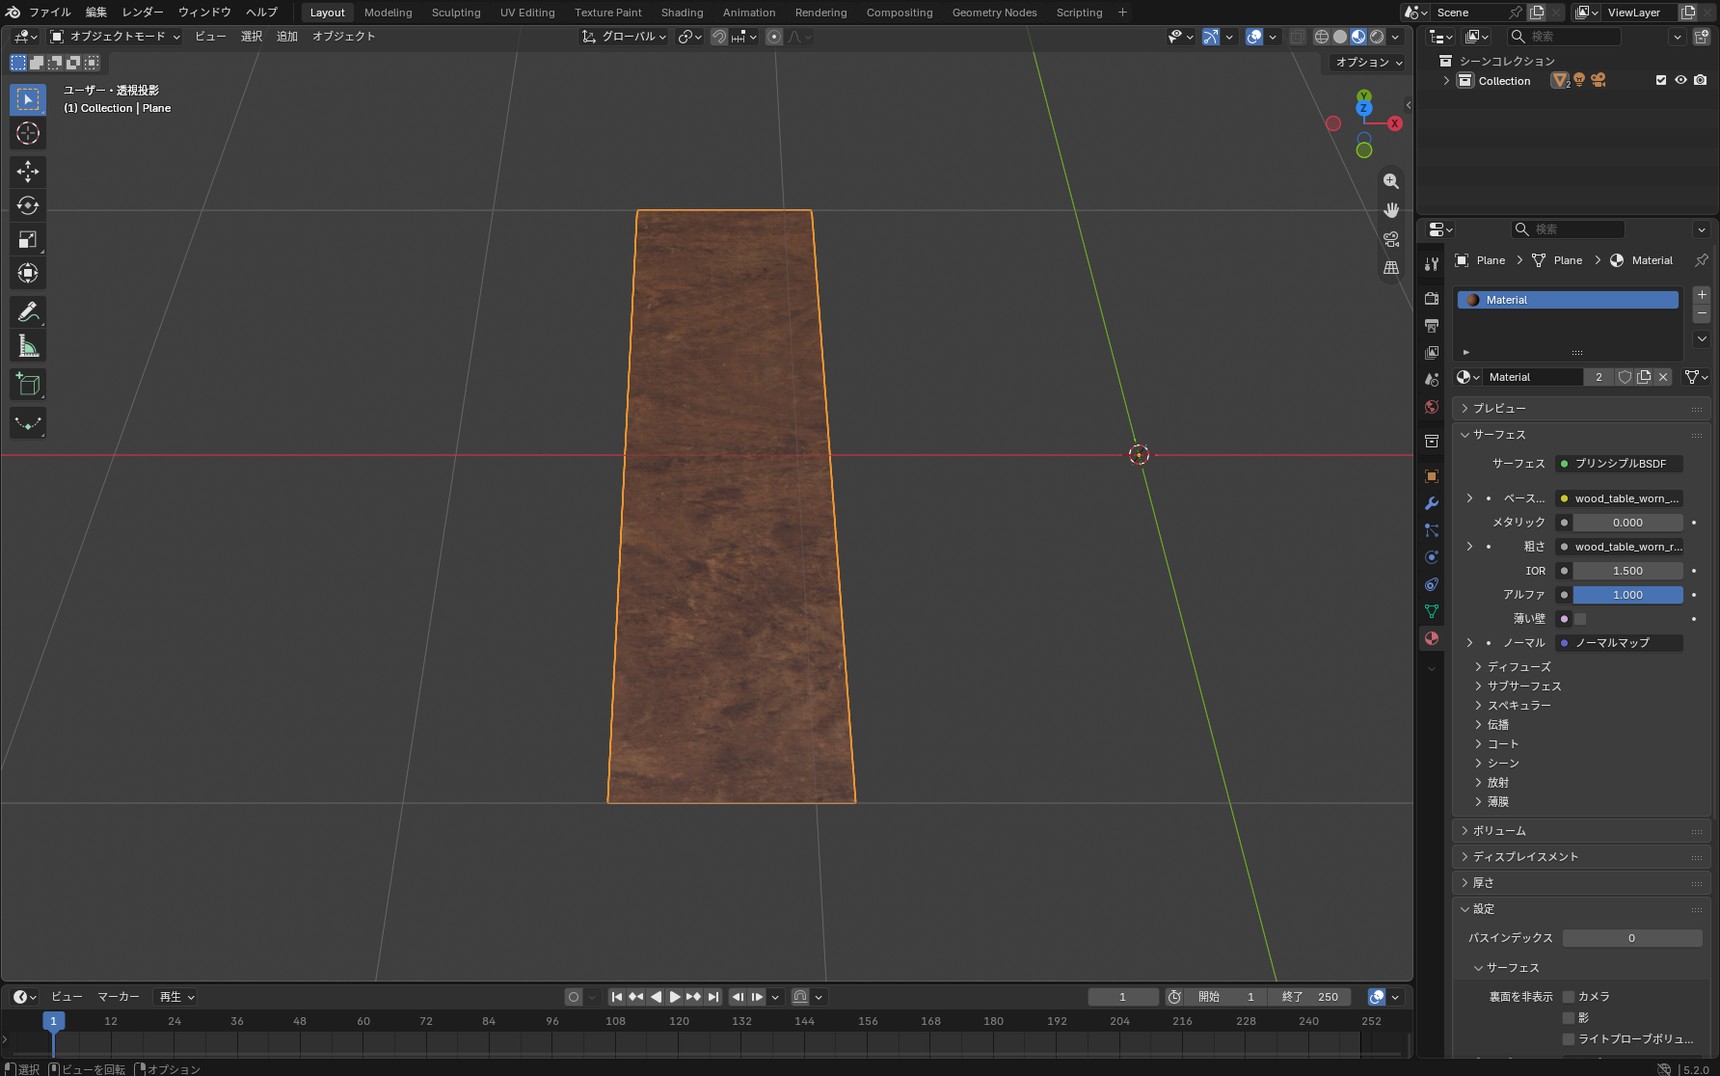
The next article walks through how to rebuild them.
Note that more than one thing makes a pattern stretch: no UVs, distorted UVs, a different set of UVs in use, or an object whose size was never applied.
So when a pattern stretches, work through the causes in order before reaching for unwrapping.
Checklist for when it isn't working
If you applied an image and nothing shows, or everything came out black, work down these five checks.
- Are all three images there? Open the
texturesfolder and check — depending on what you ticked, an image may not have been included - Is the viewport still in Solid mode? Use the four spheres at the top right of the 3D viewport and switch to the second from the right (Material Preview) or beyond
- Is "Color" on the Image Texture connected to "Base Color" on the Principled BSDF? Check that the link hasn't come loose
- Can Blender open the image at all? A filename shown in red on the node means the image can't be found
- If it's still black, suspect face orientation. Turn on "Face Orientation" in the Overlays and correct faces show blue, flipped ones red
If it looks right in Material Preview but goes black in a render, there isn't enough light. Check the environment image you loaded in the previous article.
Short on images in your texture set? See the column "Another texture site, and how to tell what's really free"
Where to go next
In this article we layered three images to build a wooden surface.
If that felt like a lot to take in, these five points are enough to work with.
- A texture applies a pattern to a surface as an image
- Base Color on its own only gets you a photo on a board
- Roughness decides how it catches the light; Normal decides which way the surface faces
- The Roughness and Normal images need their Color Space set to Non-Color
- Texture Coordinate and Mapping are what you use to resize the pattern
Next comes UV unwrapping, which is how you get "this artwork, right here." You'll put a logo on the front of the coffee cup and decide where the image sits and which way it faces. It's also where the stretched grain this article left behind gets fixed.
Next article: Blender UV Unwrapping Basics: Seams, Smart UV Project, and Placing a LogoFrequently asked questions
Q. The texture I downloaded came with a lot of images. Do I have to use all of them?
A. No. This article uses three. Which images come in a set varies from texture to texture. On Poly Haven you can pick just the ones you need before you download. Some other sites don't let you choose, so you end up with images you won't use, and that's fine. For how the sites differ, see the column "Another texture site, and how to tell what's really free."
Q. What happens if I don't set the Roughness and Normal images to Non-Color?
A. The surface comes out wrong. These images store information as brightness or as RGB numbers. Left on sRGB, Blender corrects them as if they were color, which changes the numbers that were recorded. The
shift is hard to spot by eye, so make a habit of checking Color Space the moment you connect one of these maps.
Q. Why are there two files, NormalGL and NormalDX?
A. There are two conventions for recording which way a bump faces. Blender uses NormalGL. Use DX instead and the parts that should read as dents look like bumps. The Normal Map node also has a
field where you can select "OpenGL," so if DX is all you can get, switch it there. Poly Haven offers Normal (DX) as well, but it is unticked by default.
Q. Is my texture stretching because I haven't UV unwrapped?
A. Not necessarily. There are four possible causes, and UV unwrapping only addresses some of them. People often expect Ctrl + A then "All Transforms" to fix it, but that won't repair a pattern that is already stretched. See "When you actually need to UV unwrap" for the details.
Q. I connected a Normal map, but I don't see any bumps.
A. Three things to check. First, you may have skipped the Normal Map node. Wire the image straight into "Normal" on the Principled BSDF and nothing happens — and no error is raised, so it's easy to miss, because the link is connected and simply has no effect. Second, the Color Space may not be set to Non-Color. Third, the effect may just be too subtle to see; raise "Strength" on the Normal Map node to check.
Q. I opened my file on another computer and the textures were gone.
A. A .blend file doesn't store the images themselves. It records only where they are, so moving the file alone leaves Blender unable to find them. Start with File → External Data →
Report Missing Files to see which images are missing. To fix it, choose Pack Resources from the same menu, which puts the images inside the .blend file so you can carry a single file around. If
you moved the images somewhere else yourself, Find Missing Files lets you point Blender at the new folder and relink them.
Q. Can I make patterns without using photographs?
A. Yes. Nodes such as Noise Texture let Blender calculate a pattern internally, which is called a procedural texture. You don't have to source any images, and it never goes coarse no matter how far you zoom in. The trade-off is that photographic realism is harder to reach. For materials that exist in the real world, like wood grain or fabric, the approach in this article gets you to something believable faster. There is also Texture Paint, where you paint the pattern by hand, but this article covers applying texture images you've downloaded.
Columns
Another texture site, and how to tell what's really free
When Poly Haven doesn't have what you're after, there's also ambientCG. It has a deep catalog of texture assets, so it's a good place to look for wood, stone, fabric, and similar surfaces.
ambientCG also names its files more plainly: Color, Roughness, and NormalGL, spelled out, so there's less guesswork about which image is which. Poly Haven abbreviates them to
diff, rough, and nor_gl, which are Base Color, Roughness, and Normal in that order.
You can also choose the file format you download. Pick JPG and you never have to deal with an unfamiliar extension like EXR.
Two things to watch for.
-
You get both
NormalDXandNormalGL. The one to use in Blender isNormalGL - Files you won't use come along with it. Use the ones you need and ignore the rest
"Free" means different things on different sites
Spend time on texture sites and you'll run into all kinds of terms.
- "Free" doesn't necessarily mean CC0
- Some sites are free for personal use only
- Some sites require a credit
What to look for is whether it says CC0. If it does, no credit is required and commercial use is permitted.
Different textures come with different images
PBR textures, as they're known, don't all contain the same set of images. Some come with five kinds, others with only three.
That's not a difference between sites — it's that different materials need different maps. A surface with little sheen to it may not include a roughness image at all. When a map you want isn't there, you can set that value on the Principled BSDF instead.
Connecting all three images at once
In this article we loaded the three images one at a time, changed the Color Space where it was needed, and wired up the nodes ourselves.
There's a feature that does all of that in one go: Node Wrangler, an extension that ships with Blender. Select the Principled BSDF, press Ctrl + Shift + T, and select the images you want — the nodes get connected automatically, Color Space settings and the Normal Map node included.
You do have to switch it on first, though. Open Edit → Preferences → Add-ons, search for Node Wrangler, and tick it. There's nothing to install separately.
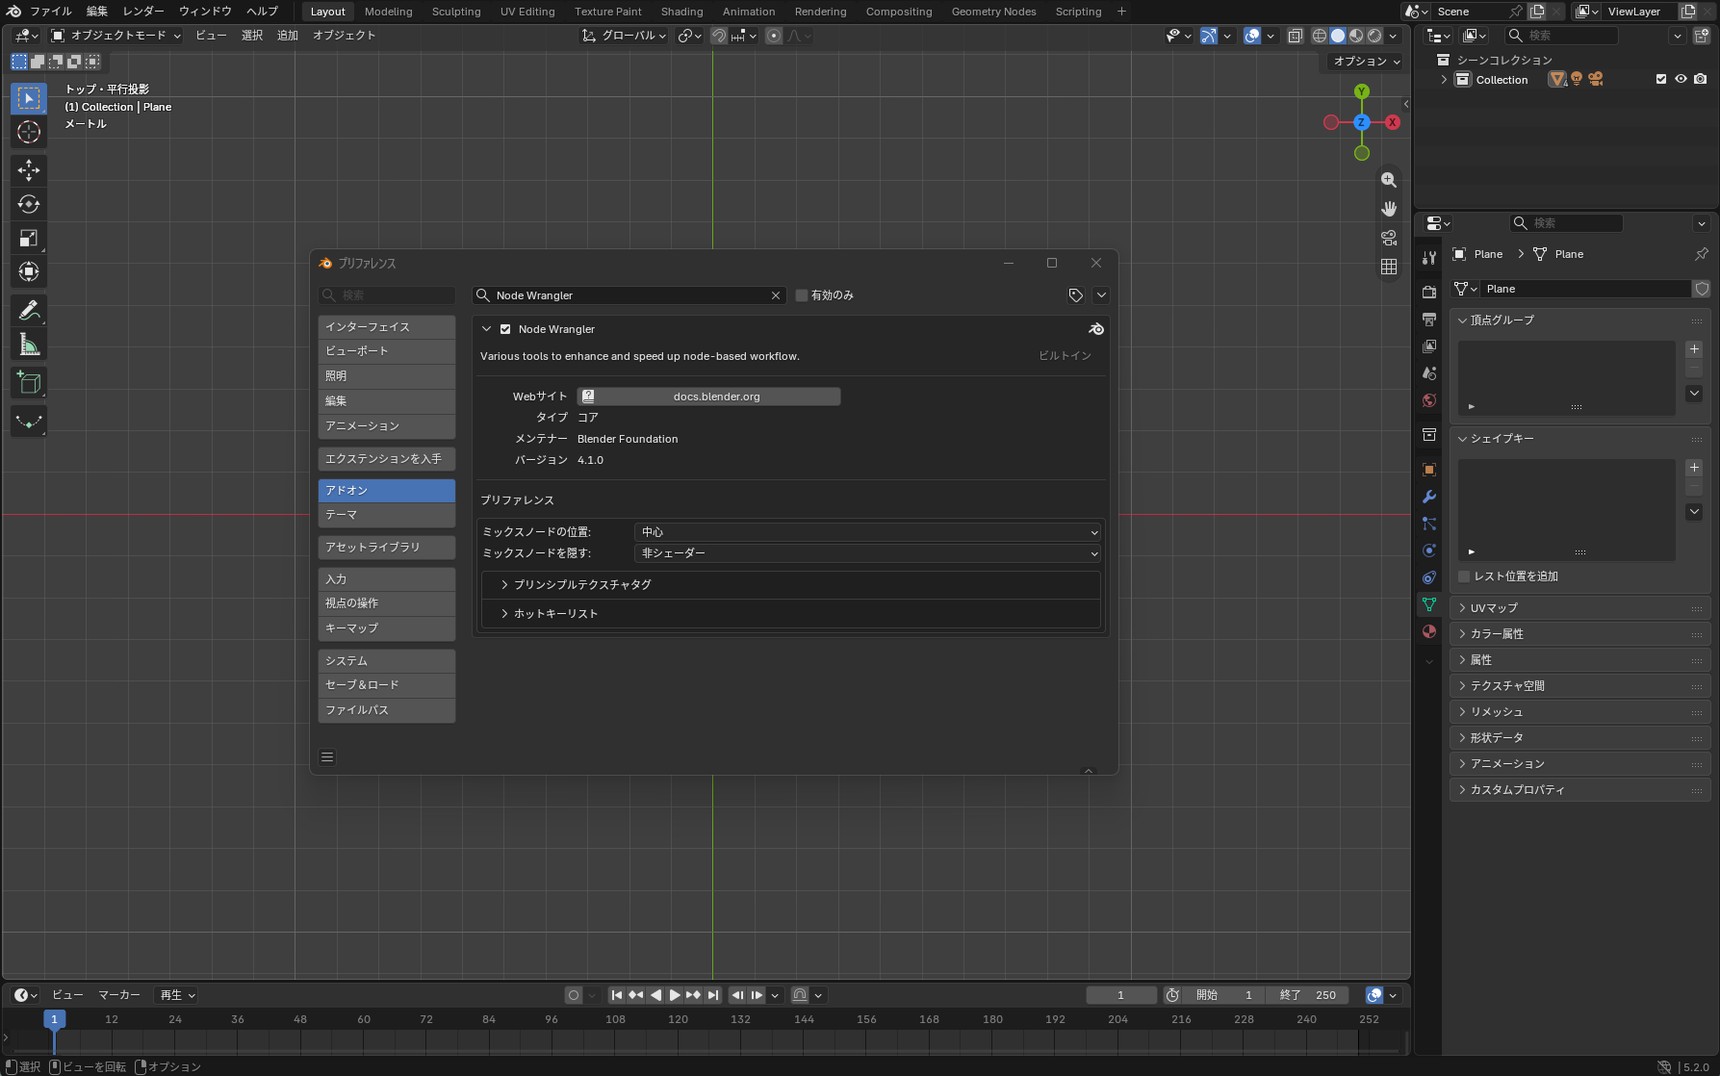
It's a genuinely useful feature, but this article walks through connecting the nodes one by one first. Having wired it up yourself once makes it much easier to work out where the problem is when something doesn't come out right.