
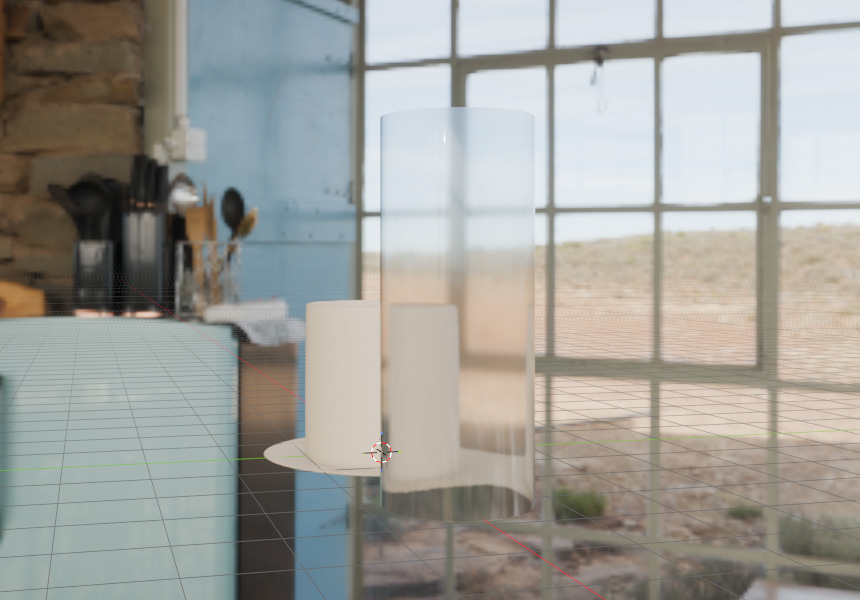
In the previous article, Blender Material Basics: How to Add Color and Surface Qualities, we gave a coffee cup a ceramic surface. In this article, we'll explain how material nodes — the mechanism that sets color and surface qualities — work, building a glass tumbler beside that cup as we go.
The most common stumbling block with glass is applying the settings that should make it transparent and finding that it still isn't. We'll explain what causes that as well.
* This article was verified with Blender 5.2 LTS. The render engine is EEVEE, the default.
Opening the Shader Editor
Material nodes are set in a screen called the "Shader Editor." Click "Shading" in the tabs at the top of the screen.
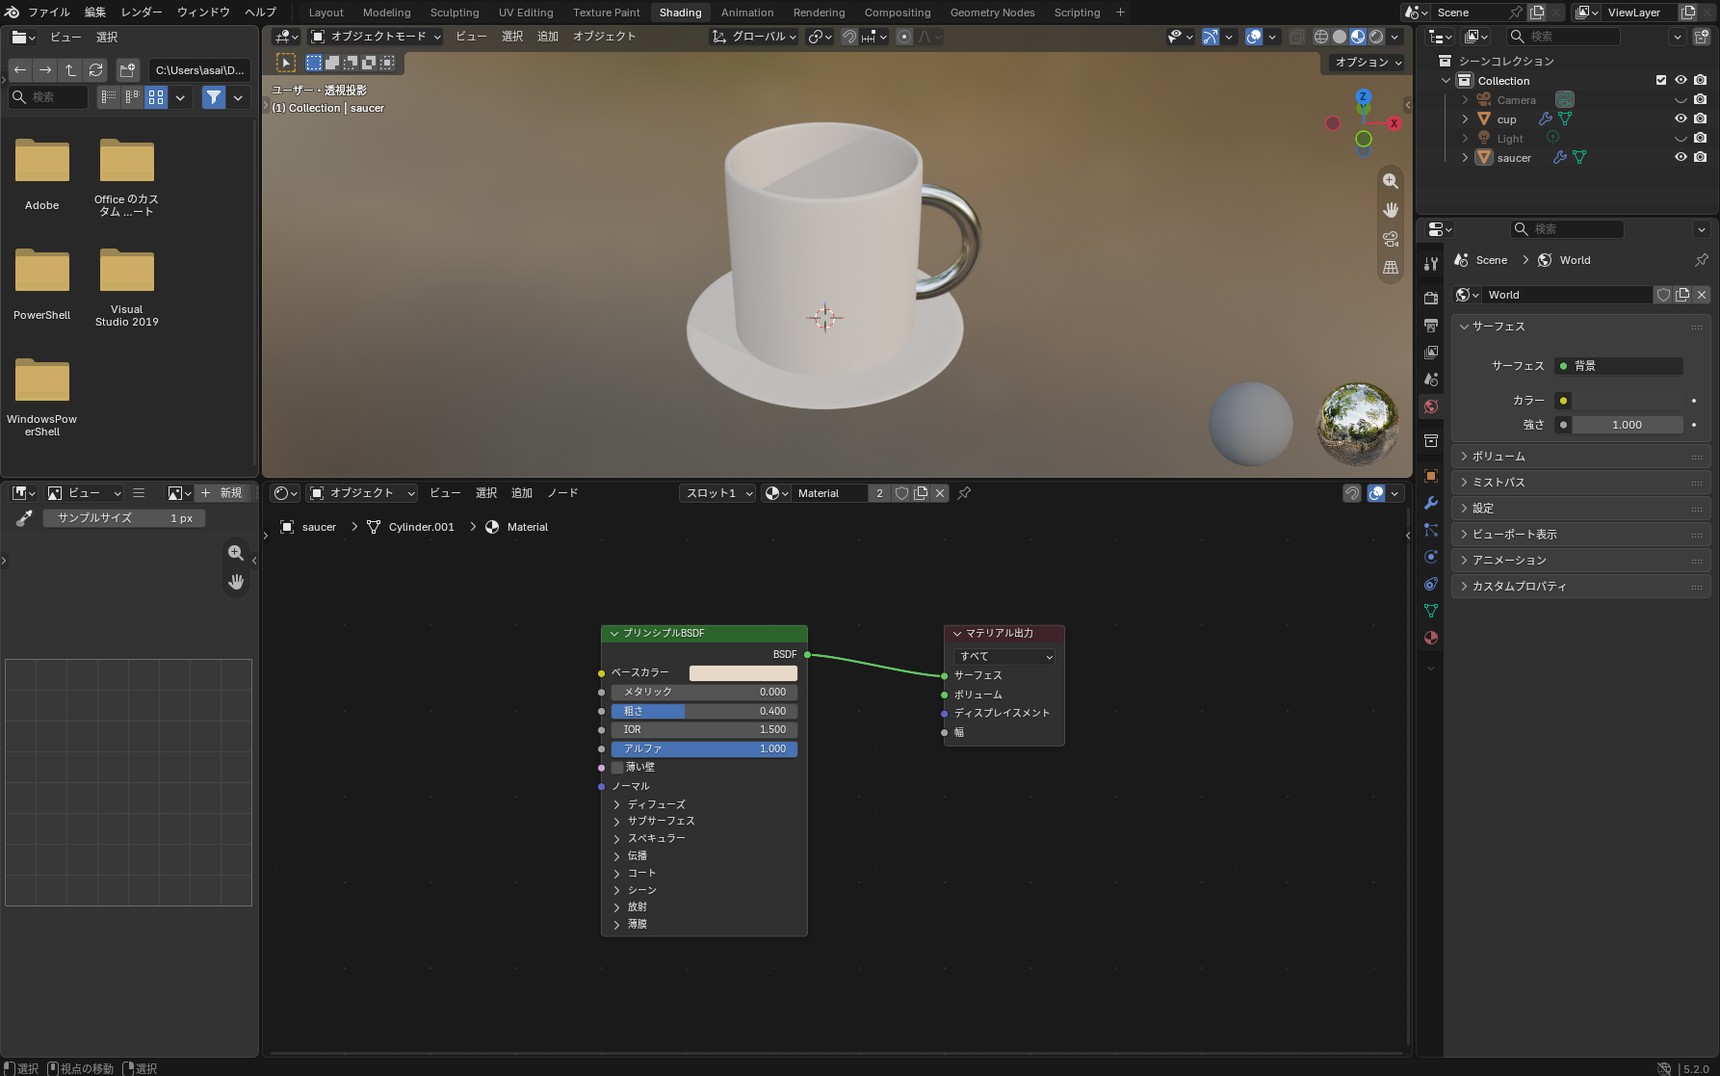
This is the Shader Editor. What you see lined up on screen are the "material nodes," features that process your color and surface settings one at a time. You may be picturing a complicated screen, but right after opening it there are only two nodes: "Principled BSDF" and "Material Output."
The thing to remember is that the Material Output on the right is the exit. Whatever arrives there is what appears on screen.
What material nodes do
Let's look at what each of the two material nodes on screen is doing.
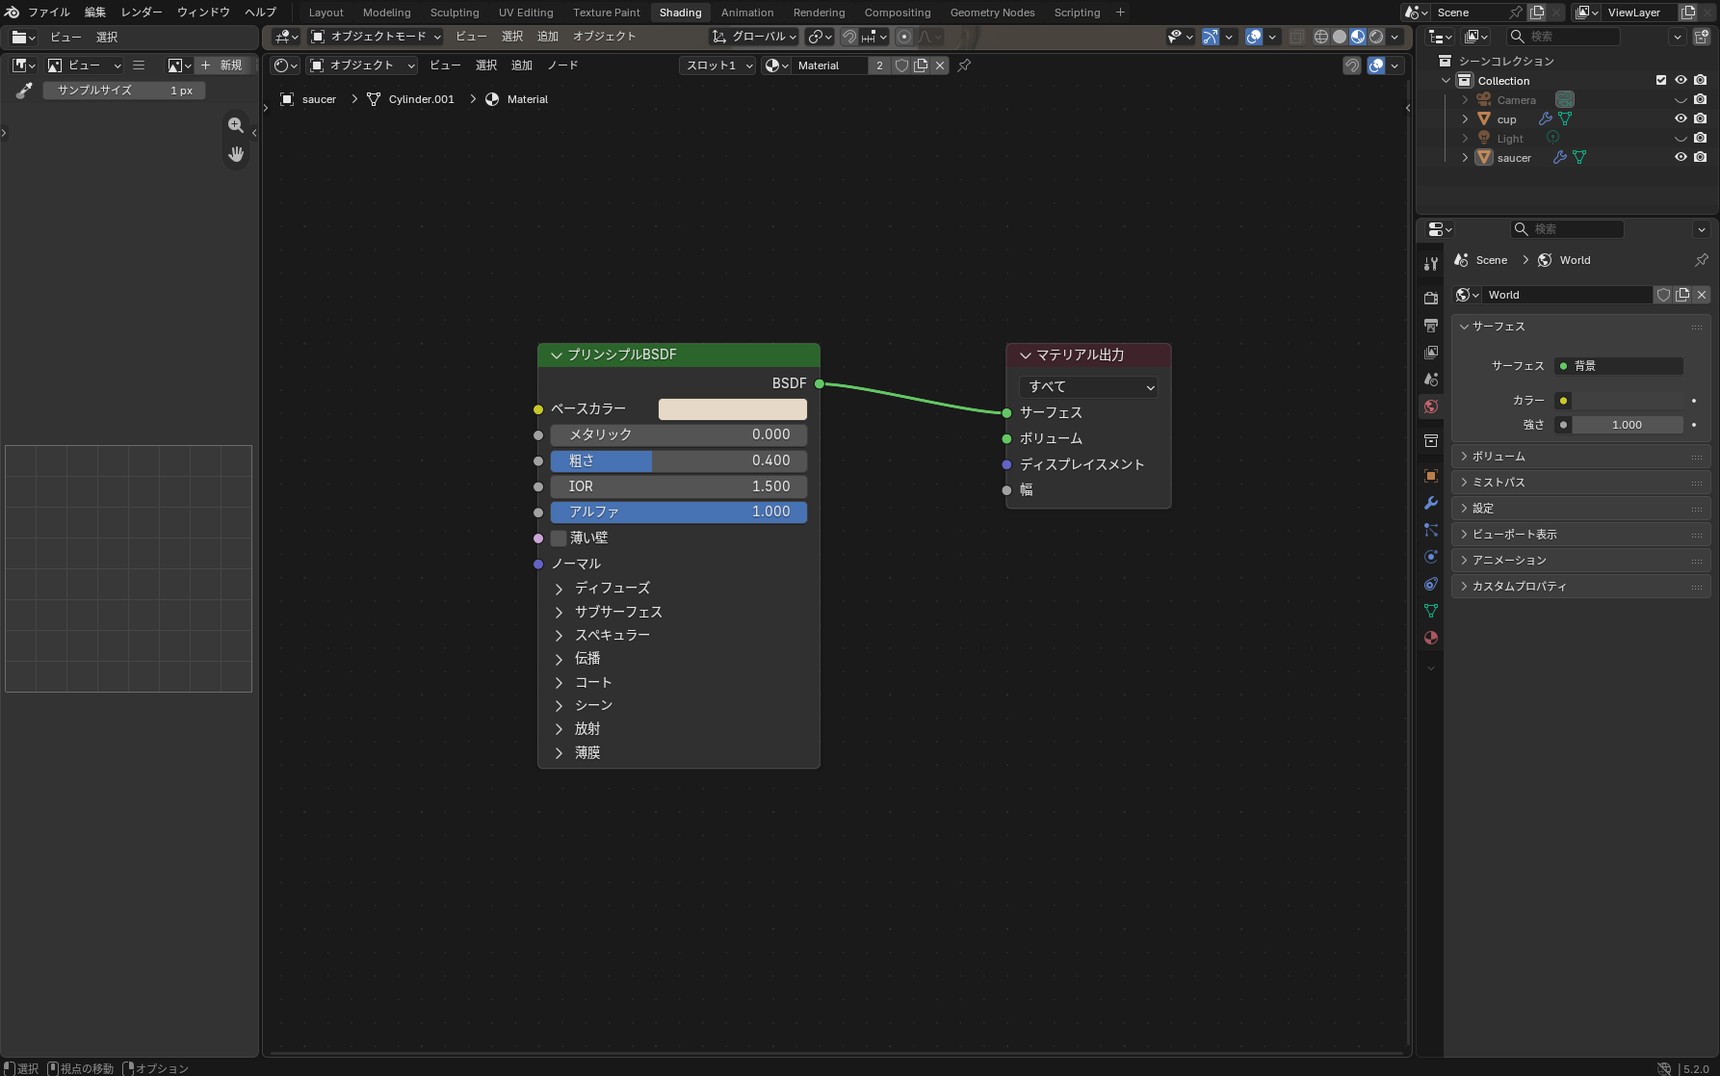
The Principled BSDF is the node that calculates how a surface looks. Using the values you enter for Base Color, Roughness, and the rest, it works out how that surface reflects light. In the previous article, changing the color or the gloss changed the look because this node's result changed.
The Material Output is the node that receives that result. As we just saw, whatever arrives there is what appears on screen.
Each node has its own defined role like this. Once it has done its job, it passes the result on to the next node. Connecting nodes together is how the look of a material gets built.
A quick glossary
Here are the things you see in the Shader Editor and what each of them does.
- Material
- The surface itself. The glass we make in this article and the ceramic we made in the previous one are each a single material.
- Material node
- A part used to build a material. Each of the boxes lined up on screen is one of these. In this article we also call them "nodes" for short.
- Principled BSDF
- The material node that calculates how a surface looks. It lets you adjust color, gloss, metallicness, and more in one place.
- Material Output
- The exit that receives the finished result. Whatever arrives there is what appears on screen.
What travels along the link
So what travels along the link that connects the material nodes? It's the result the Principled BSDF worked out, its answer to "here is how this surface looks." Let's cut the link and see for ourselves.
Click the dot next to "Surface" on the Material Output, drag, and drop it on an empty area. The link comes away.

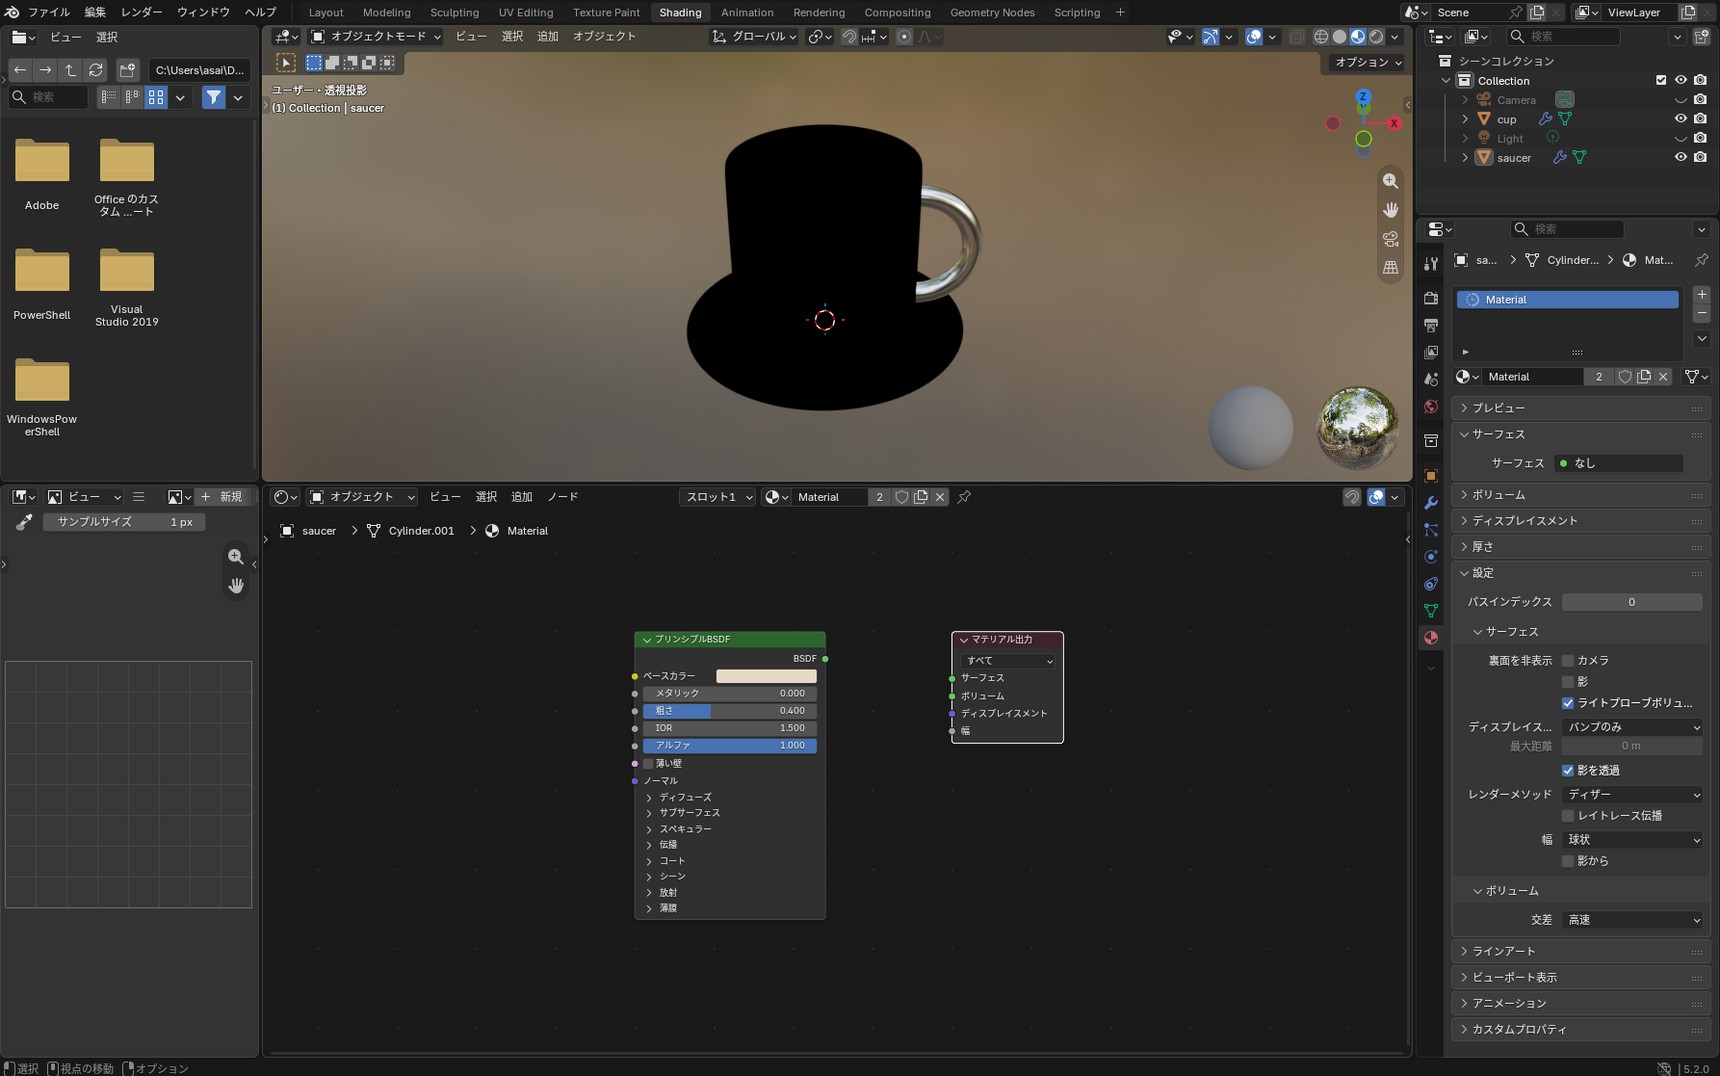
Nothing about the settings changed, yet the object turned black. That's because the Principled BSDF's result no longer reaches the exit.
Your settings haven't been lost. Ctrl + Z brings the link back. You can also drag the "BSDF" dot on the Principled BSDF and drop it on the "Surface" dot of the Material Output to reconnect it.
In the previous article, we said that when a color doesn't show up, you should check whether the Principled BSDF is connected to the Material Output. What you just created by removing the link is exactly that state.
Preparing the tumbler
From here we'll build the shape of the tumbler. To make that easier, switch the tab at the top of the screen back to "Layout."
Glass only looks transparent once its surroundings are reflected in it. With nothing to reflect, it won't look like glass no matter how correct your settings are. So we'll set up the surroundings first.
- Download one environment image (an HDRI) from Poly Haven. Poly Haven is a free asset site that also allows commercial use. Something with clear reflections, such as an interior or a street scene, makes the effect easy to see
- In the Properties panel on the right side of the screen, open the globe icon (World Properties), click the dot to the left of "Color," and choose "Environment Texture." Use "Open" to load the image you downloaded
- From the four sphere icons at the top right of the 3D viewport, switch to the rightmost one (Rendered). We'll stay in this display from here on
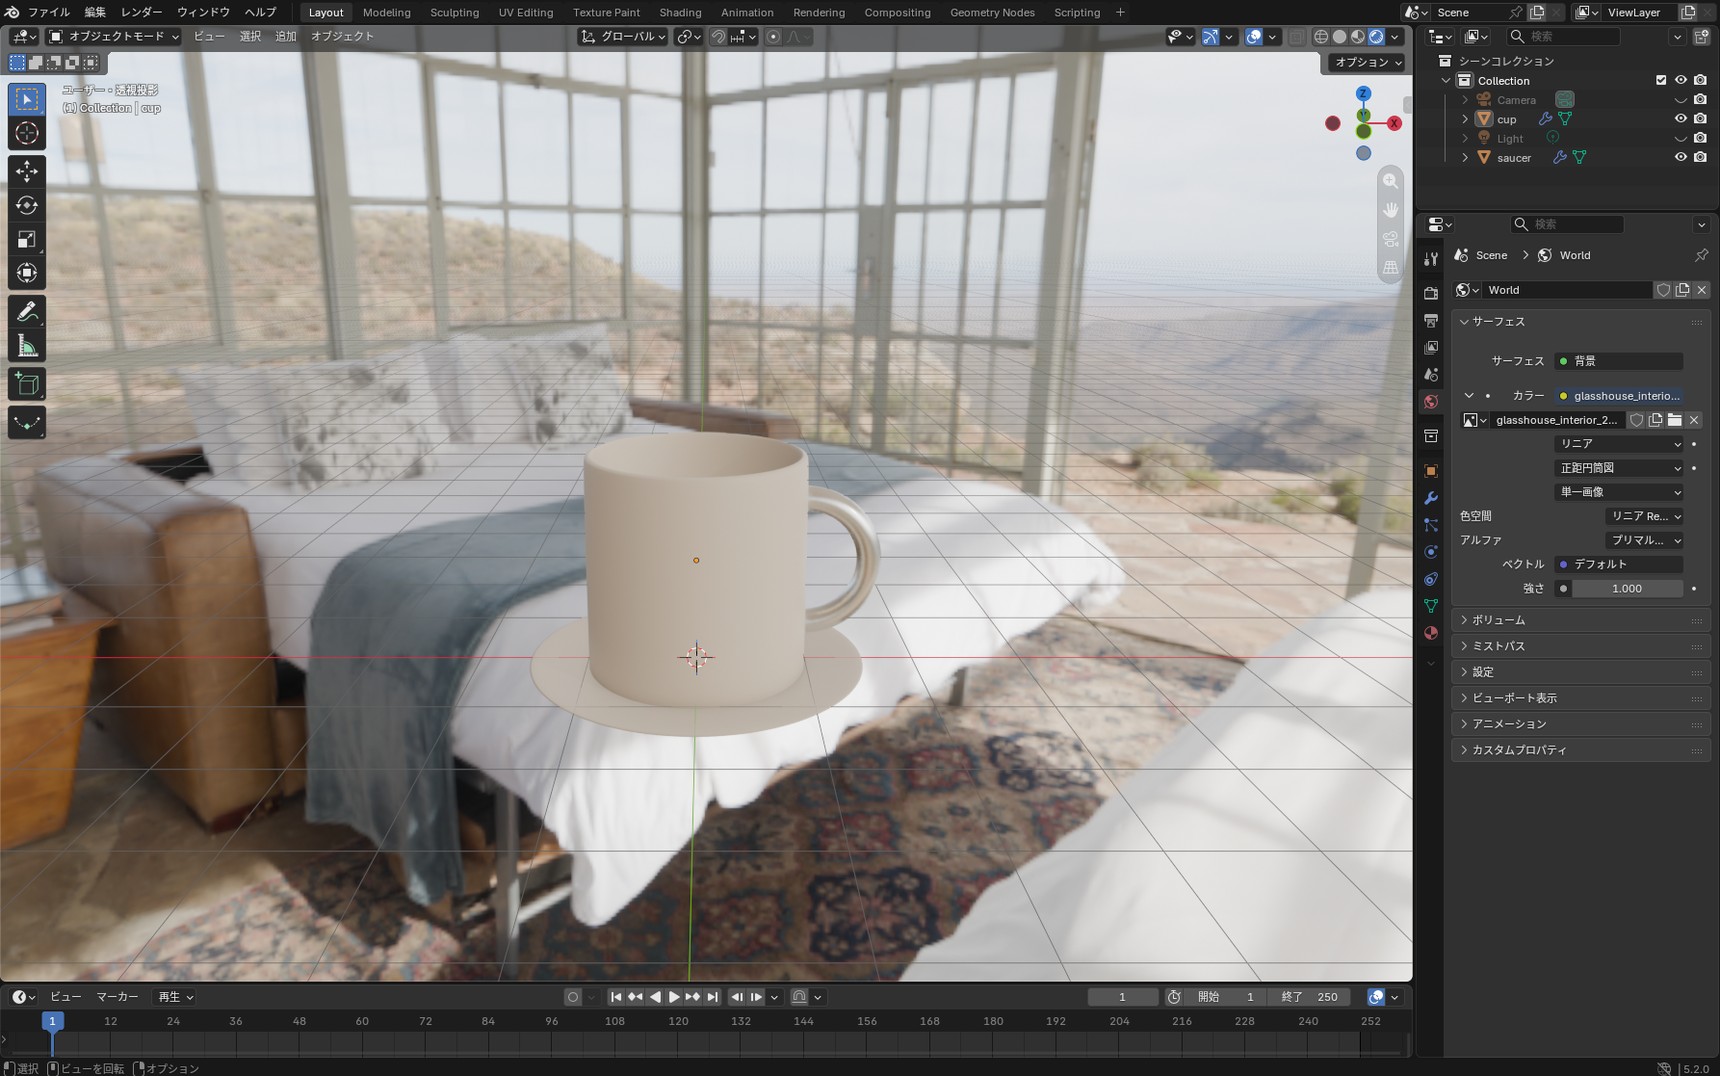
Press Shift + A and add "Mesh" then "Cylinder," and place it next to the cup. If you're continuing from the previous article, add it to that file. If you're starting from this article, use a new file with a cube or something similar standing in for the cup.

It doesn't look like a tumbler yet, so let's give it a taller proportion.
Press S then Shift + Z to scale the width (the X and Y axes) down only. Aim for around 0.4.
Next press S to scale the whole thing up. A tumbler looks natural standing taller than the cup, so aim for around 2.

Now remove the top face to make it read as a tumbler.
- Press Tab to enter Edit Mode
- Switch to face select mode (3)
- Click the top face to select it, then press X and choose "Faces" to delete it
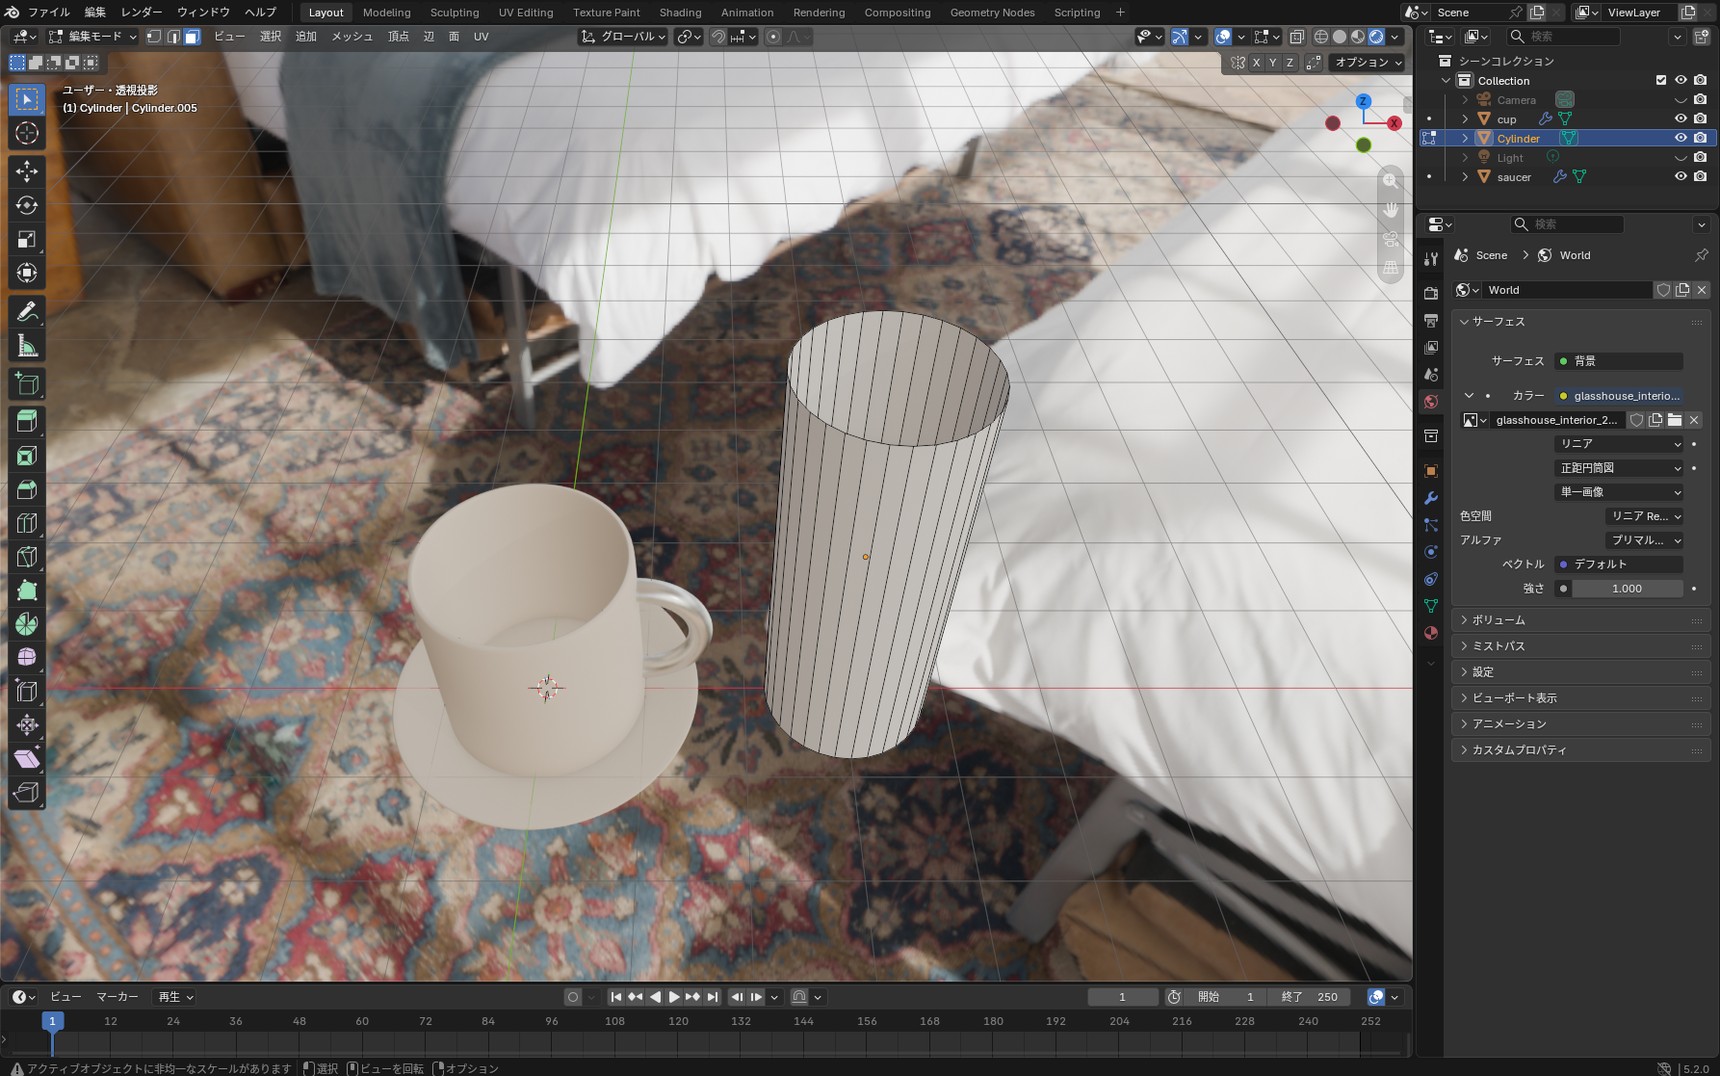
Next we'll give it thickness. Without thickness, glass doesn't read as transparent. Thickness is what makes light bend as it travels through the glass, which is what gives glass its look.
Press Tab to return to Object Mode, then press Ctrl + A and choose "Scale" to apply the scale. If you don't lock in the size you just changed, the thickness will come out uneven from one direction to another.
Then, in Modifier Properties (the blue wrench icon), choose "Add Modifier" then "Generate" then "Solidify," and set "Thickness" to around 0.02.
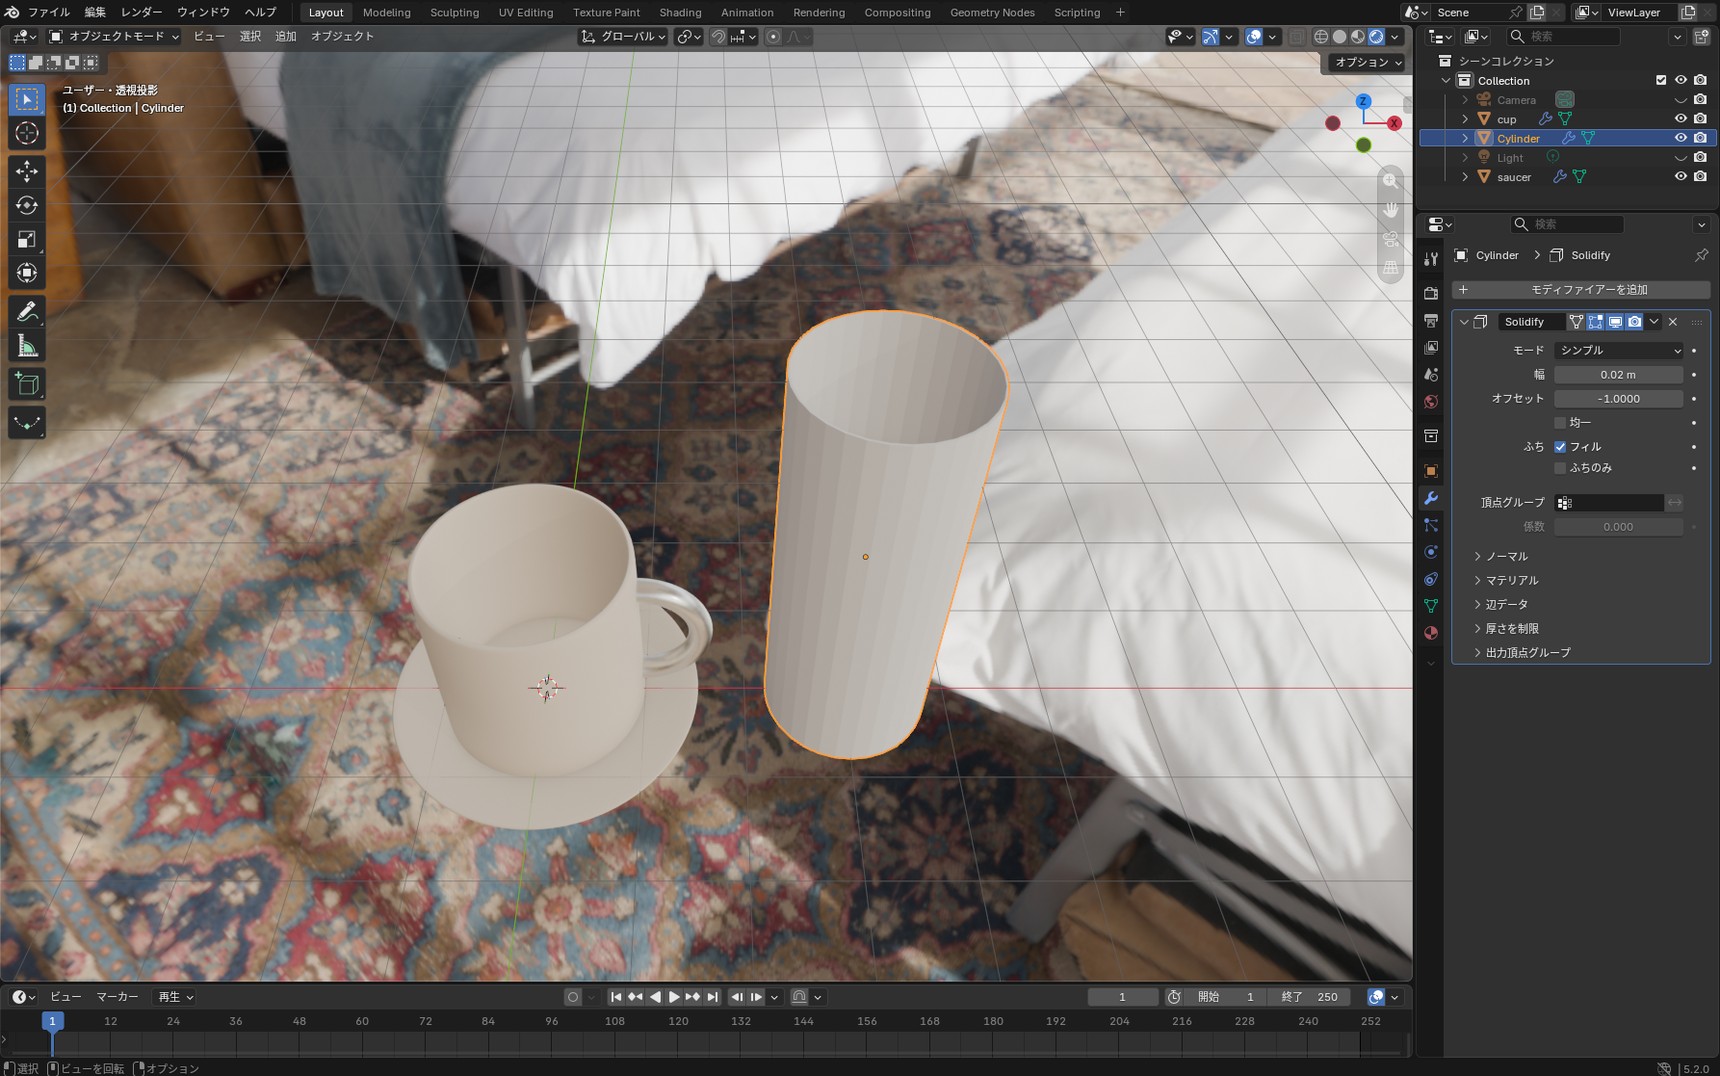
Add a "Bevel" the same way, with Amount at around 0.005 and Segments at 2. Sharp edges make light bend in unnatural ways.
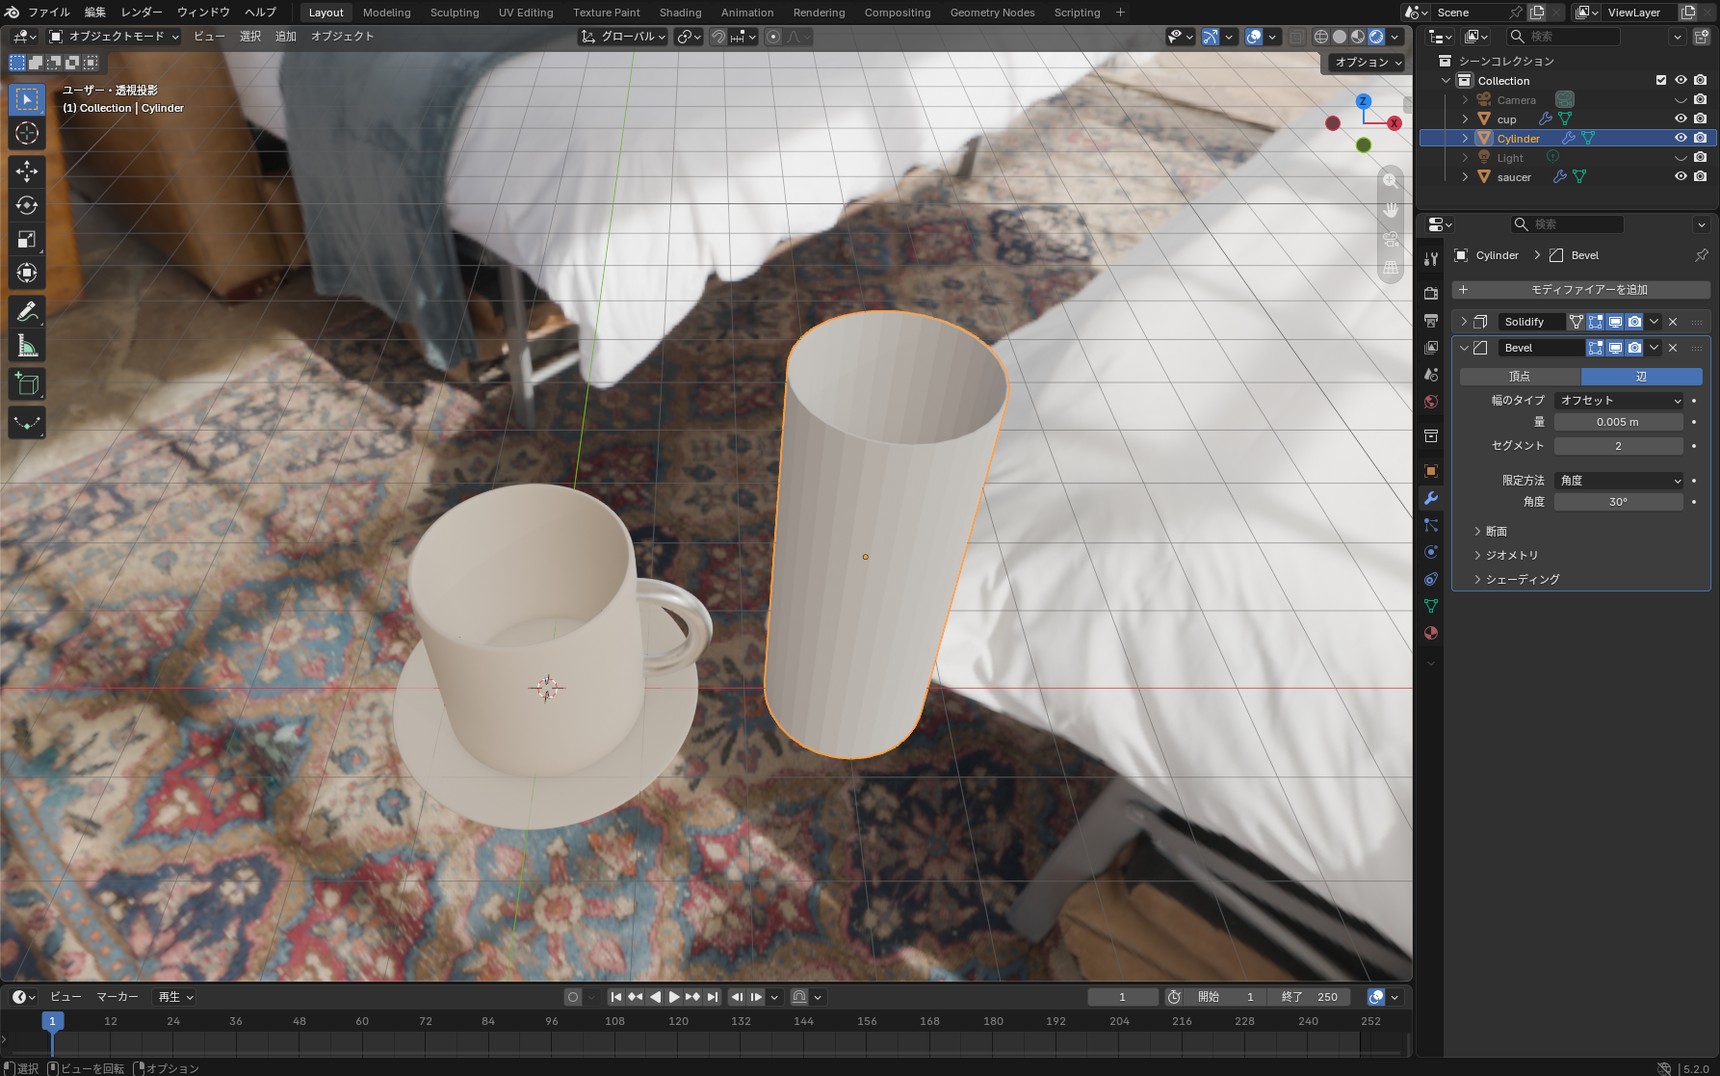
Finally, let's smooth out the faceted look of the surface. From Add Modifier again, choose "Normals" then "Smooth by Angle."
Sometimes that alone changes nothing. It's because the "Bevel" you added just before automatically marks the edges it creates as "sharp." Tick "Ignore Sharpness" in the Smooth by Angle options.
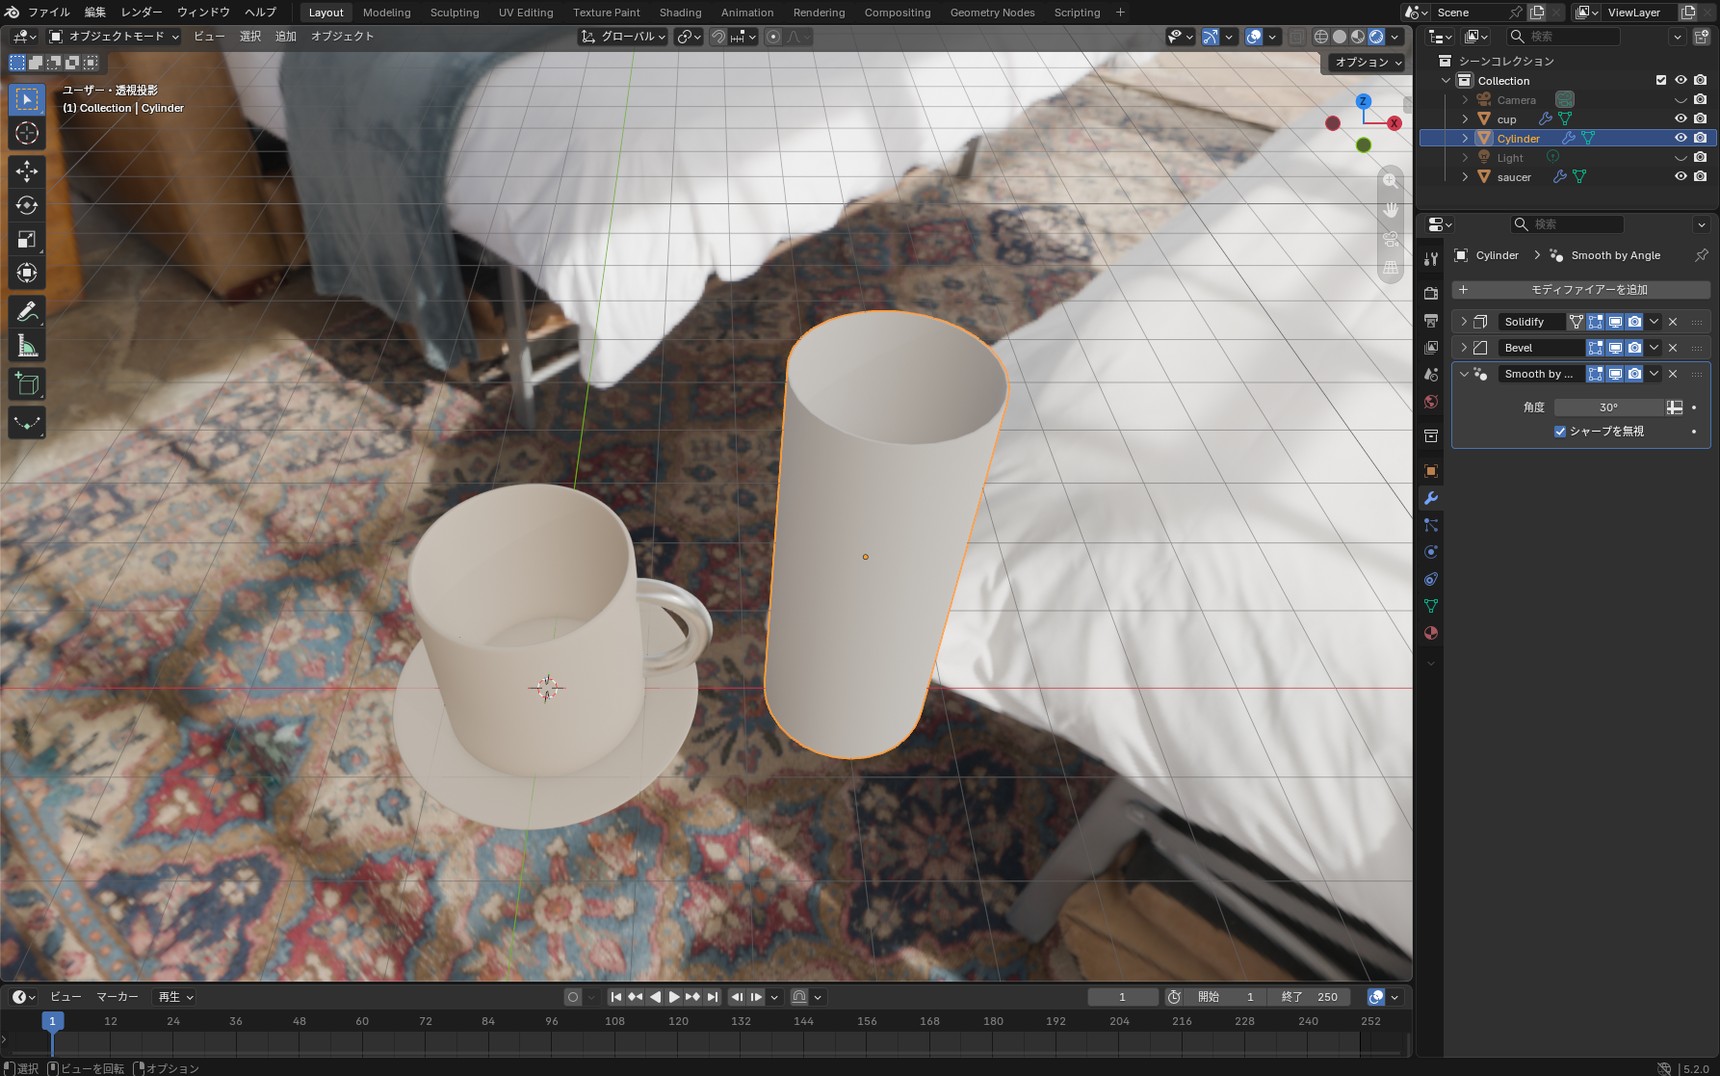
Setting up the glass surface
With the tumbler selected, switch to "Shading" in the tabs at the top of the screen. At this point the display may switch itself back to Material Preview. Use the icons at the top right of the 3D viewport to check that you're in Rendered view.
The tumbler has no material yet, so click "New" to create one. Creating the material places two nodes automatically: the Principled BSDF and the Material Output.
The setting that makes glass is "Transmission." Note that "Transmission" isn't kept in the same place as the three settings from the previous article. Scroll down the options on the Principled BSDF node and you'll find a collapsed heading called "Transmission" — click it to open it.
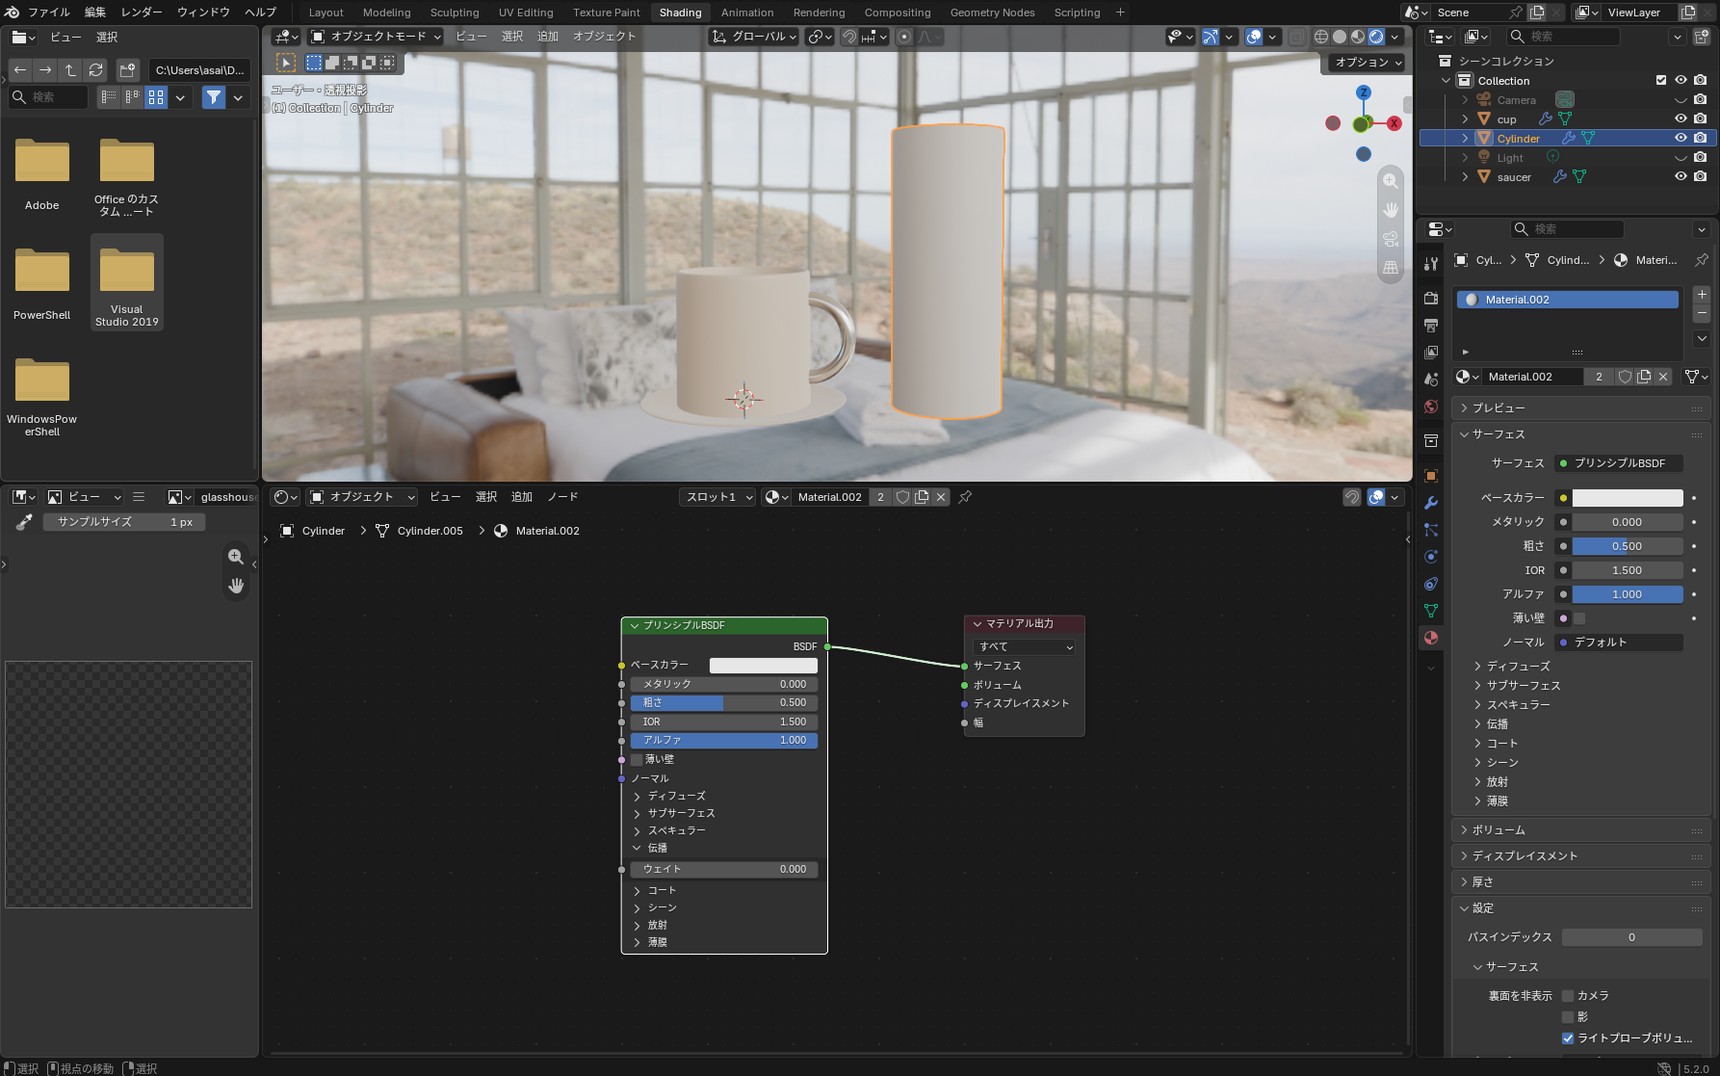
Set "Weight" inside it to 1.0. From here on, this article refers to that in short as "setting Transmission to 1.0." Set these three on the same node as well.
- Roughness: 0.05 (a smooth surface; higher values give frosted glass)
- IOR: 1.45 (the index of refraction, which sets how light bends)
- Metallic: 0 (glass isn't metal, so leave it at 0)
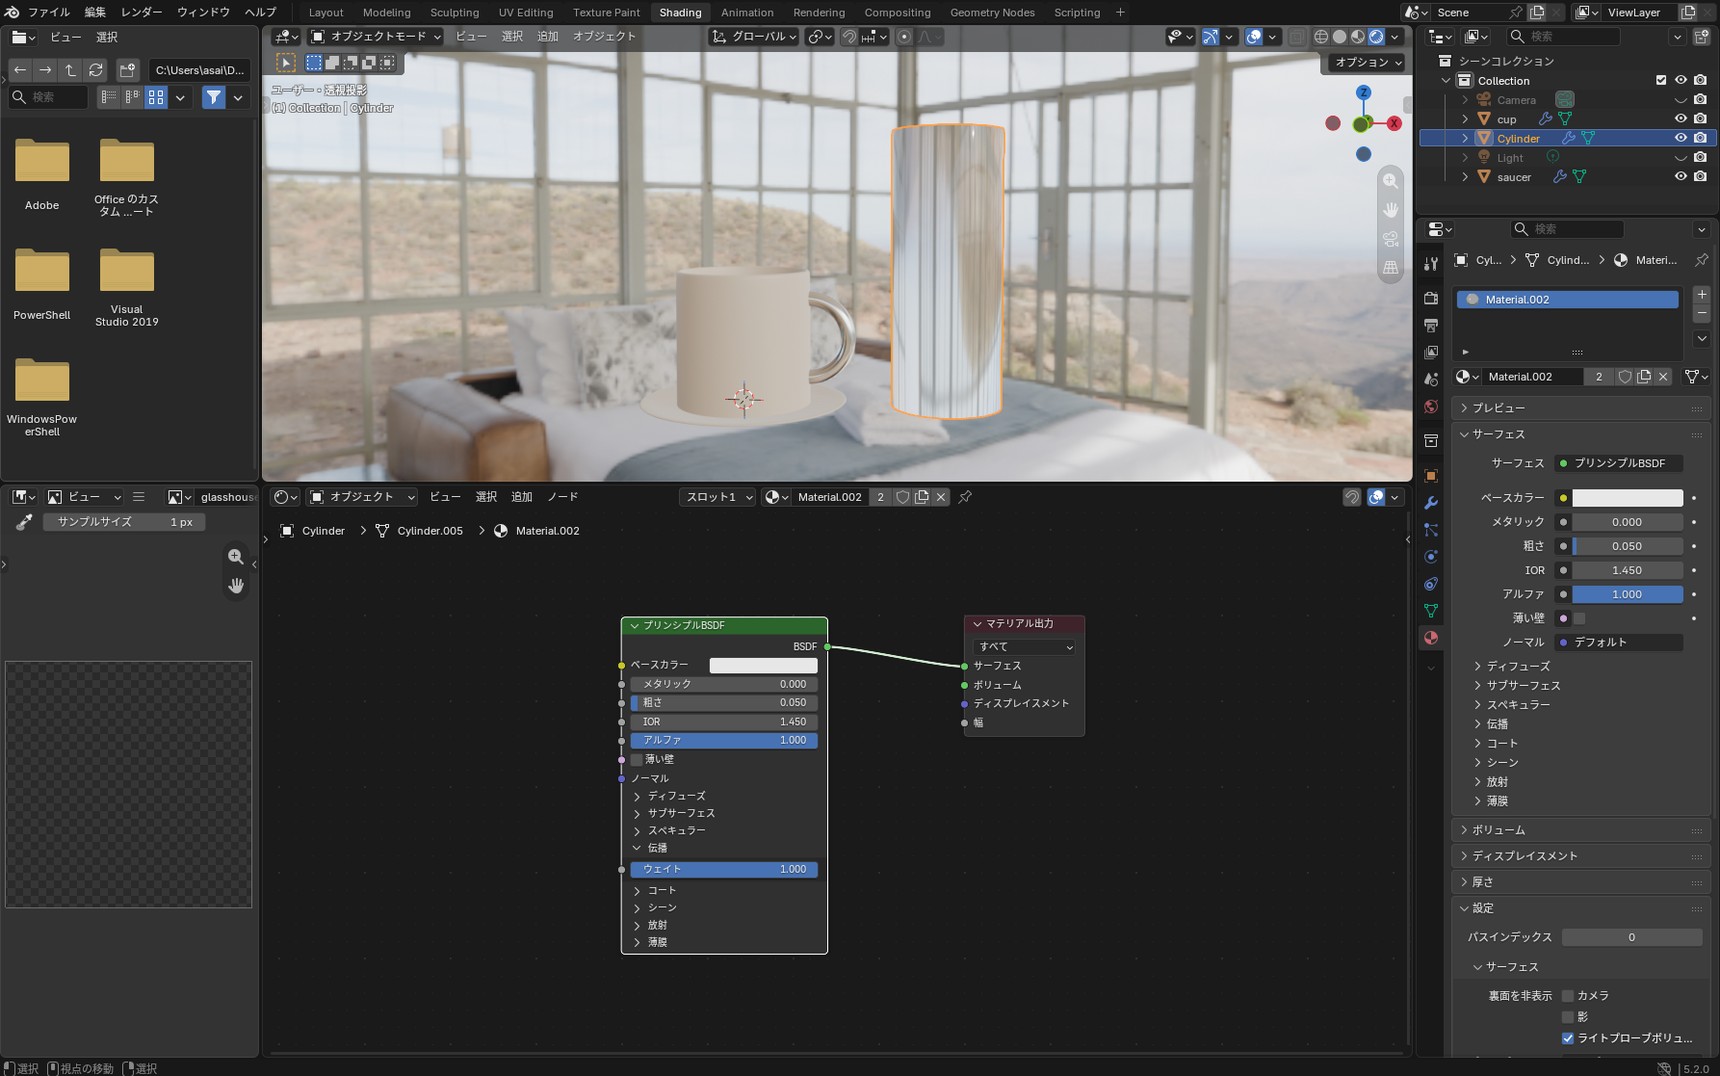
Transmission at 1.0 still isn't transparent
Take a look at the screen at this point. The tumbler is only reflecting light off its surface; it isn't transparent.
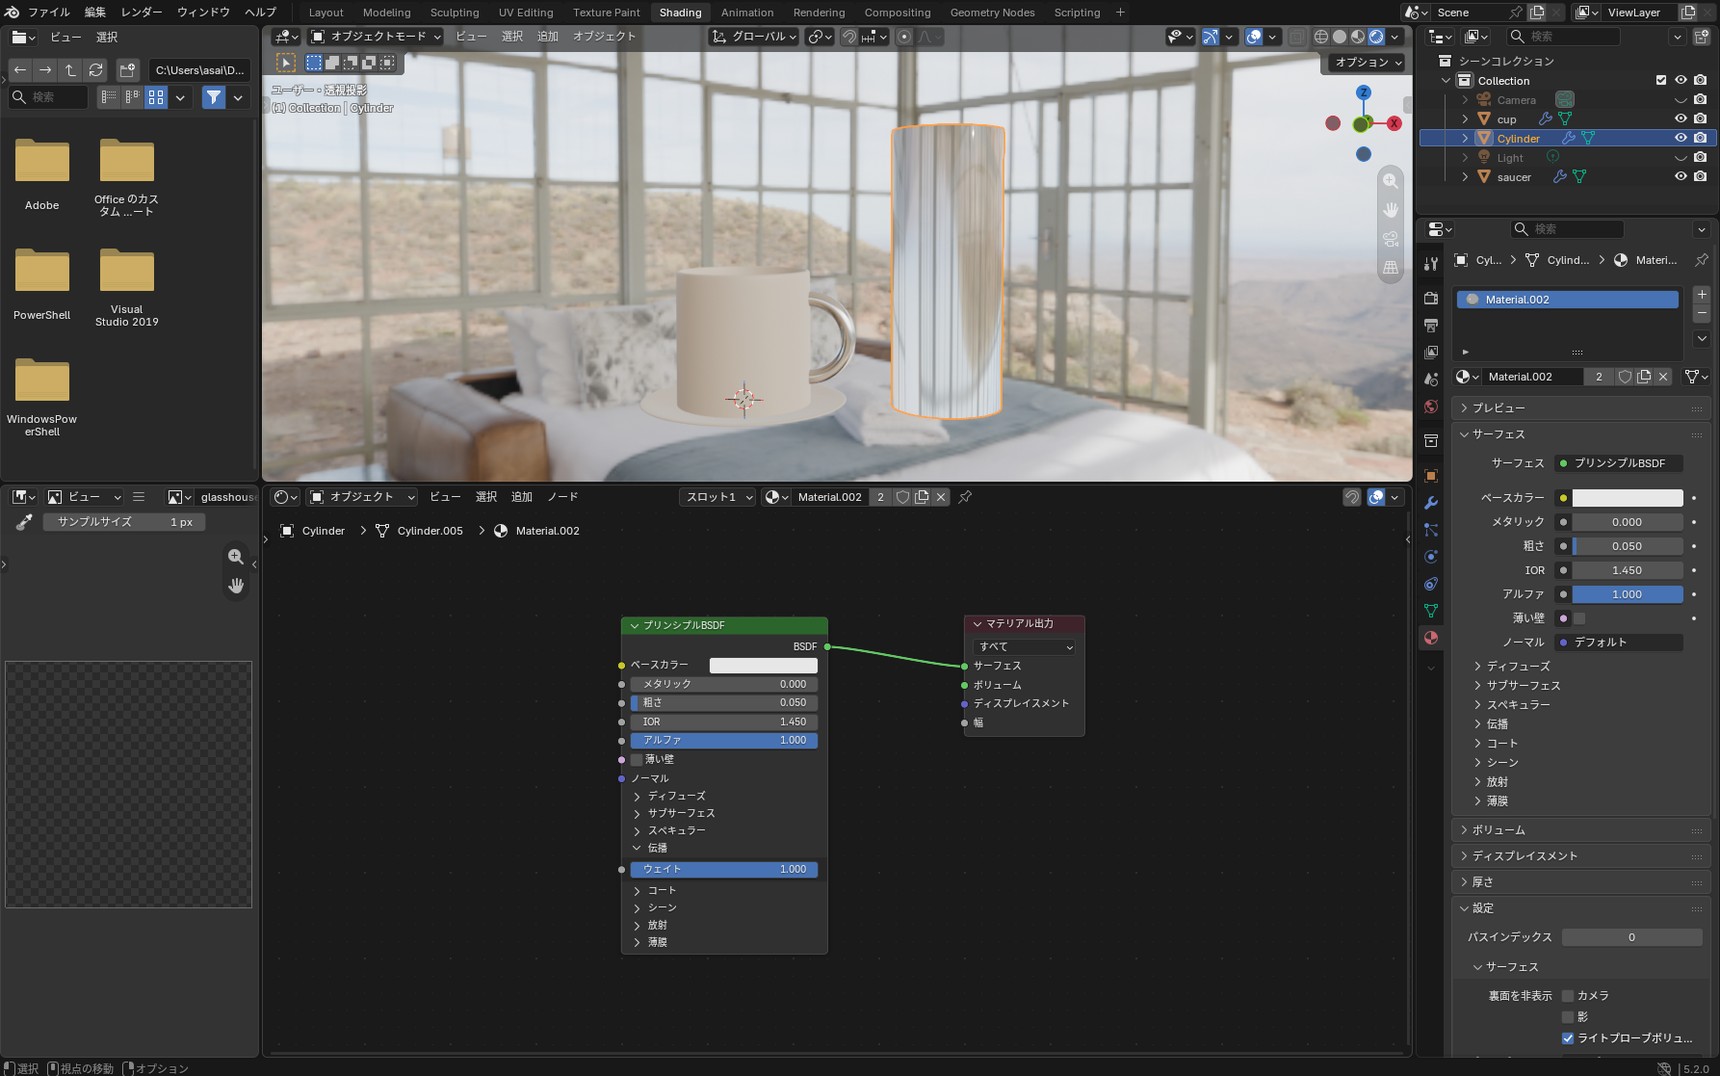
You haven't set anything wrong. Transmission isn't a setting that "raises transparency." It switches the surface to a different behaviour: bouncing part of the light off the surface and letting the rest pass into the glass. A window lets the view through and at the same time reflects a faint image of you. What you're seeing now is that reflection. The calculation for light passing through the glass is still off by default in Blender. We'll turn it on in the next step.
Making the glass transparent
Let's enable the calculation for light passing through the glass. There are two places to set it: Render Properties, which turns the calculation on for Blender as a whole, and Material Properties, which applies it to this glass. One without the other has no effect.
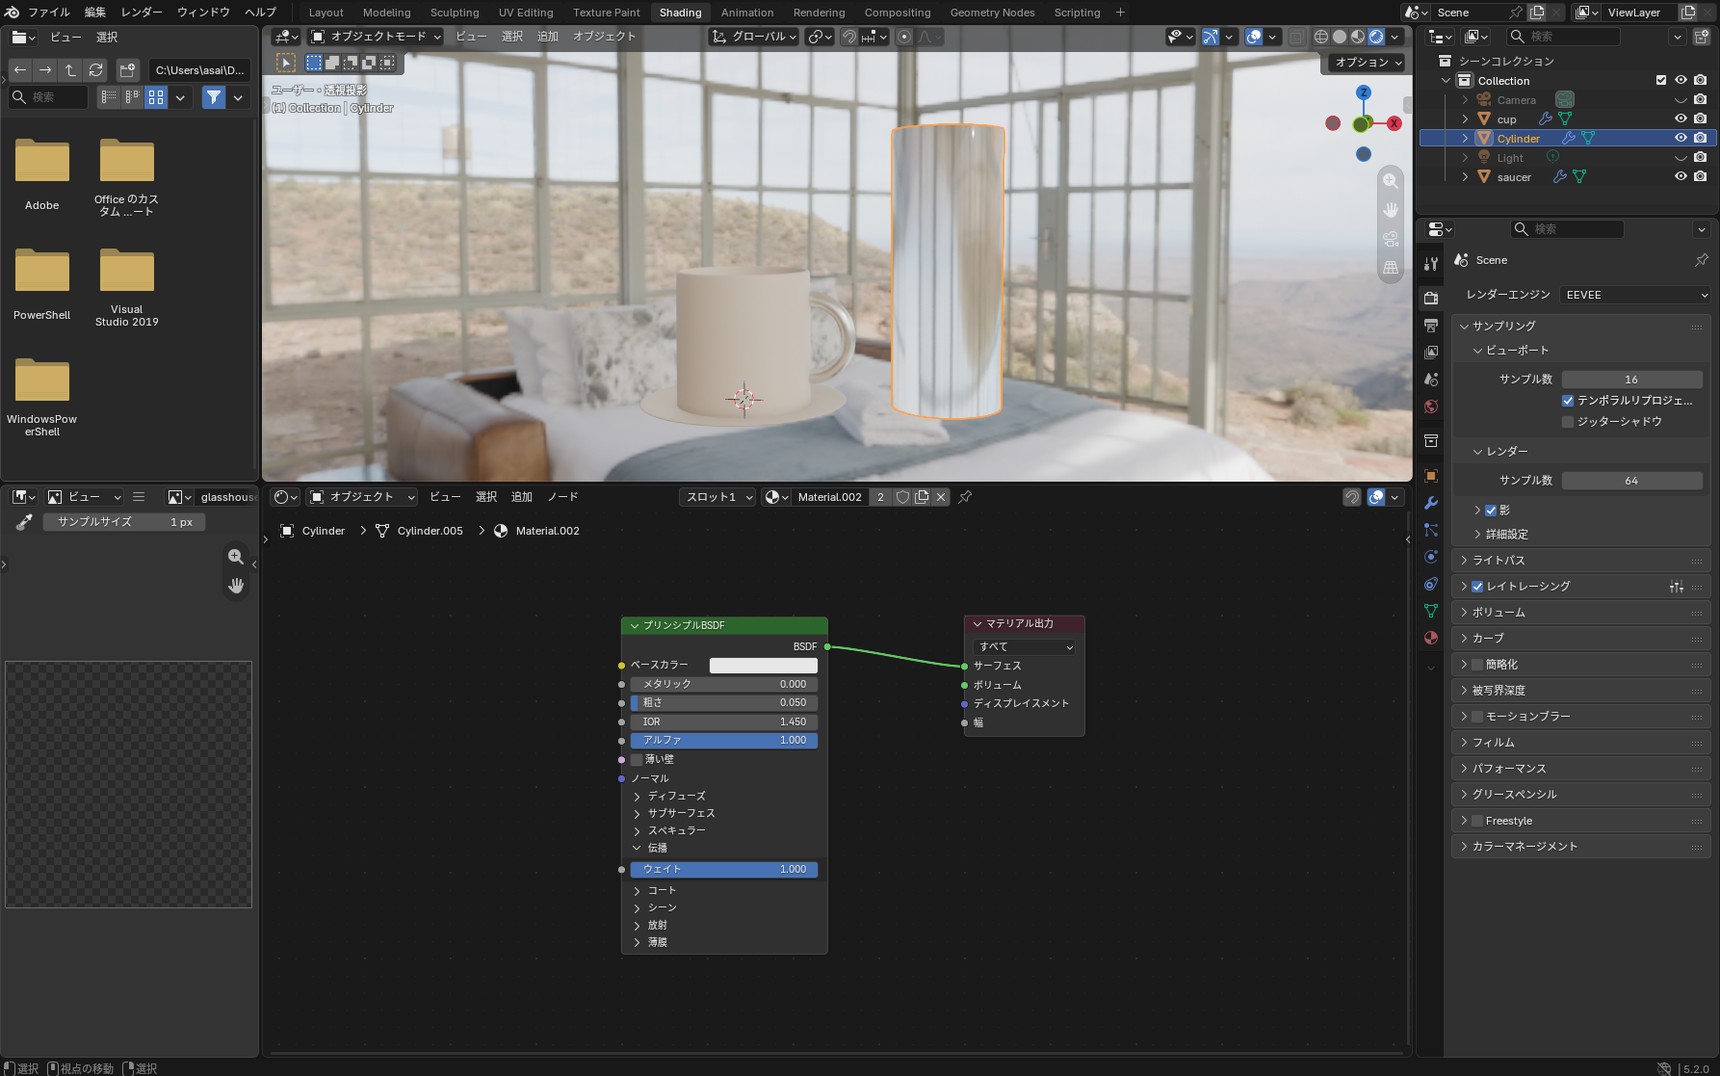
Render Properties
Open the camera icon (Render Properties) and tick "Raytracing." It's the system that calculates how light bounces and bends.
Material Properties
From here on, these options aren't on the nodes in the Shader Editor. Go back to Material Properties and open "Settings" then "Surface," near the bottom.
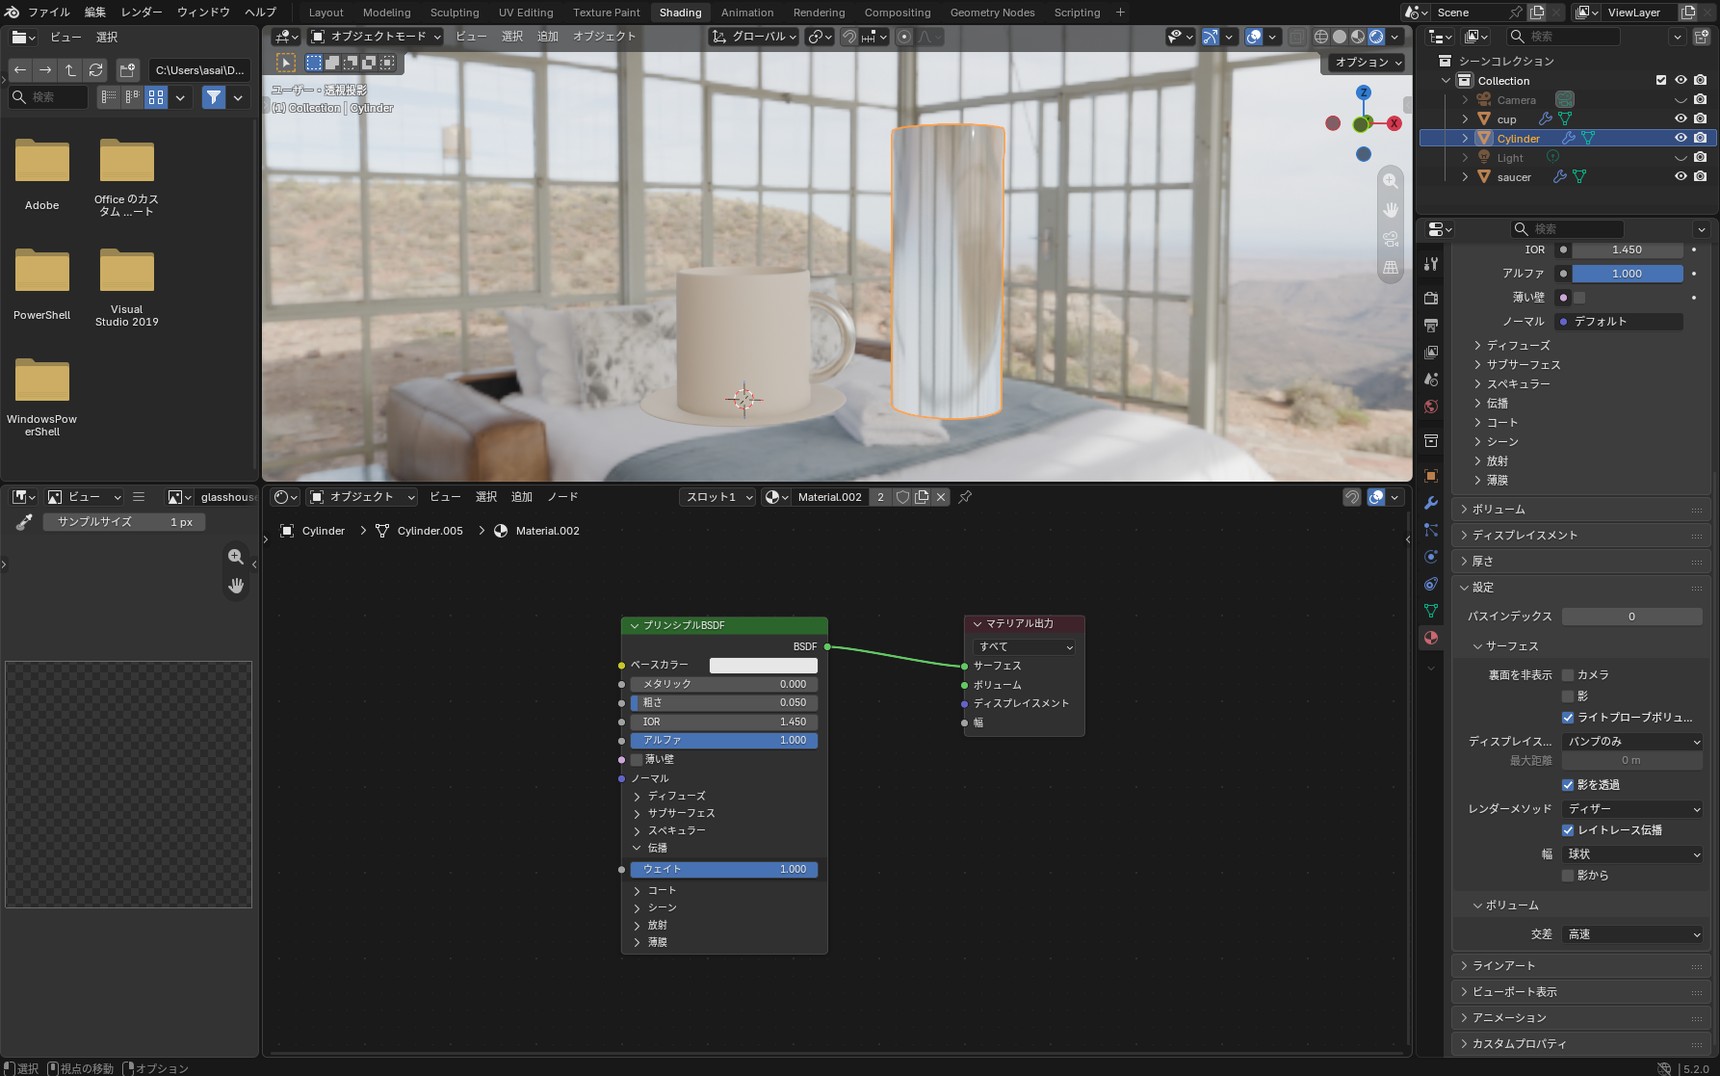
- Render Method: leave it on "Dithered" (no change needed)
- Raytraced Transmission: tick it
- Thickness: choose "Slab"
A note on that last one. The official manual explains that a rounded shape such as the tumbler in this article is better suited to "Sphere." When we tried it ourselves, though, "Slab" came out more clearly see-through, so that's what this article uses.
Staying in Rendered view, take a look at the tumbler.
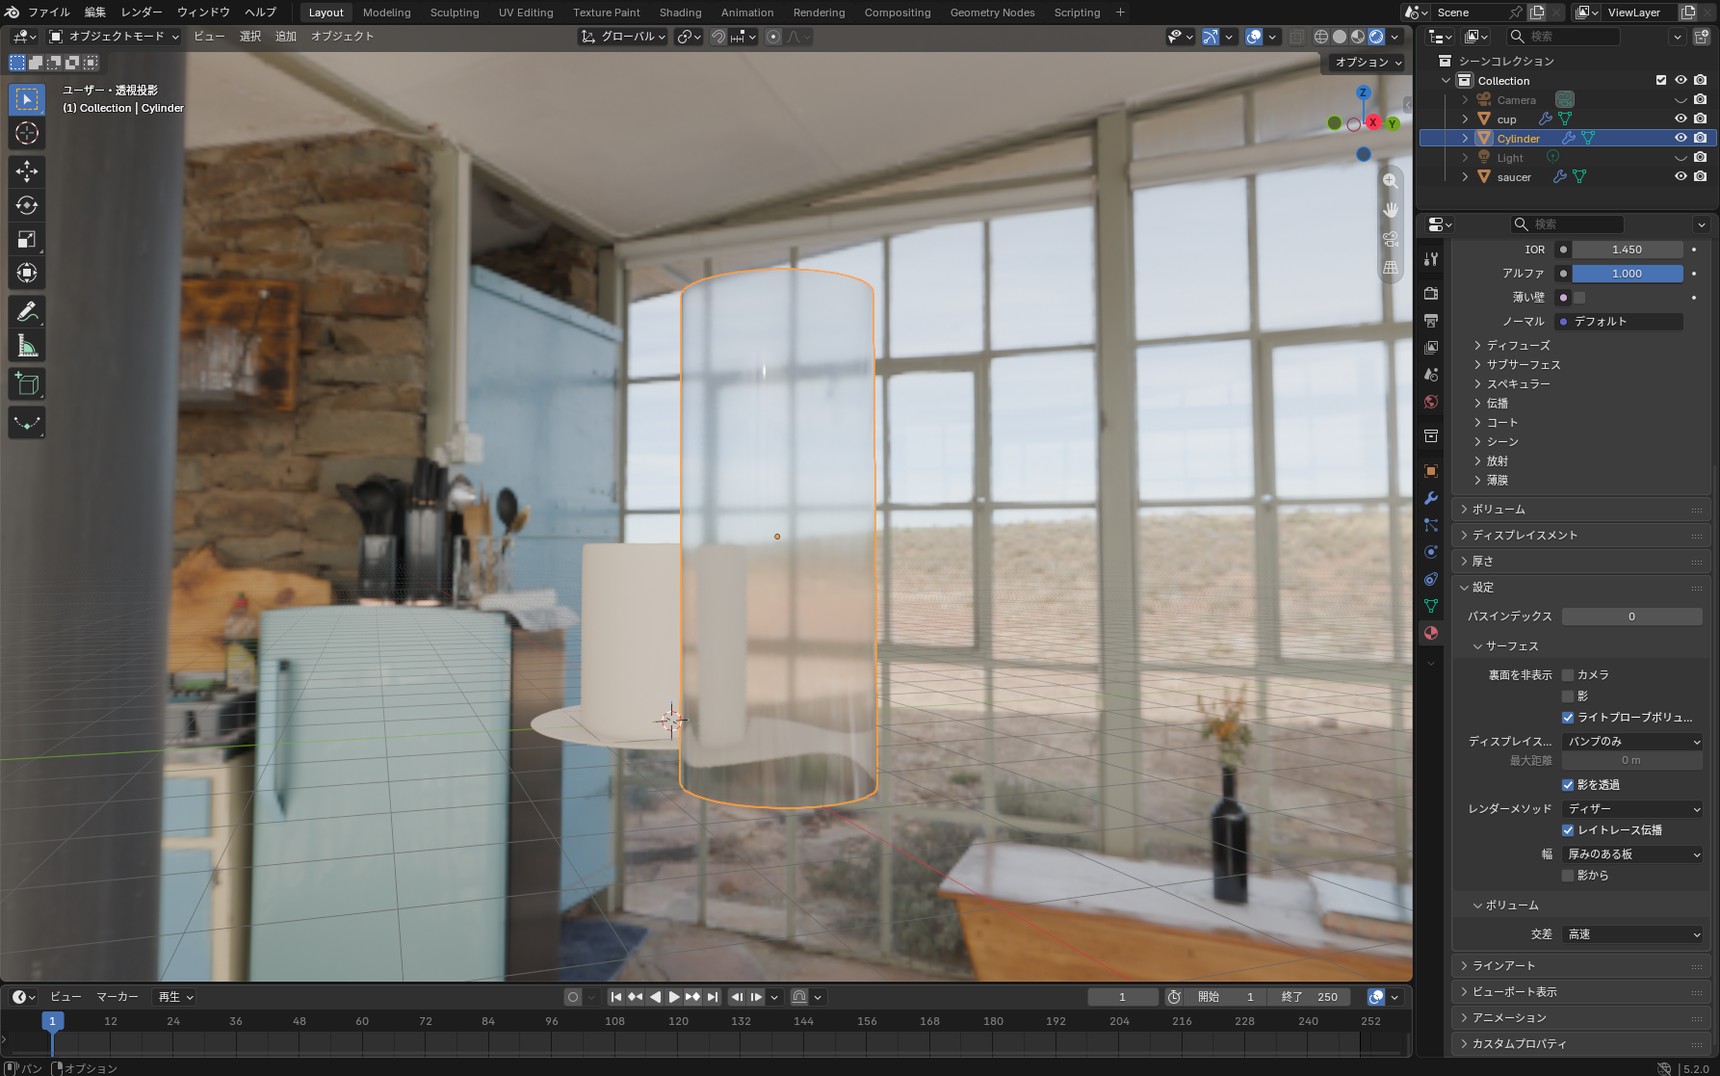
The tumbler that was reflecting at its surface a moment ago now shows clearly through to what's behind it.
Settings summary
Here are all the values set in this article. If it isn't as see-through as you expected, compare them against your current settings.
| Setting | Value | Where |
|---|---|---|
| Solidify: Thickness | 0.02 | Modifier |
| Bevel: Amount / Segments | 0.005 / 2 | Modifier |
| Smooth by Angle: Ignore Sharpness | On | Modifier |
| Transmission → Weight | 1.0 | Principled BSDF |
| Roughness | 0.05 | Principled BSDF |
| IOR | 1.45 | Principled BSDF |
| Metallic | 0 | Principled BSDF |
| Raytracing | On | Render Properties |
| Render Method | Dithered | Material → Settings → Surface |
| Raytraced Transmission | On | Material → Settings → Surface |
| Thickness (material setting) | Slab | Material → Settings → Surface |
When the steps you find online look different
Search for something like "Blender glass not transparent" and you'll find steps such as "tick Screen Space Refraction" or "set Blend Mode to Alpha Blend." Those options were renamed and moved when Blender 4.2, released in July 2024, changed how EEVEE works.
For a conversion table from the older options, see the supplementary column "Converting older tutorials"
When the glass won't turn transparent
If the glass won't turn transparent, work down these six checks.
- Is the viewport in Rendered view?: it's the rightmost of the icons at the top right of the 3D viewport
- Is Raytracing enabled in Render Properties?
- Is "Raytraced Transmission" enabled in the material?: you need both this and the render side. One without the other has no effect
- Is Render Method set to "Dithered"?: "Blended" can't use Raytraced Transmission
- Is Thickness under Settings then Surface set to "Slab"?: left on "Sphere," it may not come out clearly see-through
- Is Metallic set to 0?: at 1 it's treated as metal and won't transmit at all
If that doesn't solve it, see the supplementary column "How to narrow down the cause"
What to do next
In this article we looked at how material nodes work while building a glass tumbler.
- Each material node has its own defined role and passes its result on to the next node
- The Material Output is the exit, and whatever arrives there is what appears on screen
- If the link isn't connected, your settings won't show up on screen
- Glass comes together through both the material settings and the render settings
Next, we'll cover textures. Patterns such as wood grain and woven fabric are applied with nodes like Image Texture and Noise Texture. You add the node and connect it exactly as you did here.
Frequently asked questions
Q. What is the difference between Material Properties and material nodes?
A. They are both showing you the same material in a different form. Material Properties takes the settings you use most often and lines them up, while the material nodes are the contents themselves. Whichever one you change the value in, the result is the same. For a side-by-side look at both, see the supplementary column "Material nodes and Material Properties."
Q. I deleted a material node by mistake. Can I get it back?
A. Ctrl + Z will undo it. If you deleted the Principled BSDF, add it again with Shift + A, then "Shader" then "Principled BSDF," and connect the "BSDF" socket on the right of the Principled BSDF to the "Surface" socket of the Material Output to get back where you were.
Q. After connecting a link, I can no longer edit that value.
A. Nothing is broken. While a link is connected, the node on the left is what decides the value. Remove the link and you can set it yourself again.
Q. I set Transmission to 1.0, but the glass still isn't transparent.
A. You are seeing surface reflections only, because the calculation for light passing through the glass is disabled. Enable both "Raytracing" in Render Properties and "Raytraced Transmission" in the material. One without the other has no effect. Also check that the 3D viewport is set to Rendered view. If there is little around the object to reflect, it can also stay looking hazy. See "Making the glass transparent" for the full steps.
Q. Should I choose Sphere or Slab for Thickness?
A. This article uses "Slab." The official manual explains that "Sphere" suits rounded shapes and "Slab" suits very flat or thin objects. However, when we tried it in Blender 5.2, even a rounded shape such as a tumbler came out more clearly see-through with "Slab." For that reason this article follows what we actually saw rather than the official guidance. Try switching between the two and compare.
Q. I can't find the "Screen Space Refraction" option that tutorials mention.
A. Blender 4.2, released in July 2024, changed how EEVEE works, and this option was renamed. It is now "Raytraced Transmission," under "Settings" then "Surface" in the material. "Blend Mode" was likewise replaced by "Render Method." The supplementary column "Converting older tutorials" has a conversion table.
Q. How do I make frosted glass?
A. Set Transmission to 1.0 and then raise Roughness. The closer to 0, the clearer it is; the higher you go, the more what's behind it blurs.
Q. Why does glass look different in EEVEE and Cycles?
A. Because they build the image in different ways. EEVEE, which this article uses, is a system that calculates images quickly and simplifies the light calculations to stay fast. Cycles takes its time tracing light, so complex reflections and refractions come out more accurately. The difference shows up most where several layers of glass overlap. We'll cover rendering itself in a separate article.
Supplementary columns
Material nodes and Material Properties
In the previous article, we set color and surface qualities in "Material Properties" on the right side of the screen. How is that different from the material nodes we've been looking at in this article?
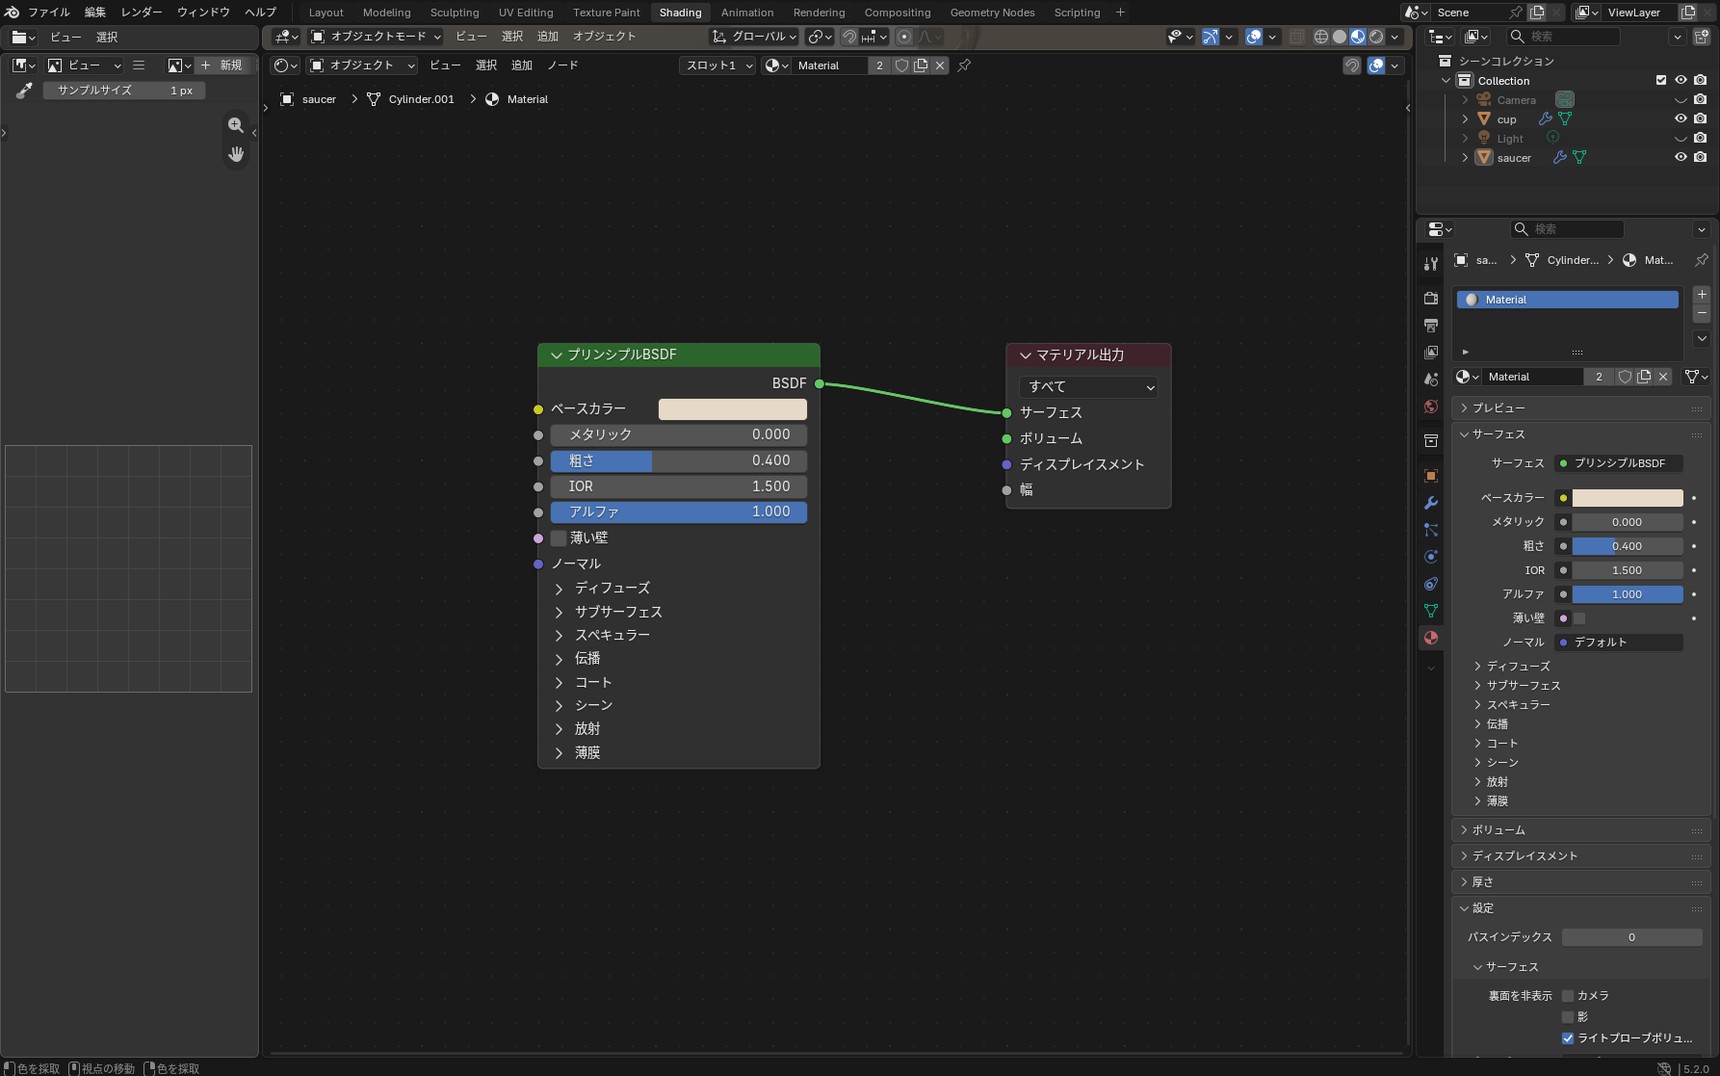
Compare the Principled BSDF on the left with Material Properties on the right. Base Color, Metallic, Roughness — the same settings are lined up in both.
Change the color in Material Properties and the color on the material node changes too. That's because you're looking at the same thing from two different places. The panel on the right takes the settings you use most often and lines them up. The material nodes are the contents themselves.
Whichever one you change the value in, the result is the same, so use whichever suits you. Where you do need to open the nodes is for settings the panel on the right doesn't show.
How to narrow down the cause
If the checklist in "When the glass won't turn transparent" didn't solve it, check these as well.
The settings are right but it still looks hazy
- Is the render engine set to EEVEE?: it's at the very top of Render Properties. In Cycles, the options used in this article don't appear at all
- Is the Base Color dark?: Base Color affects the color of glass too. Start with white to check
- Is Roughness too high?: close to 1 gives frosted glass, which is hard to read in a dark setting
- Is an Environment Texture (HDRI) set in the World?: with nothing behind the glass, you can't see the effect even when it is transparent. That's why this article loads an HDRI and puts the cup beside the tumbler
A note on that last point. In the previous article, we gave "little around the object to reflect" as the reason metal doesn't look metallic even at Metallic 1. Glass works the same way: how it looks isn't decided by the settings alone. If the surroundings are dark, or there's nothing to reflect, it won't look transparent no matter what you set.
Is the Principled BSDF connected to the Material Output?
As we saw in "What material nodes do," a removed link turns the object pure black. Links can come away while you're moving nodes around.
Build something that definitely works first
Set the tumbler aside for a moment and add a new sphere.
- Press Shift + A and add "Mesh" then "UV Sphere"
- Add a new material and set Base Color to white, Metallic to 0, Roughness to 0.05, IOR to 1.45, and Transmission Weight to 1.0
- Under "Settings" then "Surface" in the material, set Render Method to "Dithered," enable Raytraced Transmission, and set Thickness to "Slab"
- Enable "Raytracing" in Render Properties
- Place a colored plane behind the sphere
- Switch the display to "Rendered"
If this sphere turns transparent, Blender's settings themselves are fine. The cause is on the tumbler's side.
Rather than working down a list of symptoms, building something that works and comparing against it gets you to the cause faster.
When the shape (the mesh) is the cause
With a model you built yourself, there are a few other possible causes.
- The faces are inside out: enable "Face Orientation" from "Overlays" at the top right of the 3D viewport and the outside shows blue, the inside red. If red is facing out, select everything in Edit Mode and press Shift + N to fix it
- Faces are overlapping: repeated extrudes and solidifies can leave two faces in the same position. Select everything in Edit Mode and run "Mesh" then "Clean Up" then "Merge by Distance"
- The scale hasn't been applied: press N to check the scale, and if it isn't 1, press Ctrl + A and choose "Scale"
Converting older tutorials
Blender 4.2, released in July 2024, changed how EEVEE works. Tutorials written before that use option names that no longer match what's on screen.
The underlying system changed, so this isn't a strict one-to-one mapping, but as a rough guide it converts as follows.
| Option in older tutorials | Current option |
|---|---|
| Screen Space Refraction | Raytraced Transmission |
| Blend Mode → Alpha Hashed | Render Method → Dithered |
| Blend Mode → Alpha Blend | Render Method → Blended |
| Screen Space Reflections → Refraction | Render Properties → Raytracing |
One word of warning. Even when an older tutorial tells you to use "Alpha Blend," don't convert that straight to "Blended." The table does map it that way, but the current "Blended" can't use Raytraced Transmission. You'll get something semi-transparent, but light won't bend, so it reads more like cellophane than glass. For glass, leave it on "Dithered."
Different kinds of glass
What we built in this article is thick glass, like a tumbler. Thin glass, like a window, is set up a little differently.
Thin glass (windows and the like)
When you're making glass from a single face with no thickness, tick "Thin Wall" on the Principled BSDF. Then, under "Settings" then "Surface" in the material, set the following.
- Thickness (value): 0
- Thickness (mode): Slab
That treats it as a thin panel. There's no need to add thickness with Solidify, so windows and sheet glass are easier to build this way.
Thick glass (the tumbler in this article)
The official manual explains that "Sphere" suits rounded shapes and "Slab" suits very flat or thin objects such as panes of glass and blades of grass. The tumbler in this article is a rounded shape, so going by the official guidance you would choose "Sphere."
When we tried it ourselves, though, even a rounded shape such as a tumbler came out more clearly see-through with "Slab," which is what the main part of this article uses. It's worth trying "Sphere" and comparing the two.
There's also a dedicated "Glass BSDF" node
There is a node dedicated to glass, the "Glass BSDF." Add it with Shift + A then "Shader" then "Glass BSDF," and connect it to the Surface socket of the Material Output to use it.
It has only three settings — Color, Roughness, and IOR — so it's simpler than the Principled BSDF. That said, the Principled BSDF is easier to work with when you want to adjust things like color and coating together, which is why this article uses it.
It's also good practice at adding a node and reconnecting links, so do give it a try.